All Occasion Cards, Birthday Cards, Just Because Cards, Washi Tape Cards

Tasty Treats Popsicle Card

Hello everyone! Even though we are just beginning spring, I have a summer themed card for you today, as you can see. I designed this card around the “Tasty Treats Designer Washi Tape” which is part of the Cool Treats suite of products. At first I thought this suite was only appropriate for the summer months, but now I think it’s fun to make and send anytime of the year.

I really love the little accents the “Cool Treats” stamp set has. The diagonal stripes, the two vertical stripes to make it look like twin pops, the cute little cherry. I think the popsicle with the little bit out of it is hilarious and very authentic. 🙂 I love how you can go the popsicle direction like I did, or the ice cream way, or even mix them together. 

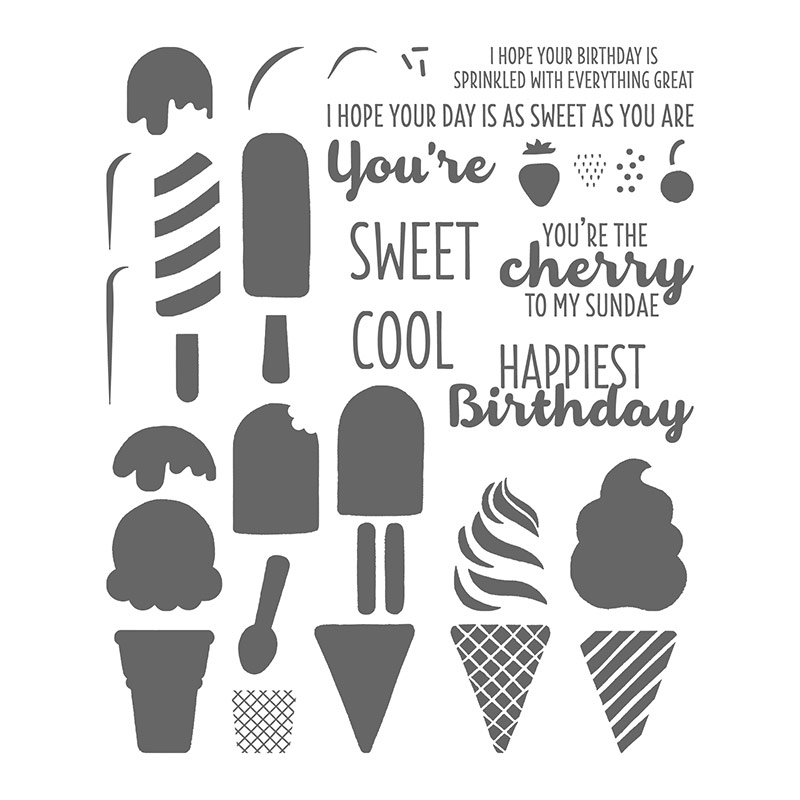
Below you can see some of the adorable accent stamps. I wish I had noticed the little curved pieces before I assembled this card. I would have used one to give the Pool Party popsicle on the left a little shine. I stamped off the main image of the Watermelon Wonder and Peekaboo Peach popsicles on my grid paper and then stamped the accent stamp full strength (without stamping off). I rounded the corners of this layer with the Project Life Corner Punch.

I like the contrast of the Whisper White layer against the colorful washi tape (no need for a colored cardstock layer in between). I popped up the popsicle layer with dimensionals and added some Sale-A-Bration 3/8″ Metallic Ribbon (gold here) underneath.  I adhered the ends of a length of ribbon under the washi tape layer and then tied a shorter length of ribbon around it in a knot. Much easier than bows!

Since Stampin’ Up! envelopes are made to be stamped on, I jazzed up the envelope flap with some more playful popsicles.

Here’s a look at the card and envelope together. I love the coordination. 🙂

I hope you are inspired to create some summer fun cards in anticipation of those warm, relaxing summer days. If you’d like to do some creating with the Cool Treats suite of products and don’t already have a demonstrator, I’d love to earn your business. Send me a message or click the icon to my online store.

Joyful stamping!

~Stephanie

Supplies used: Cool Treats Photopolymer Stamp Set, Tasty Treats Designer Washi Tape, 3/8″ Mettalic Ribbon (gold), Project Life Corner Punch, Watermelon Wonder Classic Stampin’ Pad, Peekaboo Peach Classic Stampin’ Pad, Pool Party Classic Stampin’ Pad, Crumb Cake Classic Stampin’ Pad, Whisper White Cardstock, Pool Party Cardstock, Whisper White Medium Envelopes, Stampin’ Dimensionals, Snail Adhesive.

2016-2018 In Color Cards, All Occasion Cards, Birthday Cards, Die Cut Cards, Just Because Cards, Stampin' Up!

In Colors “For You”

Hello everyone! If you saw my last blog post, this card may seem familiar. My last post, Color Blocking with In Colors featured five different layouts with the new 2016-2018 In Colors. I thought the last layout was so fun, I decided to keep creating with it.

A

I have been playing around with these In Colors a lot. It’s always fun to create with new product – everything feels fresh and original. It’s also fun to see how the products that carried over from the old catalog can really compliment these new items. For example, I think the Large Polka Dot embossed background is a really cool contrast to all of the fun and playful In Color die cuts.B

These dies from the Mini Treat Bag Thinlits die set are so much fun to use on cards, as well as mini treat bags. My favorite one is the “for you” sentiment die. I love the font. I popped the heart up with Stampin’ Dimensionals.

C

I hope you are inspired to create with these mini treat bag thinlits dies and/or the new 2016-2018 In Colors. I also hope you try your hand at combining carry over product with new product for a fresh look!

Joyful stamping!

~Stephanie

Supplies**: Large Polka Dot Textured Impressions Embossing Folder, Big Shot, Mini Treat Bag Thinlits Dies, Whisper White cardstock, Emerald Envy cardstock, Dapper Denim cardstock, Peekaboo Peach cardstock, Flirty Flamingo cardstock, Sweet Sugarplum cardstock, Snail Adhesive, Stampin’ Dimensionals, & Stampin’ Trimmer.

**All supplies can be purchased from my online store. If you would like to place an order (and it is under $150) I invite you to enter 4ZN3MB4Z in the Hostess Code box. Thank you for your support!

2016-2018 In Color Cards, All Occasion Cards, Birthday Cards, Congratulations Cards, Die Cut Cards, Just Because Cards, Stampin' Up!, Thank You Cards

Color Blocking with In Colors

Hello everyone! A few weeks ago I held a New Catalog Launch party. One of the Make & Takes was a color blocking card with the new 2016-2018 In Colors. I had a few extra cards prepped and thought I would have some fun coming up with different ways to finish off this card using the color blocking with the In Colors as the starting point. The strips of cardstock are 3 3/4 x 5″.

Leave me a comment below and let me know which of the five versions is your favorite!

Die Cut

Card #1: Flourish Thinlits and Floral Phrases stamp set.

(For a little extra dimension and to make the spacing easier I glued the colored cardstock strips to a piece of 4 x 5 1/4″ piece of Whisper White carstock and then adhered it to the card base.)

Hip Hip Hooray

Card #2: Party Pop Ups Thinlits

Embossed

Card #3: Gold Embossed with Floral Phrases stamp set

Tone on Tone

Card #4: Tone-on-tone with Kinda Eclectic Stamp Set

(Sweet Sugarplum banner 3 5/8 x 1 3/4″, Whisper White banner 3 3/8 x 1″)

Mini Treat Bag

Card #5: Mini Treat Bag Thinlits Dies & Rhinestone Basic Jewels

(3 1/2 x 1/2″ banner, it is smaller than the die)

I hope you are inspired to try your hand at some color blocking, especially with the new 2016-2018 In Colors. They look awesome together!

Joyful stamping!

~Stephanie

Supplies**: Whisper White Thick Cardstock, Peekaboo Peach Cardstock, Emerald Envy Cardstock, Flirty Flamingo Cardstock, Sweet Sugarplum Cardstock, Dapper Denim Cardstock, Snail Adhesive, Stampin’ Trimmer.

**All supplies can be purchased from my online store. If you would like to place an order (and it is under $150) I invite you to enter 4ZN3MB4Z in the Hostess Code box. Thank you for your support!

2016-2018 In Color Cards, All Occasion Cards, Designer Series Paper Cards, Just Because Cards, Stampin' Up!

In Color Paper Weaving

Hello everyone! Here is the 4th and last card in my current Designer Series Paper (DSP) series. This is not the first time I’ve done a card with paper weaving on my blog (see Paper Weaving with DSP). However, it is an excellent way to use up DSP scraps and I wanted to include that idea with these DSP cards.

Dimensions: The cardbase is 8 1/2 x 5 1/2″ (scored in half at 4 1/4″). The Flirty Flamingo Layer is 3 3/4 x 5″. The Crumbcake layer is 3 1/2 x 4 3/4″. The DSP strips are 1/2 x 4 3/4″. The cardstock strips are 1/2 x 3 1/2″.

Weaving

The biggest hint I can give for weaving the DSP strips is to adhere one end of all the strips in place with a glue dot. This gives just enough adhesive to keep the strips where you want them and still allows you to maneuver the strips into the woven pattern. I also used a few glue dots to adhere the rest of the strips into place after weaving.

The second hint is to keep the strips pretty close together. This is actually the second card I made because the first card had a looser weave that just didn’t look as striking. Speaking of striking, how awesome are those adorable little white hearts? I think they are what pulls the card together.

Weaving Side

I hope you are inspired to play with paper weaving and to create with some of the new 2016-2018 In Colors as well. Aren’t they lovely?

Joyful stamping!

~Stephanie

**Supplies**: Sweet Sugarplum Cardstock, Flirty Flamingo Cardstock, Crumb Cake Cardstock, 2016-2018 In Color Envelope Paper, Hearts Border Punch, Crumb Cake Classic Stampin’ Pad, Love You Lots Stamp Set, Glue Dots, Snail Adhesive, Stampin’ Trimmer.

**All supplies can be purchased from my online store. If you would like to place an order (and it is under $150) I invite you to enter 4ZN3MB4Z in the Hostess Code box. Thank you for your support!


All Occasion Cards, Birthday Cards, Designer Series Paper Cards, Just Because Cards, Stampin' Up!

Double Vision

Hello everyone! Today’s post is a double feature. Both cards have the same design and basic color scheme, but one is subdued while the other is bold.

IMG_4123

Both cards feature the Affectionately Yours Specialty Designer Series Paper (DSP). One neat thing about Stampin’ Up!’s DSP packs is that all the colors used in each individual pack coordinate with the other colors used in that pack. That way, even if you use a one color design like I did on both cards, you don’t have to think too long about what colors to use with it.IMG_4121

I love how the large chunks of Watermelon Wonder contrast with the pops of Night of Navy in the bold card. I also love the softness of the light contrast between the little dots of Watermelon Wonder and the Crumb Cake in the subdued card. Which one is your favorite? Leave me a comment below and let me know. 🙂

IMG_4124

Instructions: Cut a piece of DSP to 3 3/4 x 4 1/4″.  If you want a larger gap between your pieces simply make your DSP starting piece shorter than 4 1/4″.  To create the gap between the pieces of DSP you will need to use your Stampin’ Trimmer.  It looks strange at first, but when cutting you need to make sure the top left hand corner of the DSP is on the right side of your cutting blade.  The ruler extends to 1 1/4 on the right side of the blades. This is important for creating the slant that you want.  I wanted a gentle slant so I placed the top left hand corner of the DSP at the 1 1/4″ mark on the right hand side of the blade and I lined up the bottom right hand corner with the 1 1/4″ line on the left hand side of the blades. If you want steeper slant, simply line those same corners up with lines closer to the cutting blade.

IMG_4125

This layout is great if you really want your DSP to shine. With so much of the pattern showing, your DSP is sure to get lots of attention! The “HAPPY” sentiment is from the “Celebrate Today” stamp set. I stamped the “birthday” image on the inside of the cards in Watermelon Wonder ink. I punched the flower out with the Flower Medallion punch and popped it up with Stampin’ Dimensionals.

I hope you are inspired to try this layout with your favorite DSP. I’d love to see what you come up with. If you send me your creations at stephaniemackey2012@gmail.com, I might include them in a future blog post. 🙂

Joyful stamping!

~Stephanie

**Supplies** used on both cards: Affectionately Yours Specialty DSP, Stampin’ Trimmer, Celebrate Today Stamp Set, Watermelon Wonder Classic Stampin’ Pad, Flower Medallion Punch, Whisper White Cardstock, Stampin’ Dimensionals, Snail Adhesive.

Bold card only: Watermelon Wonder cardstock

Subdued Card only: Crumb Cake Cardstock.

**All supplies can be purchased from my online store. If you would like to place an order (and it is under $150) I invite you to enter 4ZN3MB4Z in the Hostess Code box. Thank you for your support!


All Occasion Cards, Designer Series Paper Cards, Just Because Cards, Stampin' Up!, Sympathy Cards

Butterfly Boutique

Hello everyone! I recently taught a class based on Designer Series Paper (DSP). When I was designing cards for this class I was thinking of layouts that showcase many designs of DSP packs as well as use up scraps of DSP so they don’t have to go to waste. My next few posts will be cards from this DSP class. I hope you enjoy them!

Navy Front

The DSP showcased in this first card is the Floral Boutique DSP. My favorite design of the 12 different designs in this pack is the one with the differently shades of blue lines (upper right hand corner). I love things with shades of the same color.

Navy Side

The rectangles measure 2 x 1 1/2″. The crumb cake banner measures 3 1/2 x 3/4″. The whisper white banner measures 3 1/4 x 1/2″.

Navy Top Angle

I borrowed my friend’s precision base plate to use with this detailed die cut from the Butterfly Thinlits die set. I wanted to see if it really made a difference in getting a cleaner cut for all the little pieces and I am happy to report that it did. It was also very helpful in getting a clean cut with the largest die cut of the Flourish Thinlits (see my recent post, Flowering Flourishes) and also for the two larger dies in the Detailed Floral Thinlits die set.

Navy Inside

I couldn’t resist adding a little interest to the inside of the card with this gorgeous little butterfly from the Papillon Potpourri stamp set. This more realistic butterfly image is my favorite from this set.

I hope you are inspired to be creative with some DSP and maybe to give this layout a try. 🙂

Joyful stamping!

~Stephanie

All Occasion Cards, Just Because Cards, Stampin' Up!, Sympathy Cards, Techniques

Flowering Flourishes

I have had a blast these last few days creating with the Flourish Thinlits Dies. I earned this die cut set as a reward for meeting a sales goal for Stampin’ Up! demonstrators. That’s right, I got this $29 set for free! Stampin’ Up! treats its demonstrators so well. If you’re interested in hearing more about the benefits of being a SU! demo, contact me for more information. I’d love to have you on my team!

In Laid Front

I love CASEing beautiful cards that I find on Pinterest, but there is something very rewarding about creating a card myself. Thinking through design and layout, planning color combinations, going outside of my comfort zone, maybe tossing out an idea or two when it just isn’t working, and then the happy feeling of holding a card in my hand that I designed and being proud of it. 🙂 I hope you have that feeling every once in awhile too. Below is the Flourish Thinlits set that has been inspiring me to come up with my own cards the last few days.I posted a card not too long ago in my post “Fluttering Flowers – Inlaid Die Cut Technique” that featured the same technique I used on today’s card. I think this technique works amazingly well with intricate dies. I was inspired to try some mixing and matching with the colors of the positive and negative images. I think I will try this card again but switch the background (negative image) to Rich Razzleberry and change the positive image (the flower die cut) to Pool Party. How fun would it be to see those two cards side by side? Maybe in a future post? 🙂

In Laid Close Up

Here are the dimensions for this card: Base- 8 1/2 x 5 1/2″ (scored at 4 1/4″), Pool Party Background Piece- 3 1/4 x 4 1/2″ (I took an inch off the measurements for the height and length to leave a 1/2″ border all around), Whisper White Sentiment Layer-1/2 x 3″, Pool Party Sentiment Layer- 3/4 x 3″, Rich Razzleberry Sentiment Layer- 1 x 3″.

In Laid Inside

Tips & Tricks: I thought it was a little something different to leave the ends straight and not flag them. I used the Fine Tip Glue Pen to adhere the die cut flowers. I stamped off once before stamping the sentiment in Rich Razzleberry Ink. I thought it was a fun embellishment to add the die cut border image on the inside of the card.

I hope you too are inspired to create your own cards – maybe with the Flourish Thinlits set! 🙂

Joyful stamping!

~Stephanie

**Supplies**: Flourish Thinlits Die Set, Big Shot, Sheltering Tree Stamp Set, Rich Razzleberry Classic Stampin’ Pad (stamped off), Whisper White Thick Cardstock, Pool Party Cardstock, Rich Razzleberry Cardstock, Rhinestone Basic Jewels, Snail Adhesive, Fine Tip Glue Pen, & Stampin’ Trimmer.

**All supplies can be purchased from my online store.

2016-2018 In Color Cards, All Occasion Cards, Just Because Cards, Stampin' Up!

“Love you Lots” & New Catalog!

It’s here! The 2016-2017 Annual Catalog went live June 1st. I will be sharing lots of fabulous cards made from awesome new product in the coming weeks. I think the coolest thing about the new catalog (besides the new In Colors, which are always amazing each year!) are the new thinlits and framelits. Stampin’ Up! has given us some super creative and super detailed dies to get creative with in this catalog. 🙂

2016-annual-catalog

This card is simple, as is its message. I wanted to showcase the new In Colors as well as the cuteness of this stamp, so I purposefully kept it Clean and Simple (CAS).

Elephant

The elephant and mouse image (they are the same image) comes from the hostess stamp set “Love You Lots”. And I sure do love this set! I was able to get it early during the demonstrator pre-order period last month. Just one of the many perks of being a Stampin’ Up! demonstrator. 🙂 Click on the link to the right if you would like more information on joining my Stampin’ Up! team, or contact me directly. I’d love to help you get started on this next stage of your Stampin’ Up! journey. 

I just love the shading on this elephant. Very sketched-looking which is super cute.

Elephant Close Up

I would have loved to go crazy with the Emerald Envy cardstock on this card (it’s my favorite new In Color) but I felt the look I was going for called for a Sweet Sugarplum cardbase. We’ll have some fun with the Emerald Envy in another post or two. 😉

Elephant Tilted

The tiny dots that accent the sentiment are from another hostess set, “Pun Intended”. I can’t wait to show you cards created with the main images from that set, but for now I must be content with adding a little bit of interest with the line of tiny dots.

I hope you are inspired to create with the new 2016-2018 In Colors and these adorable Hostess stamp sets. You can purchase these sets by placing an order of $150 or more and using your hostess Stampin’ Rewards towards them. You can also gather orders from some friends to help you reach the $150. Please let me know if I can assist you in this, maybe even help you host an online Stampin’ Up! party.

Joyful stamping!

~Stephanie

Supplies**: Love You Lots Stamp Set, Pun Intended Stamp Set, Basic Gray Archival Stampin’ Pad, Emerald Envy Classic Stampin’ Pad, Sweet Sugarplum Classic Stampin’ Pad, Emerald Envy Cardstock, Sweet Sugarplum Cardstock, Whisper White Cardstock, Snail, & Stampin’ Trimmer.

**Supplies for this card can be purchased from my online store. 

All Occasion Cards, Birthday Cards, Designer Series Paper Cards, Just Because Cards, Stampin' Up!, Thank You Cards

Sweet Schoolhouse Thank You

Hello everyone! Today’s card is a delightful DSP card. I CASEd the layout from Susan Itell’s blog, Simple Stampin’, but I changed up the Designer Series Paper.  I made this card with two different DSP Collections to show you how this layout will work for pretty much any DSP!
Blue School Angle

Blue School

Blue School Flat

This first card showcase designs from the Schoolhouse DSP.  It will be retiring at the end the month. If you don’t have it yet, I suggest ordering it now, while you still can! 🙂

I chose a sentiment from the “Apple of my Eye” stamp set for this card. I am thinking of it as a Thank You card, but with a sentiment like “You’re just the sweetest” you could also use this card as a Birthday card or a Just Because card.

Supplies**: Schoolhouse DSP, Apple of my Eye stamp set, 2″ Circle Punch, 1 3/4″ Circle Punch, Pool Party Cardstock, Whisper White Cardstock, Whisper White Thick Cardstock, Pool Party Classic Stampin’ Pad, Daffodil Delight Classic Stampin’ Pad, Stampin’ Trimmer, Stampin’ Dimensionals, Snail Adhesive.


I thought it would be neat to see what this Schoolhouse DSP card looked like with a different accent color.  The card below features Tangerine Tango instead of Pool Party for the accents. I also used Pool Party for the Sentiment instead of Daffodil Delight.  Leave me a comment and let me know which accent color you prefer for this card.

Orange School Angle

Orange School Flat

Orange School

**Supplies are the same as above cards with the following substitutions: Tangering Tango Cardstock and Pool Party Classic Stampin’ Pad.


I didn’t see any dimensions on Susan’s blog, so I played around and figured out my own. Took awhile to figure it out, but now I can I can whip up this card super quick. 🙂 The card base is 4 1/4″ x 11″, scored in half at 5 1/2″.  The colored cardstock layer is 4″ x 5 1/4″.  The Whisper White layer is 3 3/4″ x 5″. The two small vertical panes measure 2 3/8″ x 1/4″ and the long horizontal pane measures 3 1/2″ x 1/4″. The drawing below is the area that the cardstock DSP (Designer Series Paper) covers. It does not show any cardstock area.

IMG_3993


The following card was the first card I made. It showcases the retired “Sea Street” DSP. I wanted to include it in this blog for those of you who still had some in your retired stash. Whenever I see cards like this that use lots of DSP I immediately think of all the retired DSP I have.Sea

Sea Flat

**Supplies are the same as above cards with the following substitutions: Real Red Cardstock, Night of Navy Classic Stampin’ Pad, & Tin of Cards Stamp Set.


I hope you are inspired to try this layout out with your favorite DSP – be it current or retired. 🙂 If you would like to share your creations with me, you can do so via email at stephaniemackey2012@gmail.com and I will post them to my blog in a future post.

Joyful stamping!

~Stephanie

** All supplies can be purchased from my Online Store. I would love to be your Stampin’ Up! demonstrator.:) If you order through me, I invite you to use the Hostess Code RBTK9C7N when you place your online order.

All Occasion Cards, Just Because Cards, Stampin' Up!, Techniques

My Ink Smooshing “Adventure”

Hello everyone! I’ve got another watercolor technique for today’s card. The technique I used is called “ink smooshing”. It’s a great one for watercoloring large areas and backgrounds as well as die cuts (featured in my previous post.)

Ink Smooshing

This color combination of Tempting Turquoise, Real Red, and Pumpkin Pie made me think of sunsets, California, and vacation. 🙂 I was inspired to choose this adorable sentiment from the “Go Global” stamp set (see below).

Steps for “Ink Smooshing”:

  1. Apply ink pads directly to large clear block (Block E in this example).
  2. Spray with water using a spray bottle from a distance of about 12 inches.
  3. Place wetted block, ink side down, on your cardstock (this layer is 4″ x 5 1/4″). Press firmly.
  4. Remove block and use the Heat Tool to dry both sides.

Ink Smooshing Close Up

I love the little black accent hearts against the watercolor background. They were punched out with the Hearts Border Punch. It makes great borders AND great confetti!

I hope you are inspired to do some “ink smooshing”. It makes for some WOW cards, for sure! If you like this “Go Global” stamp set, be sure to get it now before it retires on May 31st. I would be honored to have you as a customer. If you choose to purchase from my Online Store, I invite you to use the Hostess Code RBTK9C7N when placing your order.

Joyful stamping!

~Stephanie

Supplies*: Whisper White Thick Cardstock, Basic Black Cardstock, Tempting Turquoise Classic Stampin’ Pad, Real Red Classic Stampin’ Pad, Pumpkin Pie Classic Stampin’ Pad, Memento Tuxedo Black Ink Pad, Hearts Border Punch, Go Global Stamp Set, Clear Block E, Heat Tool, Glue Dots, Snail, Stampin’ Trimmer.

*All supplies can be purchased from my Online Store.