Designer Series Paper Cards, Die Cut Cards, Halloween Cards

3 Days of Halloween – Day 3

Hello everyone! For Day 3 of my 3 Days of Halloween blog post series I have a 3D project for you. lol I didn’t even plan that, but I like the connection.  3D for Day 3. 🙂

I haven’t used my Gift Box Punch Board for awhile, but it was still super fun. This is the largest box the punch board can make, 4 x 4″. You need a 12 x 12″ piece of cardstock or DSP (Designer Series Paper) to make this box. It really is a big box – I fit lots of candy inside!

witches-and-trees

This striped pattern is my favorite from the Halloween Night Specialty Designer Series Paper pack. There are lots of great designs, as you can see below.

halloween-night-dsp

Here are the other two sides of my box. There really are some adorable little dies in the Halloween Scenes Edgelits die set.

tombstones-and-bats

halloween-scenes

It was a little tricky coming up with the topper for the box. I knew I wanted something though so I experimented. The circles are Pumpkin Pie and Basic Gray. I die cut them with circle dies from the new Layering Circles Framelits Dies. Sadly, I don’t remember which ones I used – you’ll have to experiment to find the right size. 🙂 Feel free to post a comment if you do find out which sizes work well.

topI adhered a length of the black and grey baker’s twine from the Halloween Night Baker’s Twine pack (the other twine in the pack is Pumpkin Pie and Black) between the two cardstock circles and added a sprinkling of Halloween Night Enamel Dots.

tree

I wanted to give a close up of my favorite side of the box – I really can’t get enough of this spooky tree! Hopefully I will be able to find a way to use this year round – maybe add some flowers and make it a spring-time tree? We’ll see. 🙂

I hope you have been inspired – maybe to do some Halloween crafting and get a head start for next year 🙂 – or to create a different box with a Thankful theme or a Christmas theme.

Joyful stamping!

~Stephanie

Supplies**: Halloween Night Specialty DSP, Gift Box Punch Board, Halloween Scenes Edgelits Dies, Spooky Fun Stamp Set, Basic Black Cardstock, Pumpkin Pie Cardstock, Basic Gray Cardstock, Versamark Ink, Whisper White Stampin’ Emboss Powder, Heat Tool, Big Shot Machine, Halloween Night Enamel Dots, Halloween Night Baker’s Twine, Layering Circles Framelits Dies, Glue Dots, Snail Adhesive, & 1 ” Circle Punch (for the moon).

** All supplies can be purchased from my online store. Thanks for your support!

Designer Series Paper Cards, Halloween Cards, Washi Tape Cards

3 Days of Halloween – Day 2

Today I have two more projects for you – both with coordinating envelopes.  It has been so much fun creating my own Halloween projects. Pinterest is awesome and I love getting inspiration from other crafters’ blogs, but there is something very satisfying about coming up with the idea yourself and watching it take shape below your fingertips. 🙂 Click the following link to check out the projects from 3 Days of Halloween – Day 1.

striped-mini-treat-bag-card

This first project showcases the mini treat bag thinlits dies, available in the Annual Catalog. I love tying in “old” product from the Annual Catalog with new product from the Holiday catalog.  I heat embossed “happy halloween!” from the Spooky Fun stamp set and then die cut it with the banner diecut from the Mini Treat Bag Thinlits die set. I added a vellum rectangle behind it for a little extra interest. A few enamel dots and the mini treat bag was complete!

The Halloween Night Specialty DSP is so bold on the mini treat bag that I decided to keep it simple on the card insert. I think the spooky tree is plenty of interest. The tree edgelit might be my absolute favorite part of all of the Halloween products.  The card insert measures 3 1/2 x 5″.

Supplies for this card: Halloween Night Specialty Designer Series Paper, Spooky Fun Stamp Set, Halloween Scenes Edglits Dies, Halloween Night Enamel Dots, Big Shot Die Cut Machine, Whisper White Cardstock, Basic Black Cardstock, Vellum Cardstock, Pumpkin Pie Stampin’ Write Marker, Heat Tool, Versamark Ink, Whisper White Stampin’ Emboss Powder, Mini Treat Bag Thinlits Dies, Basic Grey Classic Stampin’ Pad (for gravestones image), Memento Tuxedo Black Ink Pad (for witch image), & Stampin’ Trimmer.


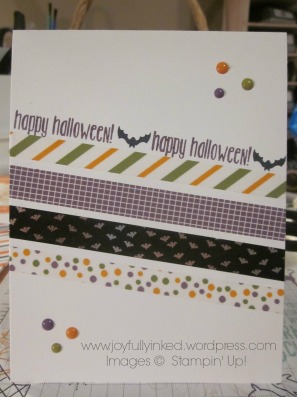
I really do love the Halloween Night Designer Washi Tape. I just had to make it the focal point of one of my Halloween projects for my 3 Days of Halloween blog posts. There is a 5th design (black background with Pumpkin Pie, Perfect Plum, and Old Olive dots) that I didn’t use on this card. It is also great! Check it out here.

washi-tape-halloween

I have been on a washi tape card kick for awhile. I love running the sentiment parallel with the washi tape, as I did on this card. I also love covering the envelope flap with washi tape to coordinate it with the card.

You might not notice at first glance, but the bats are actually stamped upside down. Oops! I didn’t notice on the first one and then I figured I had to make the second bat the same or my mistake would really stand out. 🙂 I finished off the card with a few Halloween Night Enamel Dots. Perfect touch!

washi-tape-card-and-envelopes

Supplies for this card: Spooky Fun Stamp Set, Halloween Night Designer Washi Tape, Halloween Night Enamel Dots, Whisper White Thick Cardstock, Perfect Plum Classic Stampin’ Pad, Memento Tuxedo Black Ink Pad, Whisper White Medium Envelopes, Paper Snips, & Stampin’ Trimmer.

I hope you enjoyed Day 2 of my 3 Days of Halloween blog post series. You still have time to create a few last minute Halloween projects yourself! If you would like to stock up on Halloween supplies for next year check out my online store. These products will be available until the beginning of January.

Joyful stamping!

~Stephanie

Halloween Cards

3 Days of Halloween – Day 1

I have some Halloween cards to share! I was home from school two days this week because my daughter was sick and we also had two days of no school so I have finally had some time to stamp. 🙂 I will share two more projects tomorrow and one big project on Halloween.

I love Halloween colors and figures. Just look at that cute little witch on a broom!

3-squares-halloween-card

I made this card for my friend who has three kids so I loaded it up with Halloween fun. My favorite part is the spider web with the little spider hanging down and the adorable Halloween Night Enamel Dots. The squares of DSP (Designer Series Paper) are 1 1/2″ square.

Supplies used on this card: Spooky Fun Stamp Set, Halloween Scares Stamp Set, Halloween Scenes Edgelits, Halloween Night Specialty Designer Series Paper, Halloween Night Enamel Dots, Whisper White Thick Cardstock, Basic Black Cardstock, Pumpkin Pie Cardstock, Memento Tuxedo Black Ink Pad, Perfect Plum Classic Stampin’ Pad (eek! sentiment and cat), Old Olive Classic Stampin’ Pad, Glue Dots, Snail Adhesive, Big Shot & Stampin’ Trimmer.

black-polka-dots

On this card I went a little more simple and let the DSP do the talking. . . and the three little pumpkins do the smiling! I was also able incorporate some of the Halloween Night Baker’s Twine and bring back the Hello You Thinlits Dies from the Annual Catalog. The little “Halloween” sentiment piece is 1/2 x 1 1/4″.

I really like how the baker’s twine bow finishes off this card. I went outside of my comfort zone and let the bow and strings be long – I always want to make them short for some reason.

Supplies on this card: Spooky Fun Stamp Set, Halloween Scenes Edgelits Dies, Hello You Thinlits Dies, Halloween Night Specialty Designer Series Paper, Halloween Night Baker’s Twine, Whisper White Thick Cardstock, Whisper White Cardstock, Memento Tuxedo Black Ink Pad, Pumpkin Pie Classic Stampin’ Pad, Fine Tip Glue Pen, Snail Adhesive, Stampin’ Dimensionals (behind the “Halloween” sentiment piece), Big Shot, & Stampin’ Trimmer.

Hi hope you have enjoyed Day 1 of The 3 Days of Halloween. Hopefully you have found some inspiration for Halloween cards of your own!

One last thing – Stampin’ Up! is running a “Buy 3, Get 1 Free” promotion with all of the regular Designer Series papers through the end of October. Check out the eligible DSP packs here. If you would like to place an order you can do so in my online store. Thanks for your support!

Joyful stamping!

~Stephanie

Halloween Cards

Halloween Scares: From Baker’s Box to Card

Hello! I can’t believe it’s been 25 days since my last post. I took an emergency teaching position a few weeks ago and I am still figuring out how to balance teaching duties, baby stuff, stamping time, and everyday life stuff. Today I have a Halloween card made with products from the new Holiday Catalog, which is now live!

halloween-case

This card was cased from a Baker’s Box on p. 50 in the Holiday Catalog. I liked the basic design, but didn’t have the Baker’s Box thinlits, so I decided to turn it into a card.

halloween-case-lower

My two favorite Halloween stamp sets are Halloween Scares and Spooky Fun. This card features the Halloween Scares stamp set. I also used the Halloween Scenes Edgelits Dies. I think the fence is just adorable. There is also a cool twisty tree die in that set. halloween-case-upper

These bats are part of a stamp that has three bats arranged in a v shape. I inked them up individually so I could place them where I wanted. I also loved using the Halloween Night Enamel Dots and Washi Tape. I am really into coordinating embellishments lately.

I hope you are inspired by my card and have some fun creating some Halloween cards yourself!

Joyful stamping!

~Stephanie

Supplies**: Halloween Scares Stamp set, Halloween Scenes Edgelits Dies, Halloween Night Enamel Dots, Halloween Nights Deisgner Washi Tape, Whisper White Craft Ink, Memento Tuxedo Black Ink, Basic Grey Cardstock, Perfect Plum Cardstock, Pumpkin Pie Cardstock, Halloween Nights Specialty Designer Series Paper, 1 3/4″ Circle Punch, 2″ Circle Punch, Paper Snips, Stampin’ Trimmer.

**All supplies can be purchased from my online store.