All Occasion Cards, Birthday Cards, Just Because Cards, Washi Tape Cards

Tasty Treats Popsicle Card

Hello everyone! Even though we are just beginning spring, I have a summer themed card for you today, as you can see. I designed this card around the “Tasty Treats Designer Washi Tape” which is part of the Cool Treats suite of products. At first I thought this suite was only appropriate for the summer months, but now I think it’s fun to make and send anytime of the year.

I really love the little accents the “Cool Treats” stamp set has. The diagonal stripes, the two vertical stripes to make it look like twin pops, the cute little cherry. I think the popsicle with the little bit out of it is hilarious and very authentic. 🙂 I love how you can go the popsicle direction like I did, or the ice cream way, or even mix them together. 
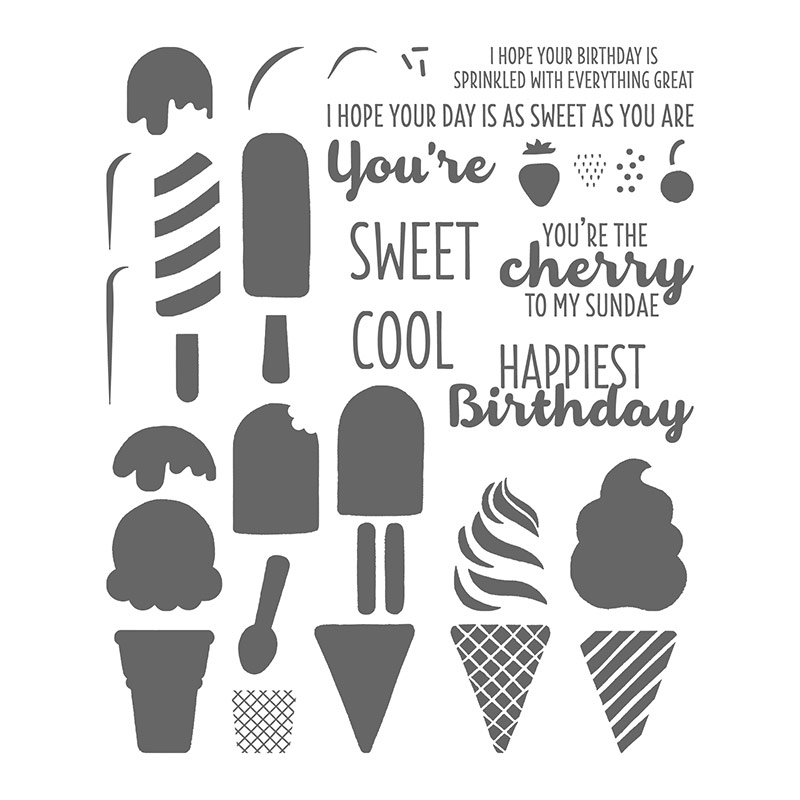
Below you can see some of the adorable accent stamps. I wish I had noticed the little curved pieces before I assembled this card. I would have used one to give the Pool Party popsicle on the left a little shine. I stamped off the main image of the Watermelon Wonder and Peekaboo Peach popsicles on my grid paper and then stamped the accent stamp full strength (without stamping off). I rounded the corners of this layer with the Project Life Corner Punch.

I like the contrast of the Whisper White layer against the colorful washi tape (no need for a colored cardstock layer in between). I popped up the popsicle layer with dimensionals and added some Sale-A-Bration 3/8″ Metallic Ribbon (gold here) underneath.  I adhered the ends of a length of ribbon under the washi tape layer and then tied a shorter length of ribbon around it in a knot. Much easier than bows!

Since Stampin’ Up! envelopes are made to be stamped on, I jazzed up the envelope flap with some more playful popsicles.

Here’s a look at the card and envelope together. I love the coordination. 🙂

I hope you are inspired to create some summer fun cards in anticipation of those warm, relaxing summer days. If you’d like to do some creating with the Cool Treats suite of products and don’t already have a demonstrator, I’d love to earn your business. Send me a message or click the icon to my online store.

Joyful stamping!

~Stephanie

Supplies used: Cool Treats Photopolymer Stamp Set, Tasty Treats Designer Washi Tape, 3/8″ Mettalic Ribbon (gold), Project Life Corner Punch, Watermelon Wonder Classic Stampin’ Pad, Peekaboo Peach Classic Stampin’ Pad, Pool Party Classic Stampin’ Pad, Crumb Cake Classic Stampin’ Pad, Whisper White Cardstock, Pool Party Cardstock, Whisper White Medium Envelopes, Stampin’ Dimensionals, Snail Adhesive.

Designer Series Paper Cards, Halloween Cards, Washi Tape Cards

3 Days of Halloween – Day 2

Today I have two more projects for you – both with coordinating envelopes.  It has been so much fun creating my own Halloween projects. Pinterest is awesome and I love getting inspiration from other crafters’ blogs, but there is something very satisfying about coming up with the idea yourself and watching it take shape below your fingertips. 🙂 Click the following link to check out the projects from 3 Days of Halloween – Day 1.

striped-mini-treat-bag-card

This first project showcases the mini treat bag thinlits dies, available in the Annual Catalog. I love tying in “old” product from the Annual Catalog with new product from the Holiday catalog.  I heat embossed “happy halloween!” from the Spooky Fun stamp set and then die cut it with the banner diecut from the Mini Treat Bag Thinlits die set. I added a vellum rectangle behind it for a little extra interest. A few enamel dots and the mini treat bag was complete!

The Halloween Night Specialty DSP is so bold on the mini treat bag that I decided to keep it simple on the card insert. I think the spooky tree is plenty of interest. The tree edgelit might be my absolute favorite part of all of the Halloween products.  The card insert measures 3 1/2 x 5″.

Supplies for this card: Halloween Night Specialty Designer Series Paper, Spooky Fun Stamp Set, Halloween Scenes Edglits Dies, Halloween Night Enamel Dots, Big Shot Die Cut Machine, Whisper White Cardstock, Basic Black Cardstock, Vellum Cardstock, Pumpkin Pie Stampin’ Write Marker, Heat Tool, Versamark Ink, Whisper White Stampin’ Emboss Powder, Mini Treat Bag Thinlits Dies, Basic Grey Classic Stampin’ Pad (for gravestones image), Memento Tuxedo Black Ink Pad (for witch image), & Stampin’ Trimmer.


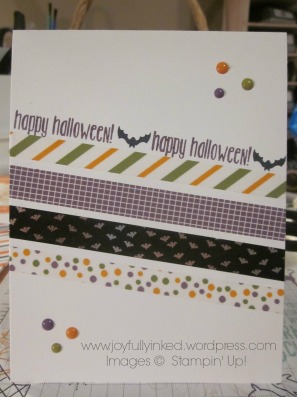
I really do love the Halloween Night Designer Washi Tape. I just had to make it the focal point of one of my Halloween projects for my 3 Days of Halloween blog posts. There is a 5th design (black background with Pumpkin Pie, Perfect Plum, and Old Olive dots) that I didn’t use on this card. It is also great! Check it out here.

washi-tape-halloween

I have been on a washi tape card kick for awhile. I love running the sentiment parallel with the washi tape, as I did on this card. I also love covering the envelope flap with washi tape to coordinate it with the card.

You might not notice at first glance, but the bats are actually stamped upside down. Oops! I didn’t notice on the first one and then I figured I had to make the second bat the same or my mistake would really stand out. 🙂 I finished off the card with a few Halloween Night Enamel Dots. Perfect touch!

washi-tape-card-and-envelopes

Supplies for this card: Spooky Fun Stamp Set, Halloween Night Designer Washi Tape, Halloween Night Enamel Dots, Whisper White Thick Cardstock, Perfect Plum Classic Stampin’ Pad, Memento Tuxedo Black Ink Pad, Whisper White Medium Envelopes, Paper Snips, & Stampin’ Trimmer.

I hope you enjoyed Day 2 of my 3 Days of Halloween blog post series. You still have time to create a few last minute Halloween projects yourself! If you would like to stock up on Halloween supplies for next year check out my online store. These products will be available until the beginning of January.

Joyful stamping!

~Stephanie

Birthday Cards, Stampin' Up!, Washi Tape Cards

Wonderful Washi Tape

Hello everyone! Gone are the days when washi tape was just an accent piece on a card. Now, Stampin’ Up! has given us such beautiful washi tape designs that it would be a shame not to let it be front and center on our card!

Front Washi

The three washi tape designs showcased on my card today are from the Affectionately Yours” collection. There are several other coordinating products, but I thought it would be fun to just work with the washi tape and give it a chance to shine. I really like the other two patterns in this collection, but didn’t want the card to get too busy. Plus, I had to leave some room for stamping! 🙂

Washi

How fun would it be to try different combinations of designs from this set? I am also super motivated to pull out the retired washi tape collections I have and go to town, even though I can’t use them on my blog or for the classes I teach in my home.

Side Washi

***A little note: It is a little hard to see in these pictures, but I used Night of Navy ink for all the stamping, not black ink.

Inside Washi

I could have trimmed the washi tape along the sides for a crisp look, but I thought it would be a fun surprise to just wrap it around have some pops of color.

I hope you are inspired to create some cards featuring the beautiful designs of Stampin’ Up!’s washi tape. The possibilities are endless!

Joyful stamping!

~Stephanie

Supplies*: Affectionately Yours Washi Tape, Celebrate Today Stamp Set, Night of Navy Classic Stampin’ Pad, Whisper White Thick Cardstock, Butterfly Basics Stamp set (inside sentiment), Stampin’ Trimmer.

*All supplies can be purchased from my online store.

All Occasion Cards, Birthday Cards, Congratulations Cards, Washi Tape Cards

Happy Day to You

Hello everyone! Today’s card is pretty basic, but still packs a punch!  I am intending it to be a “birthday” card, but I think the sentiment is pretty versatile and could work as a “congratulations” card or “just because” card as well.

Happy Day Angled

I used the Perfect Pairings Sale-A-Bration Stamp Set on this card. This stamp set is one of the many awesome products that you can choose for free through the end of March with a $50 order. I would be honored if you would choose me as your demonstrator, if you don’t already have one. You can see all the Sale-A-Bration products in the SAB Brochure and SAB Flyer. Check out the new Occasions Catalog as well for some more birthday fun!STAMPIN UP PERFECT PAIRINGS 9 PC CLEAR MOUNT RUBBER STAMP SET-SAYINGS BIRTHDAY

I love washi tape, but find myself struggling to remember to use it. When I do remember, I usually want to showcase it and make it the focal point of my card, like I did today. Another fun way is to have little pieces popping out behind a banner like an accent. I love the bright colors in the Cherry on Top Washi Tape I used on today’s card.Happy Day

Do you struggle to find a use for the tiny Rhinestones that are connected? Rather than cutting them apart and using them individually, try using them as they come. One of my favorite ways to do that is on the body of a butterfly as shown below.

Happy Day Close Up

I hope you are inspired to create with some washi tape too!

Joyful stamping!

~Stephanie

Supplies*: Cherry on Top Washi Tape, Perfect Pairings Stamp Set, Watermelon Wonder Classic Stampin’ Pad, Bermuda Bay Classic Stampin’ Pad, Very Vanilla Cardstock, Crushed Curry Cardstock, Pool Party Cardstock, Bitty Butterfly Punch, Elegant Butterfly Punch, Corner Rounder Punch, Glue Dots, & Rhinsetones Basic Jewels.

*All supplies are Stampin’ Up!