Stampin' Up!, Thank You Cards

Thoughtful In Color Card

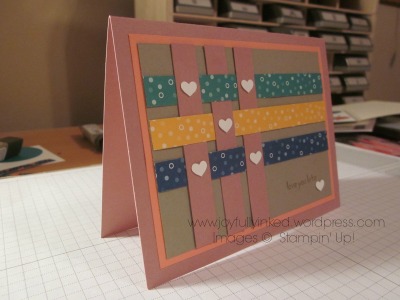
Hello everyone! I just finished preparing for my new In Color class with the 2016-2018 In Colors and here is one of the cards I came up with. I wanted to make sure I used the Stampin’ Write markers. I remembered a card with this marker technique last year and I love how it turned with these colors. Marker

I used the brush tip of the markers and free handed the lines. I like the carefree feel that resulted. It has been awhile since I inked up a stamp with markers. Such a fun way to give more expression to the sentiment.

marker angle

I am having a great time with the In Color Enamel Shapes. Isn’t that little heart just darling?  This decorative label punch does not come in different sizes, but if you cut it down the middle you can space it apart and create a border.Marker Close Up

I hope you are inspired to create with some of the new 2016-2018 In Color supplies. I’d love to see what you come up with. If you send me your creations at stephaniemackey2012@gmail.com, I might include them in a future blog post.:)

Joyful stamping!

~Stephanie

Supplies**: Emerald Envy Stampin’ Write Marker, Dapper Denim Stampin’ Write Marker, Flirty Flamingo Stampin’ Write Marker, Sweet Sugarplum Stampin’ Write Marker, Peekaboo Peach Stampin’ Write Marker, Sweet Sugarplum Cardstock, Dapper Denim Cardstock, Whisper White Cardstock, 2016-2018 In Color Enamel Shapes, Whisper White Baker’s Twine, Stampin’ Dimensionals, Snail Adhesive, Paper Snips, Stampin’ Trimmer.

**All supplies can be purchased from my online store. If you would like to place an order (and it is under $150) I invite you to enter 4SHN2EBW in the Hostess Code box. Thank you for your support!


Congratulations Cards, Stampin' Up!, Wedding Cards

Floral Boutique Washi Tape CASE

Hello everyone! I recently taught a class based on the Floral Boutique Suite (p. 76-77 of the Annual Catalog). I had a blast scouring Pinterest for awesome projects to CASE (Copy and Share Everything). Although my favorite product in this suite is the dice cut set, Detailed Floral Thinlits Dies, I did want to have one card in the class that did not involve die cutting. I decided to go with a card that put the Floral Boutique Washi Tape front and center. Here’s what I came up with. 🙂

CASE Angle

I need to give credit to Kay Kalthoff for the original on which my card is CASEd. Here is her lovely card. As you can see, I drew the washi tape, ribbon and sentiment inspiration from her card. 

I had a lot of fun adding in some color here. Night of Navy is really the only color of this suite and while it is beautiful and elegant, I thought the Rose Red helped give a little excitement to this “Congratulations” card.

CASE

I have been on a little bit of a kick with this angled washi tape look. I love off setting the sentiment on the top and then balancing it out on the bottom with a few little punched hearts or some lovely pearls. I like Kay’s idea of adding some baker’s twine in the mix. 🙂
CASE Flat

I hope you are inspired to create with some of Stampin’ Up!’s gorgeous washi tape. I’d love to see what you come up with. If you send me your creations at stephaniemackey2012@gmail.com, I might include them in a future blog post.:)

Joyful stamping!

~Stephanie

Supplies**: Floral Boutique Designer Washi Tape, Floral Phrases Stamp Set, Night of Navy Solid Baker’s Twine, Whisper White Cardstock, Whisper White Thick Cardstock, Rose Red Card Stock, Rose Red Classic Stampin’ Pad, Pearls Basic Jewels, Snail Adhesive, Paper Snips, & Stampin’ Trimmer.

**All supplies can be purchased from my online store. If you would like to place an order (and it is under $150) I invite you to enter 4SHN2EBW in the Hostess Code box. Thank you for your support!


Birthday Cards, Congratulations Cards, Designer Series Paper Cards, Stampin' Up!

DSP Strips with Affectionately Yours Paper

Hello everyone! Today’s card is a bright one. It features the Affectionately Yours Specialty Designer Series Paper (DSP) and comes with a picture tutorial.  This layout is awesome for showcasing all of the beautiful designs of a DSP pack. I am excited to try it with some of the other awesome DSP packs in the 2016-2017 Stampin’ Up! Annual Catalog. 

Stripes Angle


  1. Begin by cutting some strips of DSP, or use scraps. Make sure that they are long enough to fit across the cardstock base you will be adhering them to. For this card the cardstock base is 3 3/4 x 5″. I cut some DSP strips to a 1/2″ width and a few to 3/4″ width for variety. Lay down some Snail Adhesive on your cardstock piece to keep the DSP strips in place. IMG_4133

2. As you lay down your strips be sure to place them tightly together, leaving no cardstock showing through. It will be very obvious at the end. Also, be sure that the DSP strips hang off both sides of the cardstock base to ensure your entire base is covered.  If you want to go the easy route, just use 12″ strips. Then you’ll be sure to have long enough strips. You could probably get away with 7 or 8″ strips too. Obviously, as you get closer to the ends you don’t need as long of strips.

IMG_4134

3. When you have covered your cardstock base with DSP strips, turn it over and use Paper Snips to trim off the DSP that hangs over the sides.

IMG_4138

4. Behold your breathtaking creation!

IMG_4139


Here are a few more shots of the card. I thought the yellow flower from the Botanical Blooms Thinlits Dies set worked really well to bring out the little bits of yellow in the DSP designs. Strips

I adhered the flower with a glue dot and the sentiment piece with Stampin’ Dimensionals.

Stripes Flat

I hope you are inspired to try this layout and have fun with some DSP. 🙂

Joyful stamping!

~Stephanie

Supplies**: Affectionately Yours Specialty Designer Series Paper, Botanical Blooms Thinlits Dies, Butterfly Basics Stamp Set, Decorative Label Punch, Cucumber Crush Classic Stampin’ Pad, Crumb Cake Cardstock, Night of Navy Cardstock, Daffodil Delight Cardstock, Whisper White Cardstock, Paper Snips, Glue Dots, Stampin’ Dimensionals, Snail Adhesive, Pearls Basic Jewels.

**All supplies can be purchased from my online store. If you would like to place an order (and it is under $150) I invite you to enter 4ZN3MB4Z in the Hostess Code box. Thank you for your support!

2016-2018 In Color Cards, All Occasion Cards, Birthday Cards, Die Cut Cards, Just Because Cards, Stampin' Up!

In Colors “For You”

Hello everyone! If you saw my last blog post, this card may seem familiar. My last post, Color Blocking with In Colors featured five different layouts with the new 2016-2018 In Colors. I thought the last layout was so fun, I decided to keep creating with it.

A

I have been playing around with these In Colors a lot. It’s always fun to create with new product – everything feels fresh and original. It’s also fun to see how the products that carried over from the old catalog can really compliment these new items. For example, I think the Large Polka Dot embossed background is a really cool contrast to all of the fun and playful In Color die cuts.B

These dies from the Mini Treat Bag Thinlits die set are so much fun to use on cards, as well as mini treat bags. My favorite one is the “for you” sentiment die. I love the font. I popped the heart up with Stampin’ Dimensionals.

C

I hope you are inspired to create with these mini treat bag thinlits dies and/or the new 2016-2018 In Colors. I also hope you try your hand at combining carry over product with new product for a fresh look!

Joyful stamping!

~Stephanie

Supplies**: Large Polka Dot Textured Impressions Embossing Folder, Big Shot, Mini Treat Bag Thinlits Dies, Whisper White cardstock, Emerald Envy cardstock, Dapper Denim cardstock, Peekaboo Peach cardstock, Flirty Flamingo cardstock, Sweet Sugarplum cardstock, Snail Adhesive, Stampin’ Dimensionals, & Stampin’ Trimmer.

**All supplies can be purchased from my online store. If you would like to place an order (and it is under $150) I invite you to enter 4ZN3MB4Z in the Hostess Code box. Thank you for your support!

2016-2018 In Color Cards, All Occasion Cards, Birthday Cards, Congratulations Cards, Die Cut Cards, Just Because Cards, Stampin' Up!, Thank You Cards

Color Blocking with In Colors

Hello everyone! A few weeks ago I held a New Catalog Launch party. One of the Make & Takes was a color blocking card with the new 2016-2018 In Colors. I had a few extra cards prepped and thought I would have some fun coming up with different ways to finish off this card using the color blocking with the In Colors as the starting point. The strips of cardstock are 3 3/4 x 5″.

Leave me a comment below and let me know which of the five versions is your favorite!

Die Cut

Card #1: Flourish Thinlits and Floral Phrases stamp set.

(For a little extra dimension and to make the spacing easier I glued the colored cardstock strips to a piece of 4 x 5 1/4″ piece of Whisper White carstock and then adhered it to the card base.)

Hip Hip Hooray

Card #2: Party Pop Ups Thinlits

Embossed

Card #3: Gold Embossed with Floral Phrases stamp set

Tone on Tone

Card #4: Tone-on-tone with Kinda Eclectic Stamp Set

(Sweet Sugarplum banner 3 5/8 x 1 3/4″, Whisper White banner 3 3/8 x 1″)

Mini Treat Bag

Card #5: Mini Treat Bag Thinlits Dies & Rhinestone Basic Jewels

(3 1/2 x 1/2″ banner, it is smaller than the die)

I hope you are inspired to try your hand at some color blocking, especially with the new 2016-2018 In Colors. They look awesome together!

Joyful stamping!

~Stephanie

Supplies**: Whisper White Thick Cardstock, Peekaboo Peach Cardstock, Emerald Envy Cardstock, Flirty Flamingo Cardstock, Sweet Sugarplum Cardstock, Dapper Denim Cardstock, Snail Adhesive, Stampin’ Trimmer.

**All supplies can be purchased from my online store. If you would like to place an order (and it is under $150) I invite you to enter 4ZN3MB4Z in the Hostess Code box. Thank you for your support!

2016-2018 In Color Cards, All Occasion Cards, Designer Series Paper Cards, Just Because Cards, Stampin' Up!

In Color Paper Weaving

Hello everyone! Here is the 4th and last card in my current Designer Series Paper (DSP) series. This is not the first time I’ve done a card with paper weaving on my blog (see Paper Weaving with DSP). However, it is an excellent way to use up DSP scraps and I wanted to include that idea with these DSP cards.

Dimensions: The cardbase is 8 1/2 x 5 1/2″ (scored in half at 4 1/4″). The Flirty Flamingo Layer is 3 3/4 x 5″. The Crumbcake layer is 3 1/2 x 4 3/4″. The DSP strips are 1/2 x 4 3/4″. The cardstock strips are 1/2 x 3 1/2″.

Weaving

The biggest hint I can give for weaving the DSP strips is to adhere one end of all the strips in place with a glue dot. This gives just enough adhesive to keep the strips where you want them and still allows you to maneuver the strips into the woven pattern. I also used a few glue dots to adhere the rest of the strips into place after weaving.

The second hint is to keep the strips pretty close together. This is actually the second card I made because the first card had a looser weave that just didn’t look as striking. Speaking of striking, how awesome are those adorable little white hearts? I think they are what pulls the card together.

Weaving Side

I hope you are inspired to play with paper weaving and to create with some of the new 2016-2018 In Colors as well. Aren’t they lovely?

Joyful stamping!

~Stephanie

**Supplies**: Sweet Sugarplum Cardstock, Flirty Flamingo Cardstock, Crumb Cake Cardstock, 2016-2018 In Color Envelope Paper, Hearts Border Punch, Crumb Cake Classic Stampin’ Pad, Love You Lots Stamp Set, Glue Dots, Snail Adhesive, Stampin’ Trimmer.

**All supplies can be purchased from my online store. If you would like to place an order (and it is under $150) I invite you to enter 4ZN3MB4Z in the Hostess Code box. Thank you for your support!


All Occasion Cards, Birthday Cards, Designer Series Paper Cards, Just Because Cards, Stampin' Up!

Double Vision

Hello everyone! Today’s post is a double feature. Both cards have the same design and basic color scheme, but one is subdued while the other is bold.

IMG_4123

Both cards feature the Affectionately Yours Specialty Designer Series Paper (DSP). One neat thing about Stampin’ Up!’s DSP packs is that all the colors used in each individual pack coordinate with the other colors used in that pack. That way, even if you use a one color design like I did on both cards, you don’t have to think too long about what colors to use with it.IMG_4121

I love how the large chunks of Watermelon Wonder contrast with the pops of Night of Navy in the bold card. I also love the softness of the light contrast between the little dots of Watermelon Wonder and the Crumb Cake in the subdued card. Which one is your favorite? Leave me a comment below and let me know. 🙂

IMG_4124

Instructions: Cut a piece of DSP to 3 3/4 x 4 1/4″.  If you want a larger gap between your pieces simply make your DSP starting piece shorter than 4 1/4″.  To create the gap between the pieces of DSP you will need to use your Stampin’ Trimmer.  It looks strange at first, but when cutting you need to make sure the top left hand corner of the DSP is on the right side of your cutting blade.  The ruler extends to 1 1/4 on the right side of the blades. This is important for creating the slant that you want.  I wanted a gentle slant so I placed the top left hand corner of the DSP at the 1 1/4″ mark on the right hand side of the blade and I lined up the bottom right hand corner with the 1 1/4″ line on the left hand side of the blades. If you want steeper slant, simply line those same corners up with lines closer to the cutting blade.

IMG_4125

This layout is great if you really want your DSP to shine. With so much of the pattern showing, your DSP is sure to get lots of attention! The “HAPPY” sentiment is from the “Celebrate Today” stamp set. I stamped the “birthday” image on the inside of the cards in Watermelon Wonder ink. I punched the flower out with the Flower Medallion punch and popped it up with Stampin’ Dimensionals.

I hope you are inspired to try this layout with your favorite DSP. I’d love to see what you come up with. If you send me your creations at stephaniemackey2012@gmail.com, I might include them in a future blog post. 🙂

Joyful stamping!

~Stephanie

**Supplies** used on both cards: Affectionately Yours Specialty DSP, Stampin’ Trimmer, Celebrate Today Stamp Set, Watermelon Wonder Classic Stampin’ Pad, Flower Medallion Punch, Whisper White Cardstock, Stampin’ Dimensionals, Snail Adhesive.

Bold card only: Watermelon Wonder cardstock

Subdued Card only: Crumb Cake Cardstock.

**All supplies can be purchased from my online store. If you would like to place an order (and it is under $150) I invite you to enter 4ZN3MB4Z in the Hostess Code box. Thank you for your support!


Designer Series Paper Cards, Stampin' Up!, Thank You Cards

Cut & Flipped Hearts

Hello everyone! Here is the second card in my Designer Series Paper (DSP) blog post series.  Stampin’ Up!’s DSP is known for being two sided. Unfortunately, when we use one beautiful side of the DSP, we have to (usually) hide the other side.  I thought this cut & flipped hearts layout was a fun way to showcase both sides of each of these gorgeous DSP sheets.

Hearts Front

The DSP featured on this card is from the Affectionately Yours Specialty DSP pack. I used the Sweetheart Punch to punch out 3 hearts each from 2 different DSP sheets. I then cut them in half, flipped one half of each heart over, and re-matched them up with their other halves. It can’t be the original one because when you flip it over you have two of the same side.

Hearts Angle

I used the Multipurpose liquid glue to adhere the hearts. This glue doesn’t dry immediately so it gave me some time to wiggle the halves of the hearts into the right place before the glue dried. I used the Fine Tip Glue Pen on the “Thanks” thinlit die from the Hello You Thinlits die cut set.

I hope you are inspired to try this layout or another that lets you showcase both awesome sides of DSP sheets!

Joyful stamping!

~Stephanie

Supplies**: Hello You Thinlits, Sweetheart Punch, Affectionately Yours Specialty Designer Series Paper, Crumb Cake Cardstock, Whisper White Cardstock, Cucumber Crush Cardstock, Stampin’ Trimmer, Fine Tip Glue Pen, Snail Adhesive, Multipurpose Liquid Glue.

** All supplies are available for purchase from my Online Store. If you would like to place an order (and it is under $150) I invite you to enter 4ZN3MB4Z in the Hostess Code box. Thank you for your support!