All Occasion Cards, Designer Series Paper Cards, Stampin' Up!, Techniques, Tutorials

Embossed Vellum Flower Card with Products from the Perennial Essence Suite

Hello everyone! I’m back (with much less time between posts this time!) with two fun and colorful versions of this card layout. It took me a long time to get comfortable designing my own cards, but the accomplishment and happiness I feel after I do create my own card is definitely worth the effort! Scroll down to the bottom of this post (after all the pictures) and you’ll find my YouTube video for these cards.

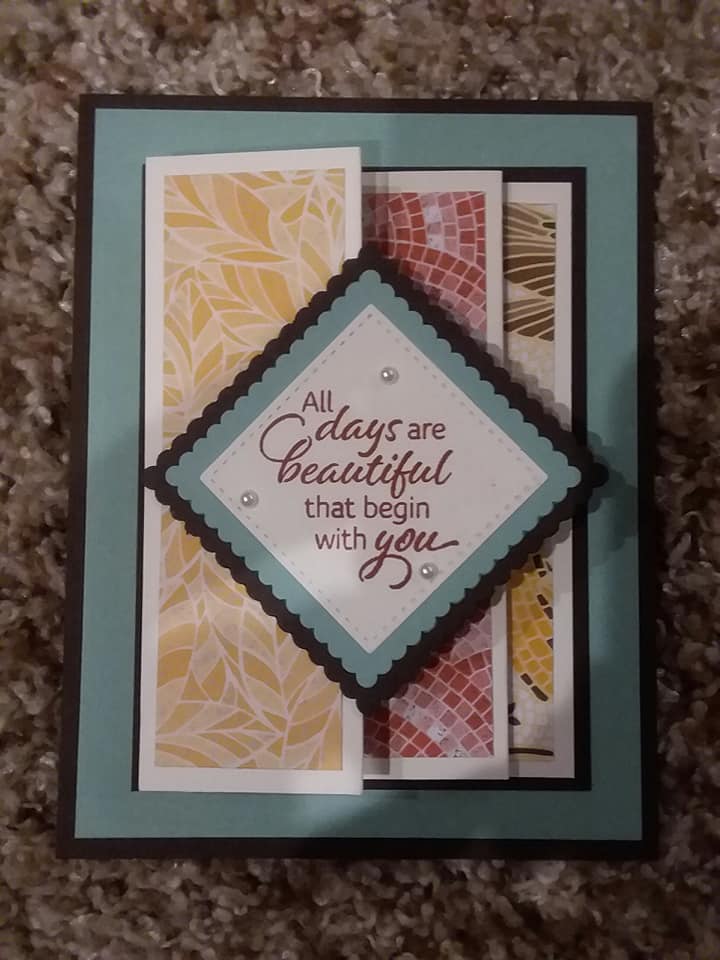
I really love both versions of this card. The card with the yellow (So Saffron) flower is so bright and cheery and the card with the pink (Petal Pink) flower on the right is so elegant and soothing. Besides the difference in color scheme there is also a slight variation in the dimensions. This is due to a cutting error at first, but I actually like the wider border on the card with the pink flower.

**Note**: I don’t think it’s visible in the pictures, but I popped up the cardstock layers (So Saffron on the left, Whisper White on the Left) with Stampin’ Dimensionals and Mini Stampin’ Dimensionals. The video shows this much more clearly.


Although the Floral Essence Stamp Set is the core of this suite, I really feel the Perennial Essence Designer Series Paper is the star of the Perennial Essence Suite. You can check out all the amazing designs at this link.


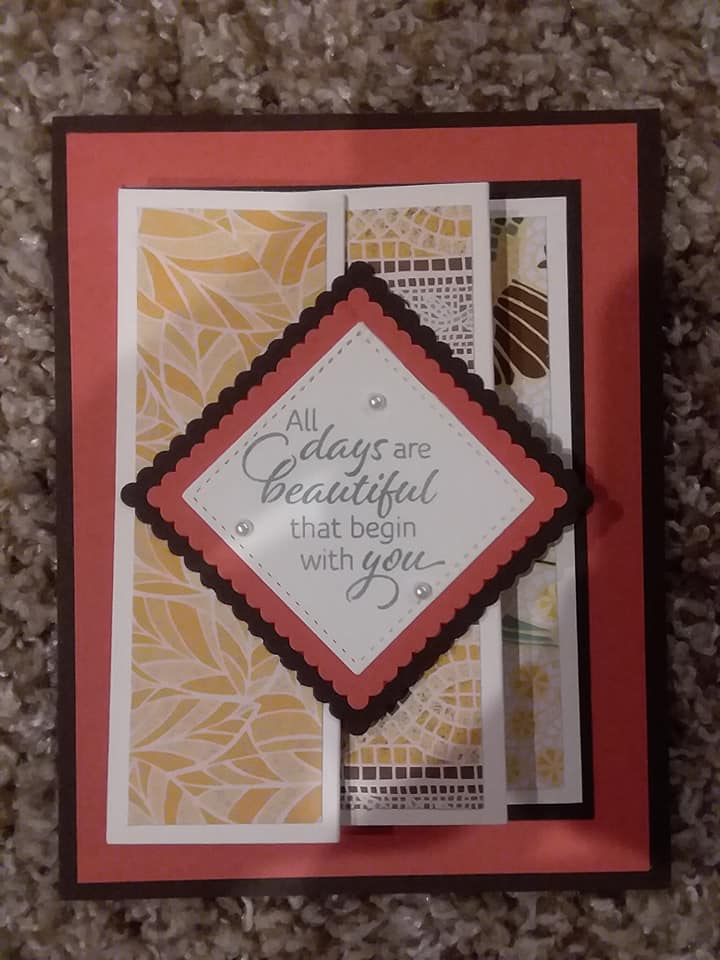
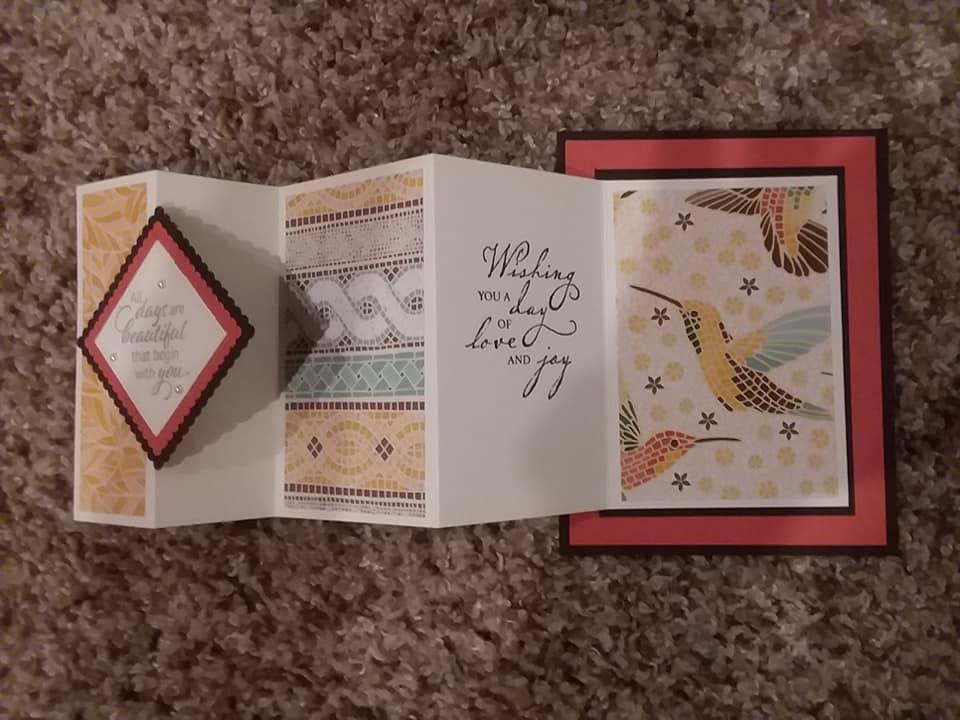
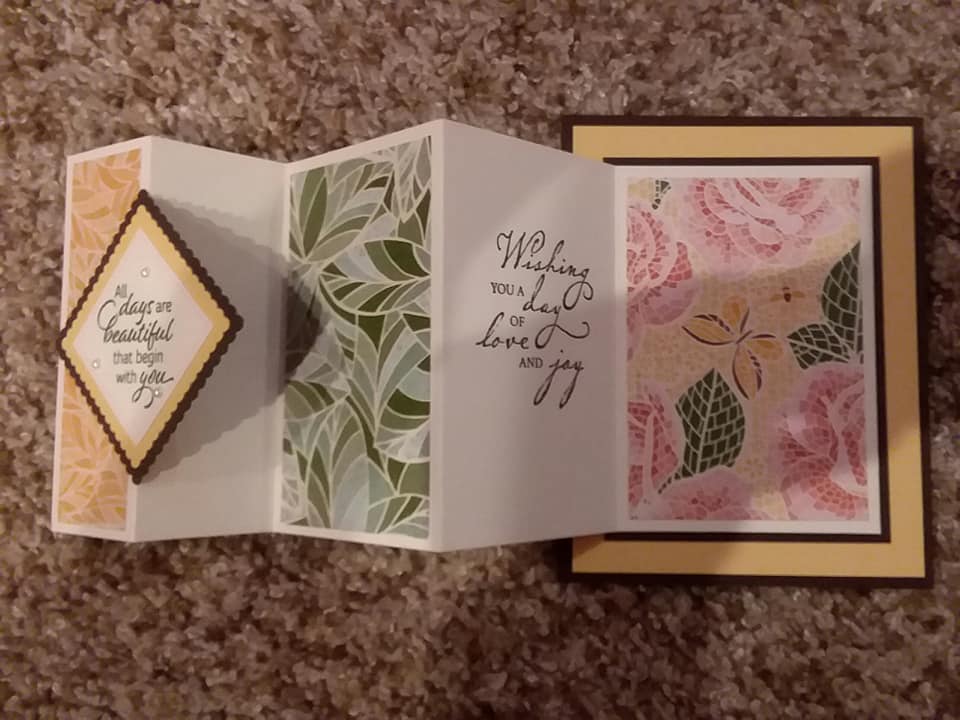
I wanted to make sure there was a picture that really showed the shine of the gold embossing powder on this version. I love the simple stamping on the inside of the card. Just a little something to pretty it up. 🙂 The stamp pads I used on this card were Versamark (for the embossing, So Saffron (flowers), Soft Suede (flower centers and sentiment).


Dimensions (Card with Soft Suede Base)

  • Base = 8 1/2 x 5 1/2″ (Scored on the long side at 4 1/4″)
  • So Saffron cardstock layer = 4 x 5 1/4″
  • DSP Layer = 3 7/8 x 5 1/8″
  • Sentiment Banner = 3 x 3/4″ (Trim left end as needed)
  • Inside cardstock layer = 4 x 5 1/4″


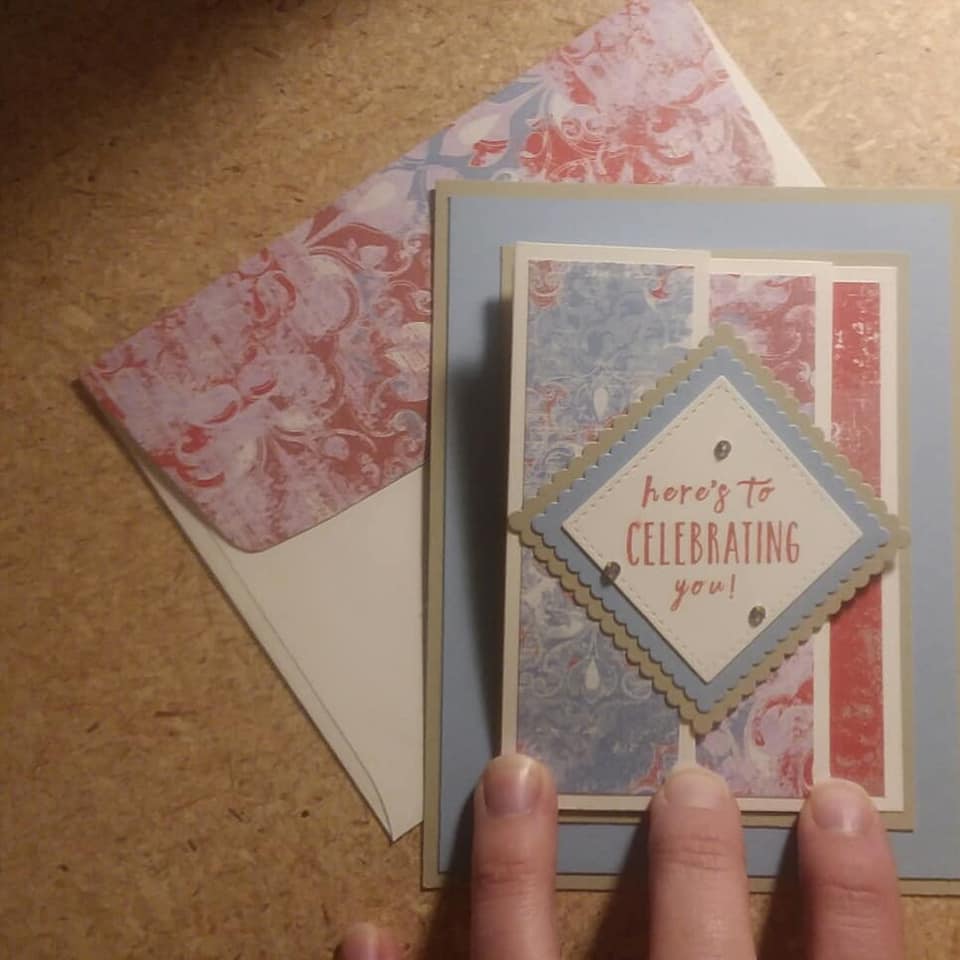
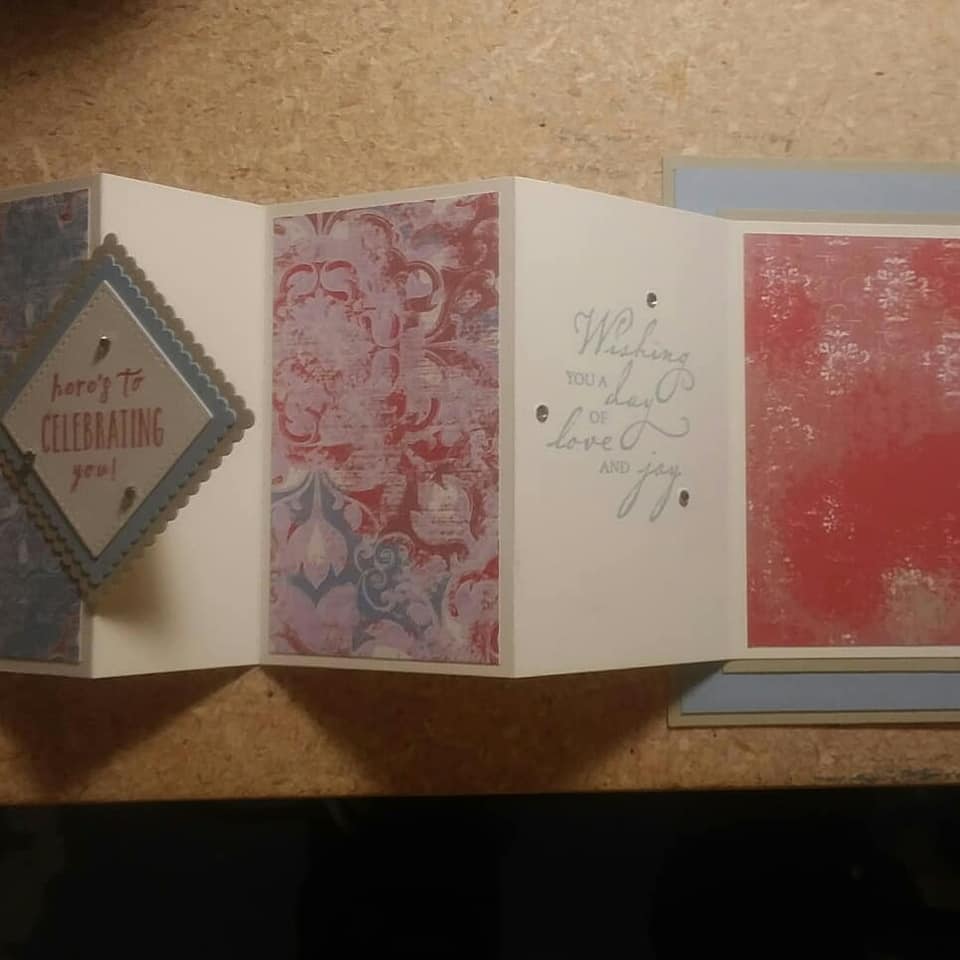
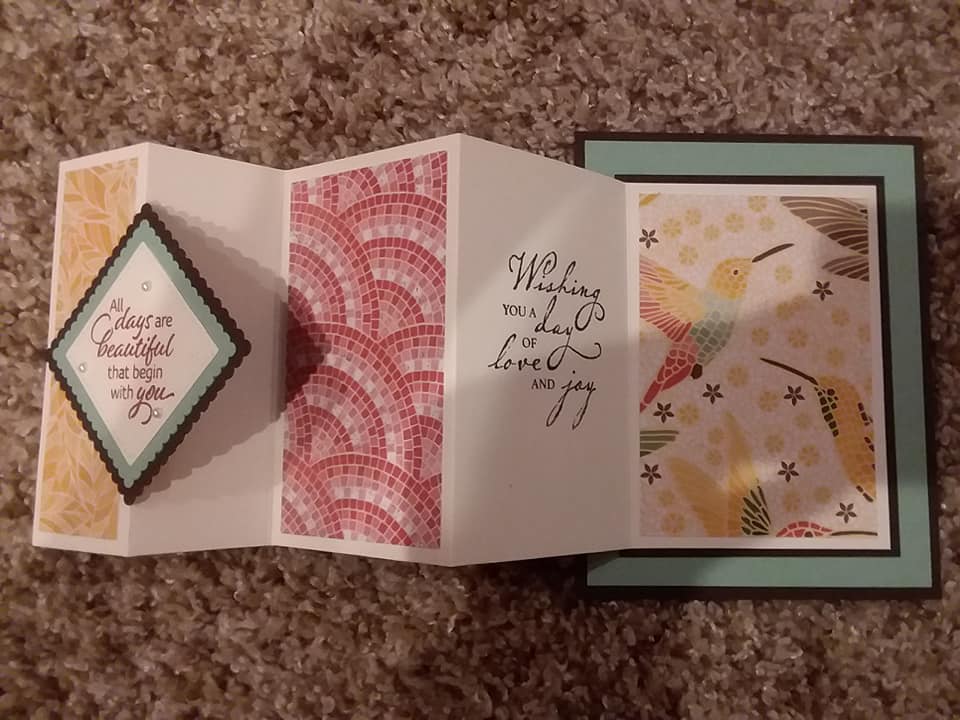
I love how the silver embossing powder really softened the look of this version. It goes so well with the blues and purples in the DSP. The stamp pads I used on this card were Versamark (for embossing), Petal Pink (flowers) and Mossy Meadow (flower centers and sentiment).


Dimensions (Card with Mossy Meadow Base)

  • Base = 8 1/2 x 5 1/2″ (Scored on the long side at 4 1/4″)
  • Whisper White cardstock layer = 3 7/8 x 5 1/8″
  • DSP Layer = 3 3/4 x 5″
  • Sentiment Banner = 3 x 3/4″ (Trim left end as needed- this sentiment is shorter than above so you could probably do 2 1/2 x 3/4″)
  • Inside cardstock layer = 3 3/4 x 5″

I really hope you have been inspired by this card. There are so many possibilities with this suite! I’d love to hear what you think of my cards. Which one is your favorite? Please leave me a comment and let me know your thoughts. I truly appreciate your feedback. Just be kind please! 🙂

Related image

If you don’t already have a Stampin’ Up! demonstrator, I would love to be your go-to gor; for all your stamping needs. 🙂  You can shop my Online Store 24/7 . Please let me know if there’s anything I can do to aid in your crafting experience. I am more than happy to do what I can to help!

If you are local to Racine, WI I invite you to join my Stampin’ Up! Facebook page, Joyfully Inked Cards with Stephanie Mackey. You can find info about classes, card ideas, crafting tips, and SU! news and promotions. I am able to share a little more often on Facebook than I am in my blog or on YouTube.

Joyful stamping!

~Stephanie

Product List

Paper Snips

$10.00
Designer Series Paper Cards, Fun Fold Cards, Stampin' Up!, Tutorials

Multi-Panel Pullout Card with Woven Threads & Mosaic Mood DSP

Hello everyone! I’m jumping back into blogging after quite a break.  I’m going to try to blog whenever the Brewers have day games and it lines up with my daughters’ naps. 🙂

I have lots of new ideas to share with you since the recent release of the new 2019-2020 Stampin’ Up! Annual Catalog.  Check out these beautiful cards featuring the brand new Woven Threads Designer Series Paper (DSP) and Mosaic Mood Specialty DSP. I can’t get enough of this card design. I just saw it a few weeks ago on fellow SU! demo, LeeAnn Greff’s, blog.  Is it new to you as well? Leave me a comment on this post and let me know. I’m curious which of these 4 designs is your favorite as well.

You can find my YouTube video for this card at the end of this post.


The Woven Threads Designer Series Paper features all 5 of the new In Colors: Pretty Peacock, Terracotta Tile, Seaside Spray, Purple Posy, and Rococo Rose.  These In Colors will only be around for the next two years so you’ll want to snatch them up now to have the most time to create with them. I love that this catalog has a suite of products dedicated just to the new 2019-2021 In Colors. The Woven Threads DSP is part of that suite. Click here to check out that In Color Suite. 


It doesn’t show up very well in the pictures but several of the Mosaic Mood Specialty DSP designs have clear embossing. The shine is so pretty! Like all of the 12 x 12 DSP packs, the Mosaic Mood Specialty pack comes with 12 sheets of paper, 2 each of 6 double-sided designs. One of each side has the shiny, clear embossing over the designs.


Measurements

-Back panel & 3rd from back layer= 4 1/4″ X 5 1/2″ & 3 1/4″ X 4 1/2″ (also scrap for die cutting biggest scalloped square)

-2nd from back layer = 4″ X 5 1/4″ & 2 1/2″  (also scrap for die cutting second biggest scalloped square)

-Whisper White 4 1/4″ X 11″,  scored at 1 1/2″, 3″, 5 1/2″ & 8″,  2 1/4″ (also scrap for die cutting the sentiment square)

-DSP (from left to right) = 1 1/4″ X 4″,  2 1/4″ X 4″ & 2 3/4″ X 4″

*Note: All cards with the Mosaic Mood Specialty DSP have the inside sentiment stamped in Early Espresso Ink. The card with the So Saffron layer has Garden Green Ink for the front sentiment.  The card with the Mint Macaron layer has Cajun Craze for the front sentiment. The card with the Calypso Coral layer has Mint Macaron for the front sentiment.


A few weeks ago I made a video showing how to make this card. I would be honored if you would “like” this video and leave me a comment letting me know what you think of it. I also invite you to subscribe to my channel to be notified of future videos. I am just starting out with making card videos and am having a lot of fun. Thanks for checking that out!

Thanks so much for checking out this post. I hope you are inspired to make a multi-panel pullout card like this with your favorite new Designer Series Paper from the new catalog. You can check out all of the new DSP packs here.

Related image

If you don’t already have a Stampin’ Up! demonstrator, I would love to be your go-to girl for all your stamping needs. 🙂  You can shop my Online Store 24/7 . Please let me know if there’s anything I can do to aid in your crafting experience. I am more than happy to do what I can to help!

If you are local to Racine, WI I invite you to join my Stampin’ Up! Facebook page, Joyfully Inked Cards with Stephanie Mackey. You can find info about classes, card ideas, crafting tips, and SU! news and promotions. I am able to share a little more often on Facebook than I am in my blog or on YouTube.

Joyful stamping!

~Stephanie

Product List

Birthday Cards, Die Cut Cards, Stampin' Up!, Thank You Cards

Lemon Lime Twist Thank You Card & Berry Burst Birthday Card

Today I have the last two cards for you that I made for my new In Color class a few weeks ago. It has been fun to relive the class through blogging. Please leave me a comment and let me know if you’ve enjoyed these In Color cards and coordinating card box (see links near end of post). Scroll to the bottom of my this blog post for card dimensions and supply lists.Both of the cards today showcase the delightful Fresh Florals Designer Series Paper Stack. It was available in the last annual catalog in Night of Navy. I have very much enjoyed the makeover this DSP received in the new annual catalog. 🙂 Amazing how different it looks with these bright and cheery In Colors.


The inside of the card has a floral image from the Floral Phrases stamp set that coordinates with the Fresh Florals DSP stack as well as a sentiment from the Dragonfly Dreams stamp set.  I really like how well the floral image goes with this particular design from the DSP stack.I just adore the 1/2″ Finely Woven Ribbon that is available in all five new In Colors.  I am not very talented with bows so I am always trying to think of different ways to use ribbon that I like. This Lemon Lime card shows an alternative way I came up with to use the ribbon.  It’s like a ribbon shaped ribbon. lol Hard to describe.

I secured the ribbon to the back of the circles by laying down some Snail first and also putting some dimensionals down with half the dimensional on the ribbbon and half of it on the cardstock. This allowed me to pop the ribbon/circle piece up as well as really secure the ribbon in place.


If you’ve read some of my blog posts before, you may know that I love stamping on Stampin’ Up! envelopes – they are specifically designed for it! I thought I was a little inventive with this envelope stamping. 🙂 I stamped the floral image upside down on the front (still looks great, huh?) with the idea of the recipient’s address being written above it (where my watermark is). I stamped the floral image on the back of the envelope specifically where I did as if it was a wax seal. The elegance of this floral image made me think of the olden days when wax seals were used to ensure the letter arrived to the recipient unopened.


I CASEd (Copy And Share Everything) this Berry Burst Happy Birthday card from fellow demonstrator Jodi Reinert at Stampin’ With Jodi. I changed the punch and sentiment and added the bow.  The inside and outside sentiments are part of an awesome stamp set that carried over into the new annual catalog. The set is called “Better Together” and is a collection of coordinating sentiments for inside and outside the card. I have really been liking those lately.

These Bitty Bows are also available in all five of the new 2017-2019 In Colors. I can’t get enough of them! I also can’t get enough of the Stitched Shapes Framelits that first debuted as an early release to last year’s Holiday Catalog. It is a super versatile framelit set because it has four of each of the following shapes: squares, circles, and ovals.  A great buy if you can’t afford all of the layering framelits sets Stampin’ Up! offers. I popped the die cut up over the ribbon with Stampin’ Dimensionals.


Click the links to see the past posts on the Tranquil Tide card, Powder Pink card, and the Fresh Fig card. I also created a card holder box that coordinates with these 2017-2019 In Color Cards.


During the month of August demonstrators get to preorder from the Holiday Catalog. But it’s not just demonstrators who get to have all the fun – you too can preorder the “Carols of Christmas” stamp set and coordinating “Card Front Builder Thinlits” dies (separately or in a bundle), through the end of August. You can even use your Bonus Days coupons that you earned in July towards this stamp set and die set. The Holiday Catalog goes live for customers September 1st.

Click the link for a VIDEO showcasing the “Carols of Christmas” bundle.


If you would like to buy any Stampin’ Up products, you can shop on line 24/7 in my online store HERE, or get in touch with me at stephaniemackey2012@gmail.com.  I would love to help you in whatever way I can.

I hope you are inspired to use ribbon in different ways on your projects and to pull out that beautiful DSP you’ve purchased and to actually use it!

Joyful stamping!

~Stephanie

Dimensions for Lemon Lime Twist Card:

  • Card base – standard A2 size (5 1/2 x 8 1/2″, scored in half at 4 1/4″)
  • DSP layer – 5 1/4 x 4 ″
  • (Inside) Whisper White layer – 5 1/4 x 4″

Supplies for Lemon Lime Twist Card:

  • All Things Thanks Stamp Set (outside sentiment)
  • Floral Phrases Stamp Set (floral image on envelope and inside card)
  • Dragonfly Dreams Stamp Set (inside sentiment)
  • Fresh Florals Designer Series Paper Stack
  • Layering Circles Framelits Dies (4th smallest regular circle and 4th smallest of scalloped circles)
  • Lemon Lime Twist 1/2″ Finely Woven Ribbon
  • Lemon Lime Twist Classic Stampin’ Pad
  • Cardstock: Lemon Lime Twist, Whisper White
  • Adhesive: Snail & Stampin’ Dimensionals

Dimensions for Berry Burst Card

  • Card base (Thick Whisper White) – standard A2 size (5 1/2 x 8 1/2″, scored in half at 4 1/4″)
  • Berry Burst layer – 5 1/4 x 4 ″
  •  Whisper White layer – 5 x 3 3/4″ (This layer does not show: it is used to line up the DSP strips and is completely covered by them.)
  • DSP strips: 1 1/4 x 3 3/4″

Supplies for Berry Burst Card

  • Better Together Stamp Set
  • Stitched Shape Framelits Dies
  • Fresh Florals DSP Stack
  • Cardstock: Thick Whisper White, Whisper White, Berry Burst
  • Berry Burst Twist 1/2″ Finely Woven Ribbon
  • Berry Burst Classic Stampin’ Pad
  • 2017-2019 In Color Bitty Bows
  • Adhesive: Snail & Stampin’ Dimensionals
Stampin' Up!, Sympathy Cards

Sympathy Card with “Fresh Fig” Ink and Ribbon

When I was designing the cards for this new In Color Card Collection (scroll down this post to see all five cards and click here for the coordinating card box) I was aiming for a variety of card types.  I knew I wanted to have a sympathy card in the mix and Fresh Fig seemed like it could be a consoling color when paired with the right stamps and card design. I think Tranquil Tide would be my other choice for a sympathy card.

 I love the 1/2″ Finely Woven Ribbon that is available in all five of the 2017-2019 In Colors. Thanks to fellow demonstrator, Josee Smuck, for the ribbon graphic below.   I didn’t want to get too flowery with a big ribbon on this sympathy card, so I opted for a more subtle option and ran it along the middle of the card. I really like the way it provides a darker contrast and an anchoring point for the sentiment, which I popped up with Stampin’ Dimensionals.

It has been awhile since I’ve created my own DSP (Designer Series Paper) like this. I took the large flower image from the Watercolor Words stamp set and stamped it repeatedly to create a gorgeous background.   It really is a great way to stretch your stamps.  I stamped on the envelope flap as well, something I try to do as much as possible – the outside can be pretty too!

The Watercolor Words stamp set  has some beautiful large sentiments and a few more large images that could also work well for creating your own DSP.

The sentiments on the front and inside of my card come from a set that carried over from the last annual catalog (and I’m glad it did!) called “Better Together”. It is full of coordinating inside/outside sentiments.

I have been using the “Better Together” stamp set a lot. Although I still write a short personal message in every card I send, it helps to have a little something stamped to start you off. It looks pretty too. 🙂 This stamp set has been a great investment – it’s so versatile with sentiments for so many occasions: New Baby, Birthday, Sympathy, Wedding, Just a Note, and Christmas, as well as cute coordinating graphic stamps.


Check back in a few days to see the next card from the 2017-2019 In Color Collection (I’m thinking I will post the last two, Lemon Lime Twist and Berry Burst, together) or subscribe to my blog by email so as not to miss a post (see the “Follow My Blog by Email” section near the top right of my blog).Click here to see the past posts on the Tranquil Tide Card and the Powder Pink Card.


Bonus Days are back!...Stampin’ Up!® - Stamp Your Art Out! www.stampyourartout.comYou earned in July, and now it’s time to redeem in August. 🙂 Don’t forget to redeem your Bonus Days coupons before the end of the month.


Today is the first day that demonstrators get to pre-order from the Holiday Catalog. But it’s not just demonstrators who get to have all the fun – you too can pre-order the Carols of Christmas stamp set and coordinating Card Front Builder Thinlits dies, today through the end of August. You can even use your Bonus Days coupon towards this stamp set and die set.


If you would like to buy any Stampin’ Up products, you can shop on line 24/7 in my online store HERE, or get in touch with me at stephaniemackey2012@gmail.com.  I would love to help you in whatever way I can.

I hope you are inspired to create some of your own DSP with stamps – you can pick any of our 50 colors for some real personalization!

Joyful stamping!

~Stephanie

Dimensions:

  • Card base – standard A2 size (5 1/2 x 8 1/2″, scored in half at 4 1/4″)
  • Fresh Fig layer – 5 1/2 x 4 1/4″
  • Whisper White stamped layer – 5 3/8 x 4 1/8″

Supplies:

  • Watercolor Words Stamp Set
  • Better Together Stamp Set
  • Fresh Fig 1/2″ Finely Woven Ribbon
  • Fresh Fig Classic Stampin’ Pad
  • Cardstock: Thick Whisper White, Fresh Fig, Whisper White
  • Adhesive: Snail & Stampin’ Dimensionals
Thank You Cards

Tranquil Tide Thanks Card

Here is the second card in the collection of In Color cards I created for my In Color card class. Click here to see the first card in the collection and here to see the coordinating card box.   Scroll down to see all five cards I created. This gorgeous new In Color is called Tranquil Tide. Makes you feel calm picturing an peaceful ocean this color.
The Detailed Floral Thinlits die set makes it so easy to create elegant cards. I chose not to use the edgelit piece to cut out the detailed pieces and instead just ran the two detailed pieces through the Big Shot together to get this beautiful laser cut look.Here is a close up of the intricate die cutting. It’s so much fun to see how this die cut looks used with different colors of cardstock.   If I have a chance to create this card in the other new In Colors, I’ll be sure to post them. I really like these matching inside/outside stamp sentiments.  I’ve been doing a lot of inside sentiment stamping lately.  It’s fun to see that pop of color inside the card as well as all the gorgeousness happening on the outside. 🙂


Check back in a few days to see the next card from the 2017-2019 In Color Collection (I’m thinking it will be the Fresh Fig card) or subscribe to my blog by email so as not to miss a post (see the “Follow My Blog by Email” section near the top right of my blog).

Below you will find information on two specials running this month -there are just 2 days left to take advantage of them. Click here to be redirected to a previous blog with more detailed information.


–> Bonus Days

For every $50 you spend in July, you earn a $5 coupon to spend in August.

Bonus Days are back!...Stampin’ Up!® - Stamp Your Art Out! www.stampyourartout.com

  • There is no limit to the number of coupons participants can receive per order or throughout the duration of the promotion.
  • An email address is required to participate; Bonus Days coupon codes can only be delivered via email.

–> Christmas in July for new demonstrators!

Purchase the Starter Kit in July for $99 ($175 value) to join my community of Stampin’ Up!® demonstrators and you will receive the Carols of Christmas stamp set AND Essentials Gift Pack of Tools for FREE (an extra $72 value)!It’s Christmas in July!...Stampin’ Up!® - Stamp Your Art Out! www.stampyourartout.com

Essentials Gift Pack:

  • 118485 – D Block (x2)
  • 130148 – Grid Paper
  • 103579 – Paper Snips
  • 104332 – SNAIL Adhesive
  • 102300 – Bone Folder


If you would like to buy any Stampin’ Up products, you can shop on line 24/7 in my online store HERE, or get in touch with me at stephaniemackey2012@gmail.com.  I would love to help you in whatever way I can.

I hope you are inspired to create with some intricate dies – they make it so easy to create elegant cards in just a few minutes.

Joyful stamping!

~Stephanie

Dimensions:

  • Card base – standard A2 size (5 1/2 x 8 1/2″, scored in half at 4 1/4″)
  • Tranquil Tide layer – 5 1/2 x 4 1/4″

Supplies:

  • Floral Phrases Stamp Set
  • Detailed Floral Thinlits Dies
  • Cardstock: Thick Whisper White & Tranquil Tide
  • Ink: Versamark & Tranquil Tide Classic Stampin’ Pad
  • Tools: Big Shot Machine & Heat Tool
  • Adhesive: Multipurpose Liquid Glue
  • Other: White Stampin’ Emboss Powder
2016-2018 In Color Cards, All Occasion Cards, Birthday Cards, Congratulations Cards, Die Cut Cards, Just Because Cards, Stampin' Up!, Thank You Cards

Color Blocking with In Colors

Hello everyone! A few weeks ago I held a New Catalog Launch party. One of the Make & Takes was a color blocking card with the new 2016-2018 In Colors. I had a few extra cards prepped and thought I would have some fun coming up with different ways to finish off this card using the color blocking with the In Colors as the starting point. The strips of cardstock are 3 3/4 x 5″.

Leave me a comment below and let me know which of the five versions is your favorite!

Die Cut

Card #1: Flourish Thinlits and Floral Phrases stamp set.

(For a little extra dimension and to make the spacing easier I glued the colored cardstock strips to a piece of 4 x 5 1/4″ piece of Whisper White carstock and then adhered it to the card base.)

Hip Hip Hooray

Card #2: Party Pop Ups Thinlits

Embossed

Card #3: Gold Embossed with Floral Phrases stamp set

Tone on Tone

Card #4: Tone-on-tone with Kinda Eclectic Stamp Set

(Sweet Sugarplum banner 3 5/8 x 1 3/4″, Whisper White banner 3 3/8 x 1″)

Mini Treat Bag

Card #5: Mini Treat Bag Thinlits Dies & Rhinestone Basic Jewels

(3 1/2 x 1/2″ banner, it is smaller than the die)

I hope you are inspired to try your hand at some color blocking, especially with the new 2016-2018 In Colors. They look awesome together!

Joyful stamping!

~Stephanie

Supplies**: Whisper White Thick Cardstock, Peekaboo Peach Cardstock, Emerald Envy Cardstock, Flirty Flamingo Cardstock, Sweet Sugarplum Cardstock, Dapper Denim Cardstock, Snail Adhesive, Stampin’ Trimmer.

**All supplies can be purchased from my online store. If you would like to place an order (and it is under $150) I invite you to enter 4ZN3MB4Z in the Hostess Code box. Thank you for your support!

All Occasion Cards, Just Because Cards, Stampin' Up!, Techniques

My Ink Smooshing “Adventure”

Hello everyone! I’ve got another watercolor technique for today’s card. The technique I used is called “ink smooshing”. It’s a great one for watercoloring large areas and backgrounds as well as die cuts (featured in my previous post.)

Ink Smooshing

This color combination of Tempting Turquoise, Real Red, and Pumpkin Pie made me think of sunsets, California, and vacation. 🙂 I was inspired to choose this adorable sentiment from the “Go Global” stamp set (see below).

Steps for “Ink Smooshing”:

  1. Apply ink pads directly to large clear block (Block E in this example).
  2. Spray with water using a spray bottle from a distance of about 12 inches.
  3. Place wetted block, ink side down, on your cardstock (this layer is 4″ x 5 1/4″). Press firmly.
  4. Remove block and use the Heat Tool to dry both sides.

Ink Smooshing Close Up

I love the little black accent hearts against the watercolor background. They were punched out with the Hearts Border Punch. It makes great borders AND great confetti!

I hope you are inspired to do some “ink smooshing”. It makes for some WOW cards, for sure! If you like this “Go Global” stamp set, be sure to get it now before it retires on May 31st. I would be honored to have you as a customer. If you choose to purchase from my Online Store, I invite you to use the Hostess Code RBTK9C7N when placing your order.

Joyful stamping!

~Stephanie

Supplies*: Whisper White Thick Cardstock, Basic Black Cardstock, Tempting Turquoise Classic Stampin’ Pad, Real Red Classic Stampin’ Pad, Pumpkin Pie Classic Stampin’ Pad, Memento Tuxedo Black Ink Pad, Hearts Border Punch, Go Global Stamp Set, Clear Block E, Heat Tool, Glue Dots, Snail, Stampin’ Trimmer.

*All supplies can be purchased from my Online Store.

Just Because Cards, Sympathy Cards

Swallowtail Sympathy Card with Watercolor Emboss Resist Technique

Hello everyone! Today’s card is dominated by a bold, large butterfly with subtle watercoloring. I haven’t done much watercoloring lately, but I recently held a watercolor class and got back into it. My next few cards will feature more watercolor techniques.

This card features the emboss resist technique, which features watercoloring over an embossed image.

Watercolor Butterfly

This butterfly in these colors just really spoke “sympathy card” to me so I went with that. I first embossed the butterfly with Black Stampin’ Emboss Powder. I did the butterfly’s body in Night of Navy and then worked from the inside of the wings to the outside with Perfect Plum, Night of Navy, Island Indigo, and then Perfect Plum again.

The aquapainters worked great for this card.. I tried not to go too heavy with the water so that the cardstock wouldn’t get to soggy and rip. I dried the cardstock afterwards with the heat tool before adhering to help with warping. Just be sure to hit it from the back so you don’t overheat the embossing powder.

I hope you inspired to try your hand at some watercoloring. It will be sure to impress the card’s recipient. 🙂

Joyful stamping!

~Stephanie

*Supplies Used: Basic Black cardstock, Whisper White cardstock, Black Stampin’ Emboss Powder, Versamark Ink Pad, Heat Tool, Swallowtail Stamp Set, Crazy About You Stamp Set (sentiment), Island Indigo Classic Stampin’ pad, Perfect Plum Classic Stampin’ pad, Night of Navy Classic Stampin’ pad, Aqua Painters, Dimensionals, Snail, Paper Snips.

*All supplies available from my online store.


All Occasion Cards, Just Because Cards

Oh Hello, Butterfly!

Hello everyone! I really had fun creating today’s card. It was one of those cards where I wanted to use certain colors together (Gold & Calypso Coral) so I created a card around them. I am really happy with the result. 🙂

Gold & Calypso Butterfly

I created this card about a week ago but didn’t have a chance to post it until today. I’m sorry to tell you that I used a Sale-A-Bration stamp set that retired on March 31st. You could probably find it on ebay if you REALLY want it, or you can substitute the “World of Dreams” stamp set from p. 95 of the Annual Catalog.


World of Dreams stamp set, P. 95

I used the second largest Deco Labels Framelits to cut out the gold embossed flowers. I wrapped the Gold Baker’s twine around the front flap; I didn’t mind that the twine will show on the inside of the card. I kinda like the effect. 🙂 I also embossed the sentiment in gold. The Whisper White banner is  2″ x 1/2″ and the gold glimmer banner is 2 1/4″ x 3/4″. I flagged the ends with Paper Snips.

Gold & Calypso ButterflyLeft

I absolutely love using the Butterflies Thinlits Dies with glimmer paper. It’s a double wow factor! I also had some fun creating my own stamped background. I stamped on the Calypso Coral cardstock with Calypso Coral ink for that lovely tone-on-tone effect.

Gold & Calypso ButterflyRight

I hope you are inspired to do some embossing and die cutting. They are sure to impress and delight the card’s recipients!

Joyful stamping!

~Stephanie

Supplies Used*: Flowering Fields stamp set (retired), Honeycomb Happiness stamp set (retired), Calypso Coral Classic Stampin’ Pad, Calypso Coral cardstock, Whisper White cardstock, Gold Glimmer Paper, Gold Baker’s Twine, Deco Label Framelits, Butterflies Thinlits Dies, Versamerk Ink, Gold Stampin’ Emboss Powder, Heat Tool, Stampin’ Dimensionals, Paper Snips, Stampin’ Trimmer.

*All supplies can be purchased from my online store.

Birthday Cards, Stampin' Up!

Butterfly Birthday

Hello everyone! Here is a card I’ve been meaning to share for awhile. I CASEd it from Lisa Young, another Stampin’ Up! demonstrator. You can view the original card on her blog. As you can see, I added the Bermuda Bay layer behind the stamped layer. I also used the Bitty Butterfly punch because the embosslits that Lisa used are retired. There are a few other differences, but I’ll let you pick them out yourself. 🙂

Butterflies

I just love this sentiment stamp set, “Happy Birthday Everybody”. As you can see, there are all sorts of sentiments for a variety of birthday cards. My husband said I would only be able to use the “to a wonderful man” for him. 🙂 I thought that could work for dads and grandpas too.

ButterfliesInside

I thought it was fun stamping the big sentiment on the inside of the card. Seemed a little “outside of the box” in a fun way.

ButterfliesLeft

The Whisper White stamped layer is 3″ x 4 1/4″ and the Bermuda Bay layer is 3 1/8″ x 4 3/8″. The card base is 4 1/4″ x 11″ scored at 5 1/2″. I used Snail Adhesive to adhere the Whisper White layer to the Bermuda Bay layer. Then I used Stampin’ Dimensionals to pop up the Bermuda Bay layer over the card base.

ButterfliesRight

I hope you are inspired to create with this amazing sentiment stamp set. It is a host stamp set, which individual customers can get by ordering $150 of product and then using their host rewards (a $150 order qualifies as a workshop and earns host rewards) to purchase this “Happy Birthday Everyone” host stamp set.

If you’d like to place an order, I’d love to be your Stampin’ Up! demonstrator. 🙂 You can click the link to my online store in the menu bar on the right. Keep reading to see how this $150 order would also earn you more FREE product!

We are still celebrating Stampin’ Up!’s biggest sale of the year, Sale-A-Bration where each $50 order earns you a free product from the Sale-A-Bration Catalog or Sale-A-Bration Brochure. With a $150 order you would choose 3 FREE items!

Joyful stamping!

~Stephanie

Supplies Used*: Happy Birthday Everyone stamp set, Sheltering Tree stamp set, Bermuda Bay Classic Stampin’ Pad, Early Espresso Classic Stampin’ Pad, Whisper White Thick Cardstock, Bermuda Bay Cardstock, Pink Pirouette Cardstock, Bitty Butterfly Punch, Rhinestone Basic Jewels, Stampin’ Dimensionals, Glue Dots, Snail Adhesive, Stampin’ Trimmer.

*All supplies can be purchased in my online store,