All Occasion Cards, Stampin' Up!, Techniques

Ink Smooshing Take Two

Hello everyone! When I was working on the card for my last post, My Ink Smooshing “Adventure”, I made two background pieces. I thought it would be fun to try this card again and put a different spin on it.

Ink Smooshing Black Background

I really like how the rainbow of inks contrasts against the black background and heart accents. I didn’t want to go too dark though, so I went with white for the butterfly focal point.

Ink Smooshing Black Background Close Up

I love the splotches of white along the right side of the technique piece. I think it adds a lot of interest to the card, gives it a little bit of a grungy chic look. That’s the magic of ink smooshing: you know every project will be unique!

Ink Smooshing Black Background Side

I wanted to keep with the multi color theme on the inside of the card, so I used the corresponding Stampin’ Write Markers to color on the sentiment stamp. I am still loving the combo of the black with the rainbow.

IMG_3931

I hope you are inspired to try some ink smooshing and see what unique results YOU get. 🙂  See my last post, My Ink Smooshing “Adventure” , for directions on the ink smooshing technique.

Joyful stamping!

~Stephanie

Supplies**: Happy Birthday Everyone stamp set,  Whisper White cardstock, Basic Black cardstock, Tempting Turquoise Classic Stampin’ Pad, Real Red Classic Stampin’ Pad, Pumpkin Pie Classic Stampin’ Pad, Temping Turquoise Stampin’ Write Marker, Real Red Stampin’ Write Marker, Pumpkin Pie Stampin’ Write Marker, Clear Block E, Hearts Border Punch, Big Shot, Butterflies Thinlits Dies, Happy Birthday Everyone stamp set, Glue Dots, Snail, Stampin’ Trimmer.

**All supplies can be purchased at my Online Store. I would be honored to have you as a customer and I invite you to use the Hostess Code RBTK9C7N when you place your order.

All Occasion Cards, Just Because Cards, Stampin' Up!, Techniques

My Ink Smooshing “Adventure”

Hello everyone! I’ve got another watercolor technique for today’s card. The technique I used is called “ink smooshing”. It’s a great one for watercoloring large areas and backgrounds as well as die cuts (featured in my previous post.)

Ink Smooshing

This color combination of Tempting Turquoise, Real Red, and Pumpkin Pie made me think of sunsets, California, and vacation. 🙂 I was inspired to choose this adorable sentiment from the “Go Global” stamp set (see below).

Steps for “Ink Smooshing”:

  1. Apply ink pads directly to large clear block (Block E in this example).
  2. Spray with water using a spray bottle from a distance of about 12 inches.
  3. Place wetted block, ink side down, on your cardstock (this layer is 4″ x 5 1/4″). Press firmly.
  4. Remove block and use the Heat Tool to dry both sides.

Ink Smooshing Close Up

I love the little black accent hearts against the watercolor background. They were punched out with the Hearts Border Punch. It makes great borders AND great confetti!

I hope you are inspired to do some “ink smooshing”. It makes for some WOW cards, for sure! If you like this “Go Global” stamp set, be sure to get it now before it retires on May 31st. I would be honored to have you as a customer. If you choose to purchase from my Online Store, I invite you to use the Hostess Code RBTK9C7N when placing your order.

Joyful stamping!

~Stephanie

Supplies*: Whisper White Thick Cardstock, Basic Black Cardstock, Tempting Turquoise Classic Stampin’ Pad, Real Red Classic Stampin’ Pad, Pumpkin Pie Classic Stampin’ Pad, Memento Tuxedo Black Ink Pad, Hearts Border Punch, Go Global Stamp Set, Clear Block E, Heat Tool, Glue Dots, Snail, Stampin’ Trimmer.

*All supplies can be purchased from my Online Store.

All Occasion Cards, Just Because Cards

Tie Dye Butterfly & Retiring Products

Farewell

Hello everyone! I’ve got another watercolor card today.  Before I get to the card I wanted to let you know that the Retiring List was announced yesterday. These products will only be available until May 31st, the last day to purchase from the Annual Catalog as well as the Occasions Catalog.  The products on the Retiring List are offered at discounts of up to 50%! Get them before they are gone! Availability may become limited as we near the end of May. If you would like to order, you can do in my online store (see link to right).  I invite you to enter the Hostess Code RBTK9C7N when you are placing your order. Thank you for your support!


My last card was a watercolor embossed resist butterfly. This time I did a watercolor butterfly die cut. I guess, for me, watercolor and butterflies go together. 🙂 They are both fun and spring-like.

Watercolor Butterfly Die Cut Side

Steps for watercoloring the butterfly die cut: 

  1. Take a large clear block and apply the Classic Stampin’ Pads directly to the clear block. Make sure you have a big enough area on the clear block inked up so that all parts of the butterfly will be in ink.
  2. Spray water on the inked up clear block. I sprayed from about a foot away. You want the colors to run together slightly, but not a ton.
  3. Dip the butterfly in the ink. Try to lay it so that you get a good amount of all three colors. I tapped gently over the butterfly die cut with a tissue so I could press all parts down without inking up my fingers. I really liked that there was still some white space on the butterfly die cut.
  4. Carefully pick up the butterfly and let dry. You could use a heat gun to speed up the process.

Watercolor Butterfly Die Cut

I sponged over the embossing for a shabby chic look. Both the card stock and the ink I used for sponging are Old Olive. I like the subtle tone on tone look – makes me think of a mossy brick wall. 🙂 I used glue dots to adhere the butterfly to the cardstock. I used the fine tip glue pen for adhering the “hello” thinlit to the cardstock. It worked amazingly well!

I hope you are inspired to try watercoloring some die cuts. You’ll get different results everytime!

Joyful stamping!

~Stephanie

Supplies*: Old Olive Cardstock, Whisper White Cardstock, Old Olive Classic Stampin’ Pad, Melon Mambo Classic Stampin’ Pad, Bermuda Bay Classic Stamping’ Pad, Pumpkin Pie Classic Stampin’ Pad, Big Shot, Butterflies Thinlits Dies, Hello You Thinlits Dies, Brick Wall Textured Impressions Embossing Folder, Wink of Stella – Clear, Fine Tip Glue Pen, Rhinestones Basic Jewels, Glue Dots, Stampin’ Sponges, Clear Block E or F, Stampin’ Trimmer, Paper Snips.

*All supplies can be purchased from my Online Store. 

Just Because Cards, Sympathy Cards

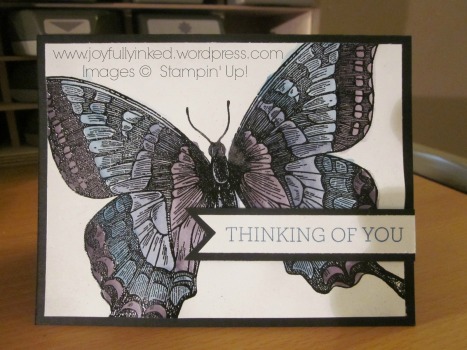
Swallowtail Sympathy Card with Watercolor Emboss Resist Technique

Hello everyone! Today’s card is dominated by a bold, large butterfly with subtle watercoloring. I haven’t done much watercoloring lately, but I recently held a watercolor class and got back into it. My next few cards will feature more watercolor techniques.

This card features the emboss resist technique, which features watercoloring over an embossed image.

Watercolor Butterfly

This butterfly in these colors just really spoke “sympathy card” to me so I went with that. I first embossed the butterfly with Black Stampin’ Emboss Powder. I did the butterfly’s body in Night of Navy and then worked from the inside of the wings to the outside with Perfect Plum, Night of Navy, Island Indigo, and then Perfect Plum again.

The aquapainters worked great for this card.. I tried not to go too heavy with the water so that the cardstock wouldn’t get to soggy and rip. I dried the cardstock afterwards with the heat tool before adhering to help with warping. Just be sure to hit it from the back so you don’t overheat the embossing powder.

I hope you inspired to try your hand at some watercoloring. It will be sure to impress the card’s recipient. 🙂

Joyful stamping!

~Stephanie

*Supplies Used: Basic Black cardstock, Whisper White cardstock, Black Stampin’ Emboss Powder, Versamark Ink Pad, Heat Tool, Swallowtail Stamp Set, Crazy About You Stamp Set (sentiment), Island Indigo Classic Stampin’ pad, Perfect Plum Classic Stampin’ pad, Night of Navy Classic Stampin’ pad, Aqua Painters, Dimensionals, Snail, Paper Snips.

*All supplies available from my online store.


All Occasion Cards, Just Because Cards

Oh Hello, Butterfly!

Hello everyone! I really had fun creating today’s card. It was one of those cards where I wanted to use certain colors together (Gold & Calypso Coral) so I created a card around them. I am really happy with the result. 🙂

Gold & Calypso Butterfly

I created this card about a week ago but didn’t have a chance to post it until today. I’m sorry to tell you that I used a Sale-A-Bration stamp set that retired on March 31st. You could probably find it on ebay if you REALLY want it, or you can substitute the “World of Dreams” stamp set from p. 95 of the Annual Catalog.


World of Dreams stamp set, P. 95

I used the second largest Deco Labels Framelits to cut out the gold embossed flowers. I wrapped the Gold Baker’s twine around the front flap; I didn’t mind that the twine will show on the inside of the card. I kinda like the effect. 🙂 I also embossed the sentiment in gold. The Whisper White banner is  2″ x 1/2″ and the gold glimmer banner is 2 1/4″ x 3/4″. I flagged the ends with Paper Snips.

Gold & Calypso ButterflyLeft

I absolutely love using the Butterflies Thinlits Dies with glimmer paper. It’s a double wow factor! I also had some fun creating my own stamped background. I stamped on the Calypso Coral cardstock with Calypso Coral ink for that lovely tone-on-tone effect.

Gold & Calypso ButterflyRight

I hope you are inspired to do some embossing and die cutting. They are sure to impress and delight the card’s recipients!

Joyful stamping!

~Stephanie

Supplies Used*: Flowering Fields stamp set (retired), Honeycomb Happiness stamp set (retired), Calypso Coral Classic Stampin’ Pad, Calypso Coral cardstock, Whisper White cardstock, Gold Glimmer Paper, Gold Baker’s Twine, Deco Label Framelits, Butterflies Thinlits Dies, Versamerk Ink, Gold Stampin’ Emboss Powder, Heat Tool, Stampin’ Dimensionals, Paper Snips, Stampin’ Trimmer.

*All supplies can be purchased from my online store.