Birthday Cards, Congratulations Cards, Designer Series Paper Cards, Stampin' Up!

DSP Strips with Affectionately Yours Paper

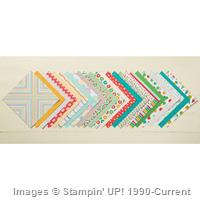
Hello everyone! Today’s card is a bright one. It features the Affectionately Yours Specialty Designer Series Paper (DSP) and comes with a picture tutorial.  This layout is awesome for showcasing all of the beautiful designs of a DSP pack. I am excited to try it with some of the other awesome DSP packs in the 2016-2017 Stampin’ Up! Annual Catalog. 

Stripes Angle


  1. Begin by cutting some strips of DSP, or use scraps. Make sure that they are long enough to fit across the cardstock base you will be adhering them to. For this card the cardstock base is 3 3/4 x 5″. I cut some DSP strips to a 1/2″ width and a few to 3/4″ width for variety. Lay down some Snail Adhesive on your cardstock piece to keep the DSP strips in place. IMG_4133

2. As you lay down your strips be sure to place them tightly together, leaving no cardstock showing through. It will be very obvious at the end. Also, be sure that the DSP strips hang off both sides of the cardstock base to ensure your entire base is covered.  If you want to go the easy route, just use 12″ strips. Then you’ll be sure to have long enough strips. You could probably get away with 7 or 8″ strips too. Obviously, as you get closer to the ends you don’t need as long of strips.

IMG_4134

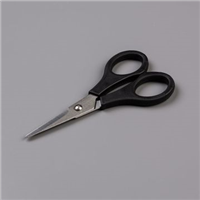
3. When you have covered your cardstock base with DSP strips, turn it over and use Paper Snips to trim off the DSP that hangs over the sides.

IMG_4138

4. Behold your breathtaking creation!

IMG_4139


Here are a few more shots of the card. I thought the yellow flower from the Botanical Blooms Thinlits Dies set worked really well to bring out the little bits of yellow in the DSP designs. Strips

I adhered the flower with a glue dot and the sentiment piece with Stampin’ Dimensionals.

Stripes Flat

I hope you are inspired to try this layout and have fun with some DSP. 🙂

Joyful stamping!

~Stephanie

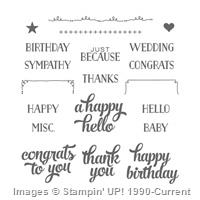
Supplies**: Affectionately Yours Specialty Designer Series Paper, Botanical Blooms Thinlits Dies, Butterfly Basics Stamp Set, Decorative Label Punch, Cucumber Crush Classic Stampin’ Pad, Crumb Cake Cardstock, Night of Navy Cardstock, Daffodil Delight Cardstock, Whisper White Cardstock, Paper Snips, Glue Dots, Stampin’ Dimensionals, Snail Adhesive, Pearls Basic Jewels.

**All supplies can be purchased from my online store. If you would like to place an order (and it is under $150) I invite you to enter 4ZN3MB4Z in the Hostess Code box. Thank you for your support!

2016-2018 In Color Cards, All Occasion Cards, Designer Series Paper Cards, Just Because Cards, Stampin' Up!

In Color Paper Weaving

Hello everyone! Here is the 4th and last card in my current Designer Series Paper (DSP) series. This is not the first time I’ve done a card with paper weaving on my blog (see Paper Weaving with DSP). However, it is an excellent way to use up DSP scraps and I wanted to include that idea with these DSP cards.

Dimensions: The cardbase is 8 1/2 x 5 1/2″ (scored in half at 4 1/4″). The Flirty Flamingo Layer is 3 3/4 x 5″. The Crumbcake layer is 3 1/2 x 4 3/4″. The DSP strips are 1/2 x 4 3/4″. The cardstock strips are 1/2 x 3 1/2″.

Weaving

The biggest hint I can give for weaving the DSP strips is to adhere one end of all the strips in place with a glue dot. This gives just enough adhesive to keep the strips where you want them and still allows you to maneuver the strips into the woven pattern. I also used a few glue dots to adhere the rest of the strips into place after weaving.

The second hint is to keep the strips pretty close together. This is actually the second card I made because the first card had a looser weave that just didn’t look as striking. Speaking of striking, how awesome are those adorable little white hearts? I think they are what pulls the card together.

Weaving Side

I hope you are inspired to play with paper weaving and to create with some of the new 2016-2018 In Colors as well. Aren’t they lovely?

Joyful stamping!

~Stephanie

**Supplies**: Sweet Sugarplum Cardstock, Flirty Flamingo Cardstock, Crumb Cake Cardstock, 2016-2018 In Color Envelope Paper, Hearts Border Punch, Crumb Cake Classic Stampin’ Pad, Love You Lots Stamp Set, Glue Dots, Snail Adhesive, Stampin’ Trimmer.

**All supplies can be purchased from my online store. If you would like to place an order (and it is under $150) I invite you to enter 4ZN3MB4Z in the Hostess Code box. Thank you for your support!


All Occasion Cards, Birthday Cards, Designer Series Paper Cards, Just Because Cards, Stampin' Up!

Double Vision

Hello everyone! Today’s post is a double feature. Both cards have the same design and basic color scheme, but one is subdued while the other is bold.

IMG_4123

Both cards feature the Affectionately Yours Specialty Designer Series Paper (DSP). One neat thing about Stampin’ Up!’s DSP packs is that all the colors used in each individual pack coordinate with the other colors used in that pack. That way, even if you use a one color design like I did on both cards, you don’t have to think too long about what colors to use with it.IMG_4121

I love how the large chunks of Watermelon Wonder contrast with the pops of Night of Navy in the bold card. I also love the softness of the light contrast between the little dots of Watermelon Wonder and the Crumb Cake in the subdued card. Which one is your favorite? Leave me a comment below and let me know. 🙂

IMG_4124

Instructions: Cut a piece of DSP to 3 3/4 x 4 1/4″.  If you want a larger gap between your pieces simply make your DSP starting piece shorter than 4 1/4″.  To create the gap between the pieces of DSP you will need to use your Stampin’ Trimmer.  It looks strange at first, but when cutting you need to make sure the top left hand corner of the DSP is on the right side of your cutting blade.  The ruler extends to 1 1/4 on the right side of the blades. This is important for creating the slant that you want.  I wanted a gentle slant so I placed the top left hand corner of the DSP at the 1 1/4″ mark on the right hand side of the blade and I lined up the bottom right hand corner with the 1 1/4″ line on the left hand side of the blades. If you want steeper slant, simply line those same corners up with lines closer to the cutting blade.

IMG_4125

This layout is great if you really want your DSP to shine. With so much of the pattern showing, your DSP is sure to get lots of attention! The “HAPPY” sentiment is from the “Celebrate Today” stamp set. I stamped the “birthday” image on the inside of the cards in Watermelon Wonder ink. I punched the flower out with the Flower Medallion punch and popped it up with Stampin’ Dimensionals.

I hope you are inspired to try this layout with your favorite DSP. I’d love to see what you come up with. If you send me your creations at stephaniemackey2012@gmail.com, I might include them in a future blog post. 🙂

Joyful stamping!

~Stephanie

**Supplies** used on both cards: Affectionately Yours Specialty DSP, Stampin’ Trimmer, Celebrate Today Stamp Set, Watermelon Wonder Classic Stampin’ Pad, Flower Medallion Punch, Whisper White Cardstock, Stampin’ Dimensionals, Snail Adhesive.

Bold card only: Watermelon Wonder cardstock

Subdued Card only: Crumb Cake Cardstock.

**All supplies can be purchased from my online store. If you would like to place an order (and it is under $150) I invite you to enter 4ZN3MB4Z in the Hostess Code box. Thank you for your support!


Congratulations Cards, Designer Series Paper Cards, Stampin' Up!, Thank You Cards

“Thank You” for SSC110

Hello everyone! I have yet another new challenge blog to introduce to you. This one is called Sunday Stamps.  It is a bi-weekly challenge, like the Fab Friday challenge blog. Apparently there are more bi-weekly challenges than I realized.

Here is the current sketch challenge:

SSC110


Here is the card I came up with based on the sketch. The top piece of DSP is Crushed Curry (just like the scallop circle piece of cardstock). Not sure if you can tell that from the photo. The bottom DSP is Bermuda Bay, as is the ink for the sentiment from Tin of Cards.

Thank You


The two pieces of Designer Series Paper come from the Cherry on Top DSP Stack. This is a stack of 48 double sided 6×6 pieces of designer series paper. When you flip through one direction there are lots of bold patterns, but when you flip through the other direction there are some calmer  patterns like the two pieces I chose for this card.  I tend to favor the calmer patterns.

cherry on top dsp


Here is a close up of the sentiment piece. I love the line of connected rhinestones from the Rhinestone Basic Jewels pack.

Thank You Close Up


When I cut my triangles for the sketch card, I first cut squares and then cut the squares in half diagonally. I decided to go ahead and use the other halves right away on a similar card. As you can see, the proportions of the DSP pieces are different.

I invite you to leave me a comment below and tell me which proportions you prefer: the one with the larger Crushed Curry piece of DSP or the one with the larger Bermuda Bay piece of DSP.

Congrats to You

I hope you are inspired by this sketch challenge, as I was.

Joyful stamping!

~Stephanie

Birthday Cards, Designer Series Paper Cards, Global Design Project Cards, Just Because Cards, Shaker Cards, Stampin' Up!

Shaker Card for GDP002

I am excited to show you another shaker card for a brand new challenge blog, Global Design Project. This challenge, #GDP002, is the second challenge ever for this challenge blog. Some of the design team also design for the Pals Paper Arts challenges that I participate in.
GDP002
This shaker card is a little more traditional than my last one. In my last post, Birthday Card for MOJO415,  I went big and did a full card shaker card.  There really are so many variations of shaker cards – you can experiment for weeks and not get bored.

This card could also be considered a DSP card. I have been creating A LOT of cards that feature Designer Series Paper lately, the reason being that I have so much retired DSP that I love and am trying to use so it doesn’t go to waste. The DSP on this card is current DSP called Cherry on Top Designer Series Paper.  Once I had picked out the DSP, the colors for this card kind of fell into place.

To a Good Friend

I felt the Cajun Craze layer under the shaker frame would look a little naked if I didn’t jazz it up a little so I embossed it with the Happy Hearts Textured Impressions Embossing Folder.  I had a lot of fun creating my own confetti for this card using the Hearts Border Punch. 

You may notice that there is a piece of the Cajun Craze embossed layer missing so as to showcase the shaker frame completely. To achieve this I first die cut the Always Artichoke shaker frame. I then laid it over the Cajun Craze piece and lightly traced around the shaker frame with pencil. After cutting that out and finishing the shaker frame, all I had to do was adhere the frame in place. Just a hint with the dimensionals – I suggest using two layers so that your confetti or sequins have plenty of room to move around. They get a little squished sometimes when there is only one layer of dimensionals.
To a Good Friend Closeup

I really love the versatility of the sentiment. It could be used as a birthday card or a “just because” card. I also think that with this color combination of Crushed Curry, Cajun Craze, and Always Artichoke this card could work for a masculine card.

However, I have a feeling that my husband would tell me the shaker frame (especially with the heart confetti) makes this NOT a masculine card. 🙂 Leave me a comment and let me know your thoughts on the masculinity of this card. 

Joyful stamping!

~Stephanie

Price: $110.00

Price: $5.25

Supply List

Built for Free Using:  My Stampin Blog