Stampin' Up!

Triple Layer Die Cut Card

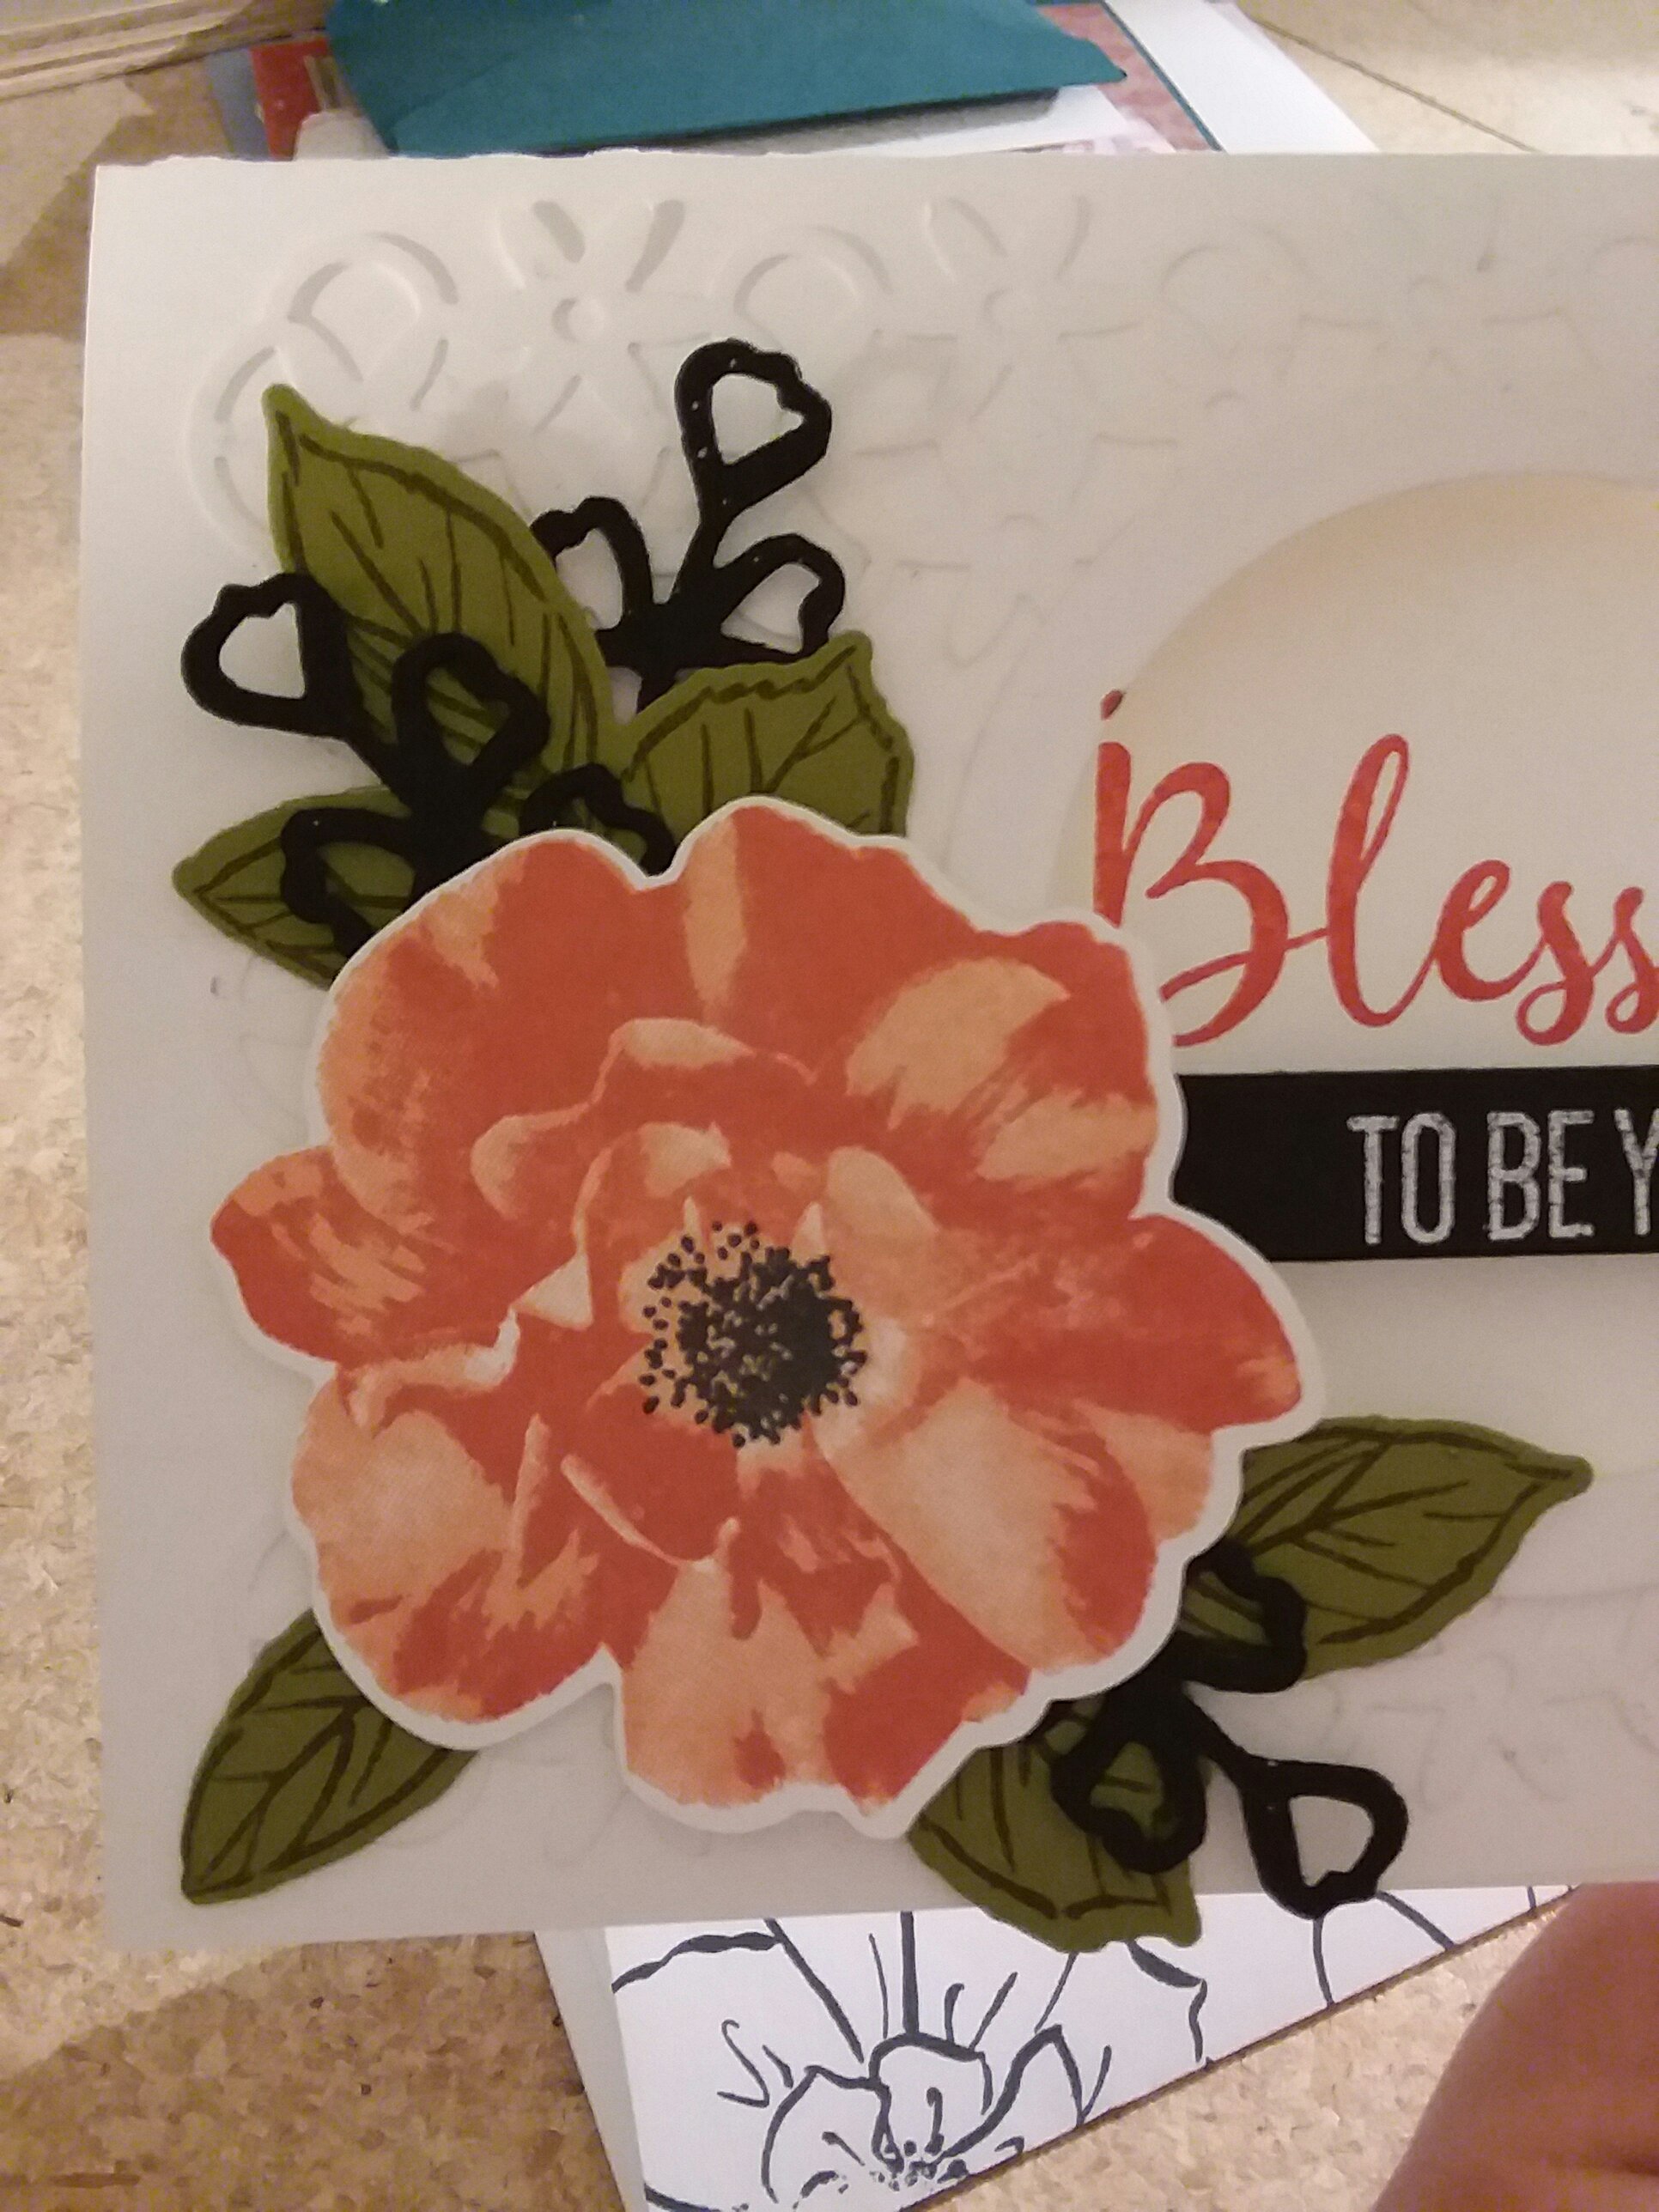
Hello again! I have been absent for awhile over Christmas and New Years but I am going to jump back in to regular blogging and videos again and do my best to be consistent. Today I have a super simple die cut technique that still delivers that WOW look.

Triple Layer Die Cut Technique Card with Designer Series Paper

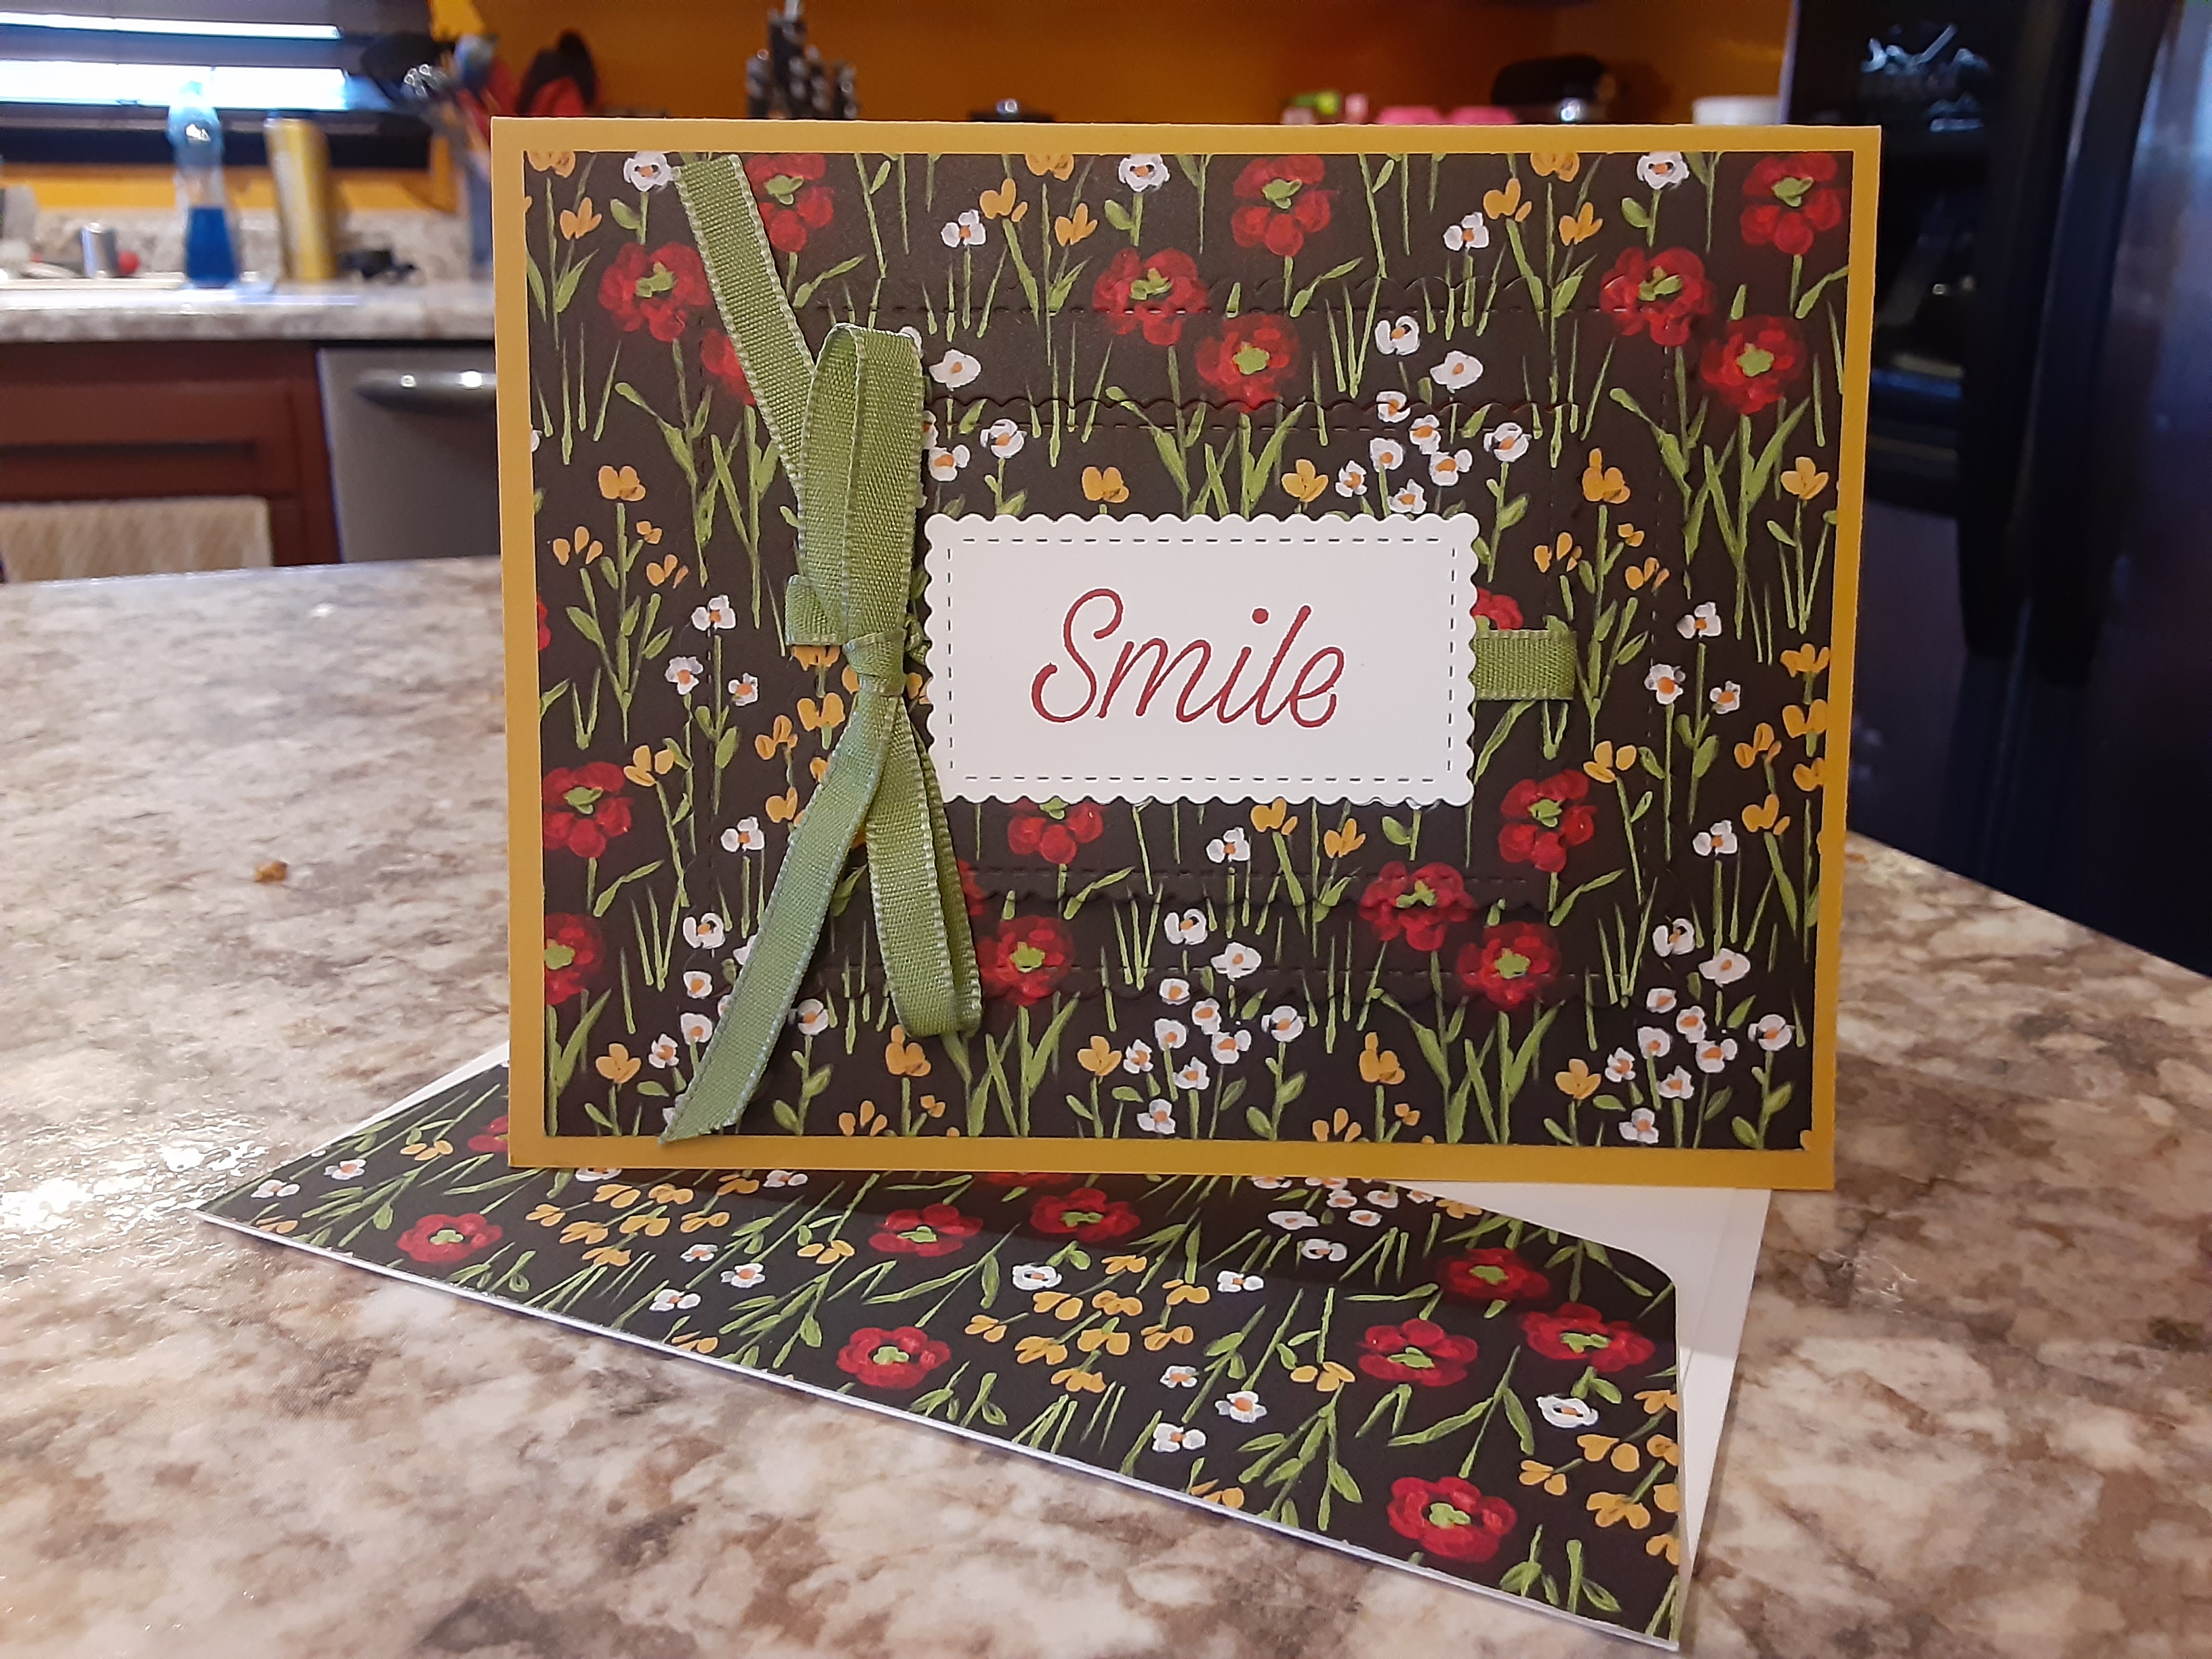
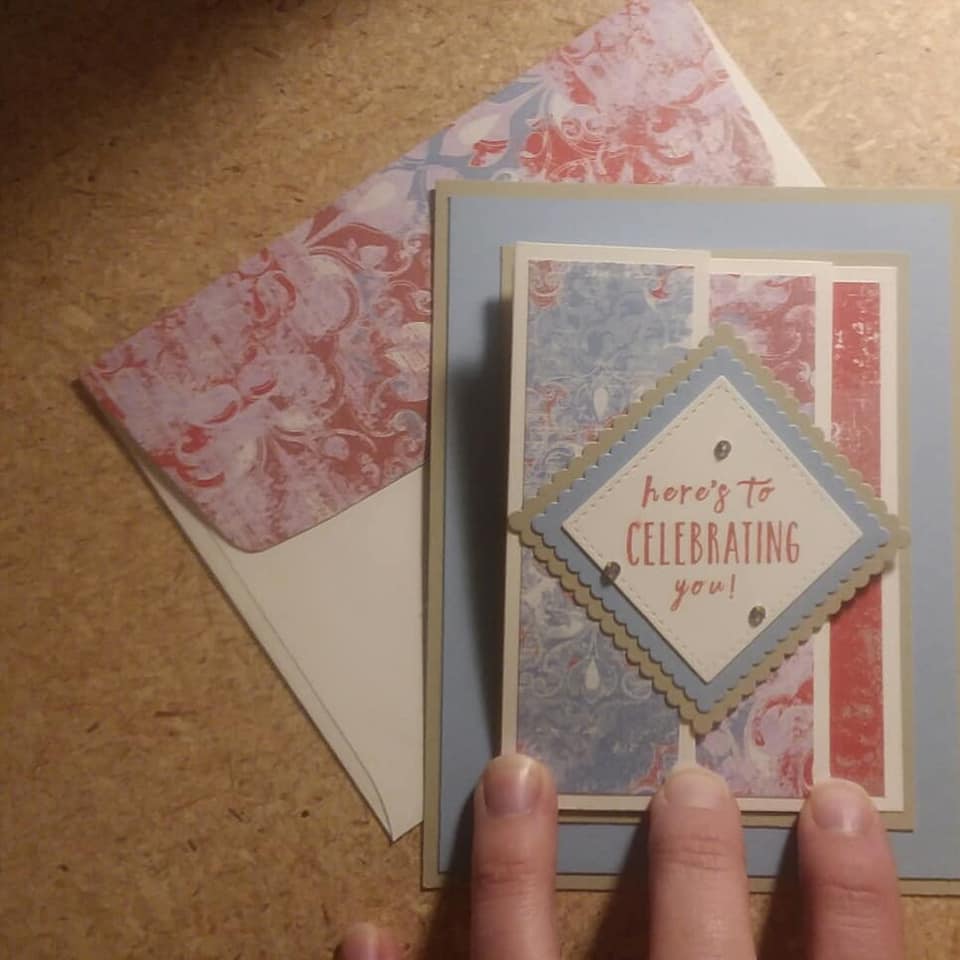
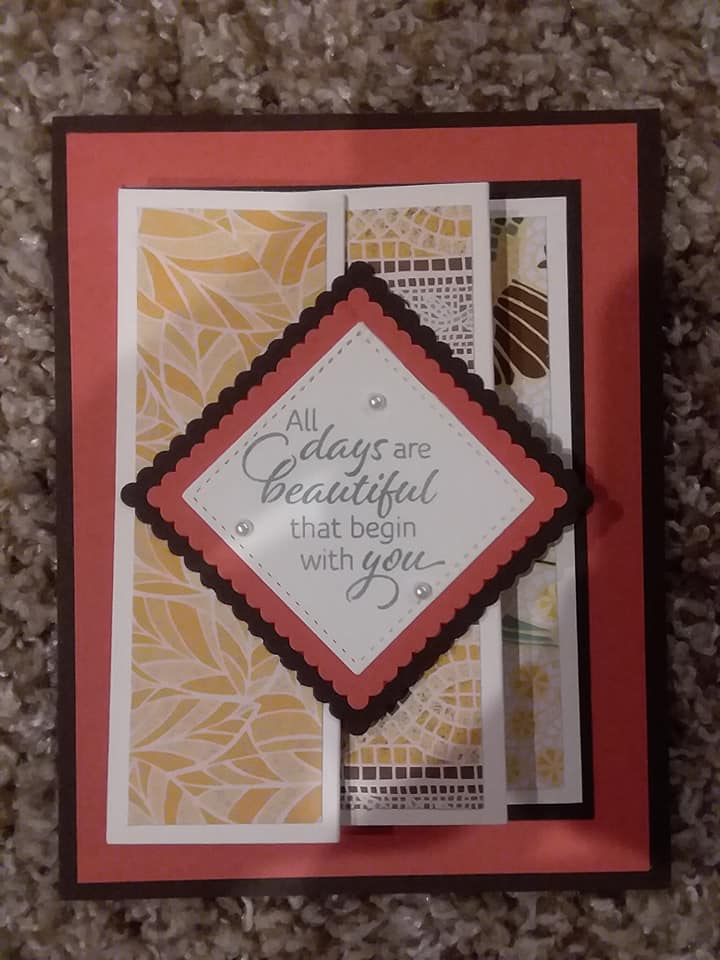
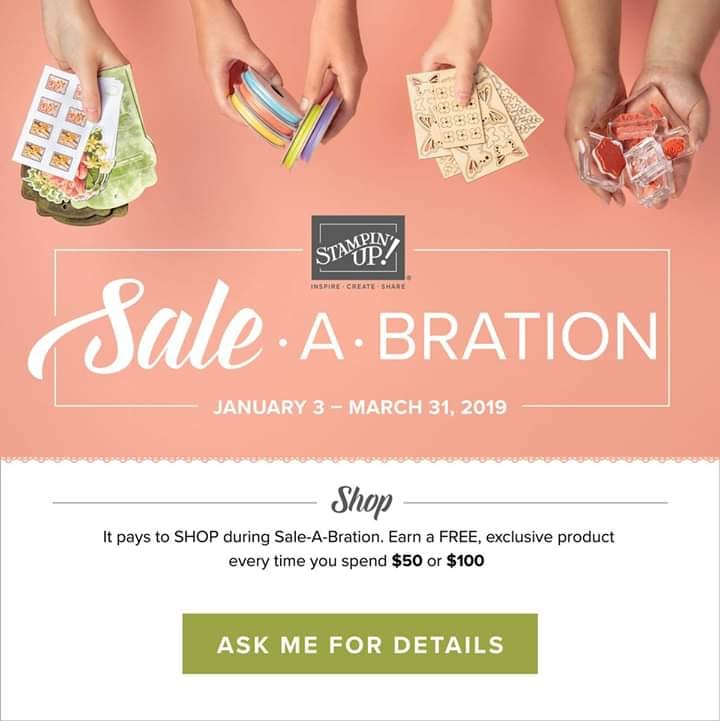
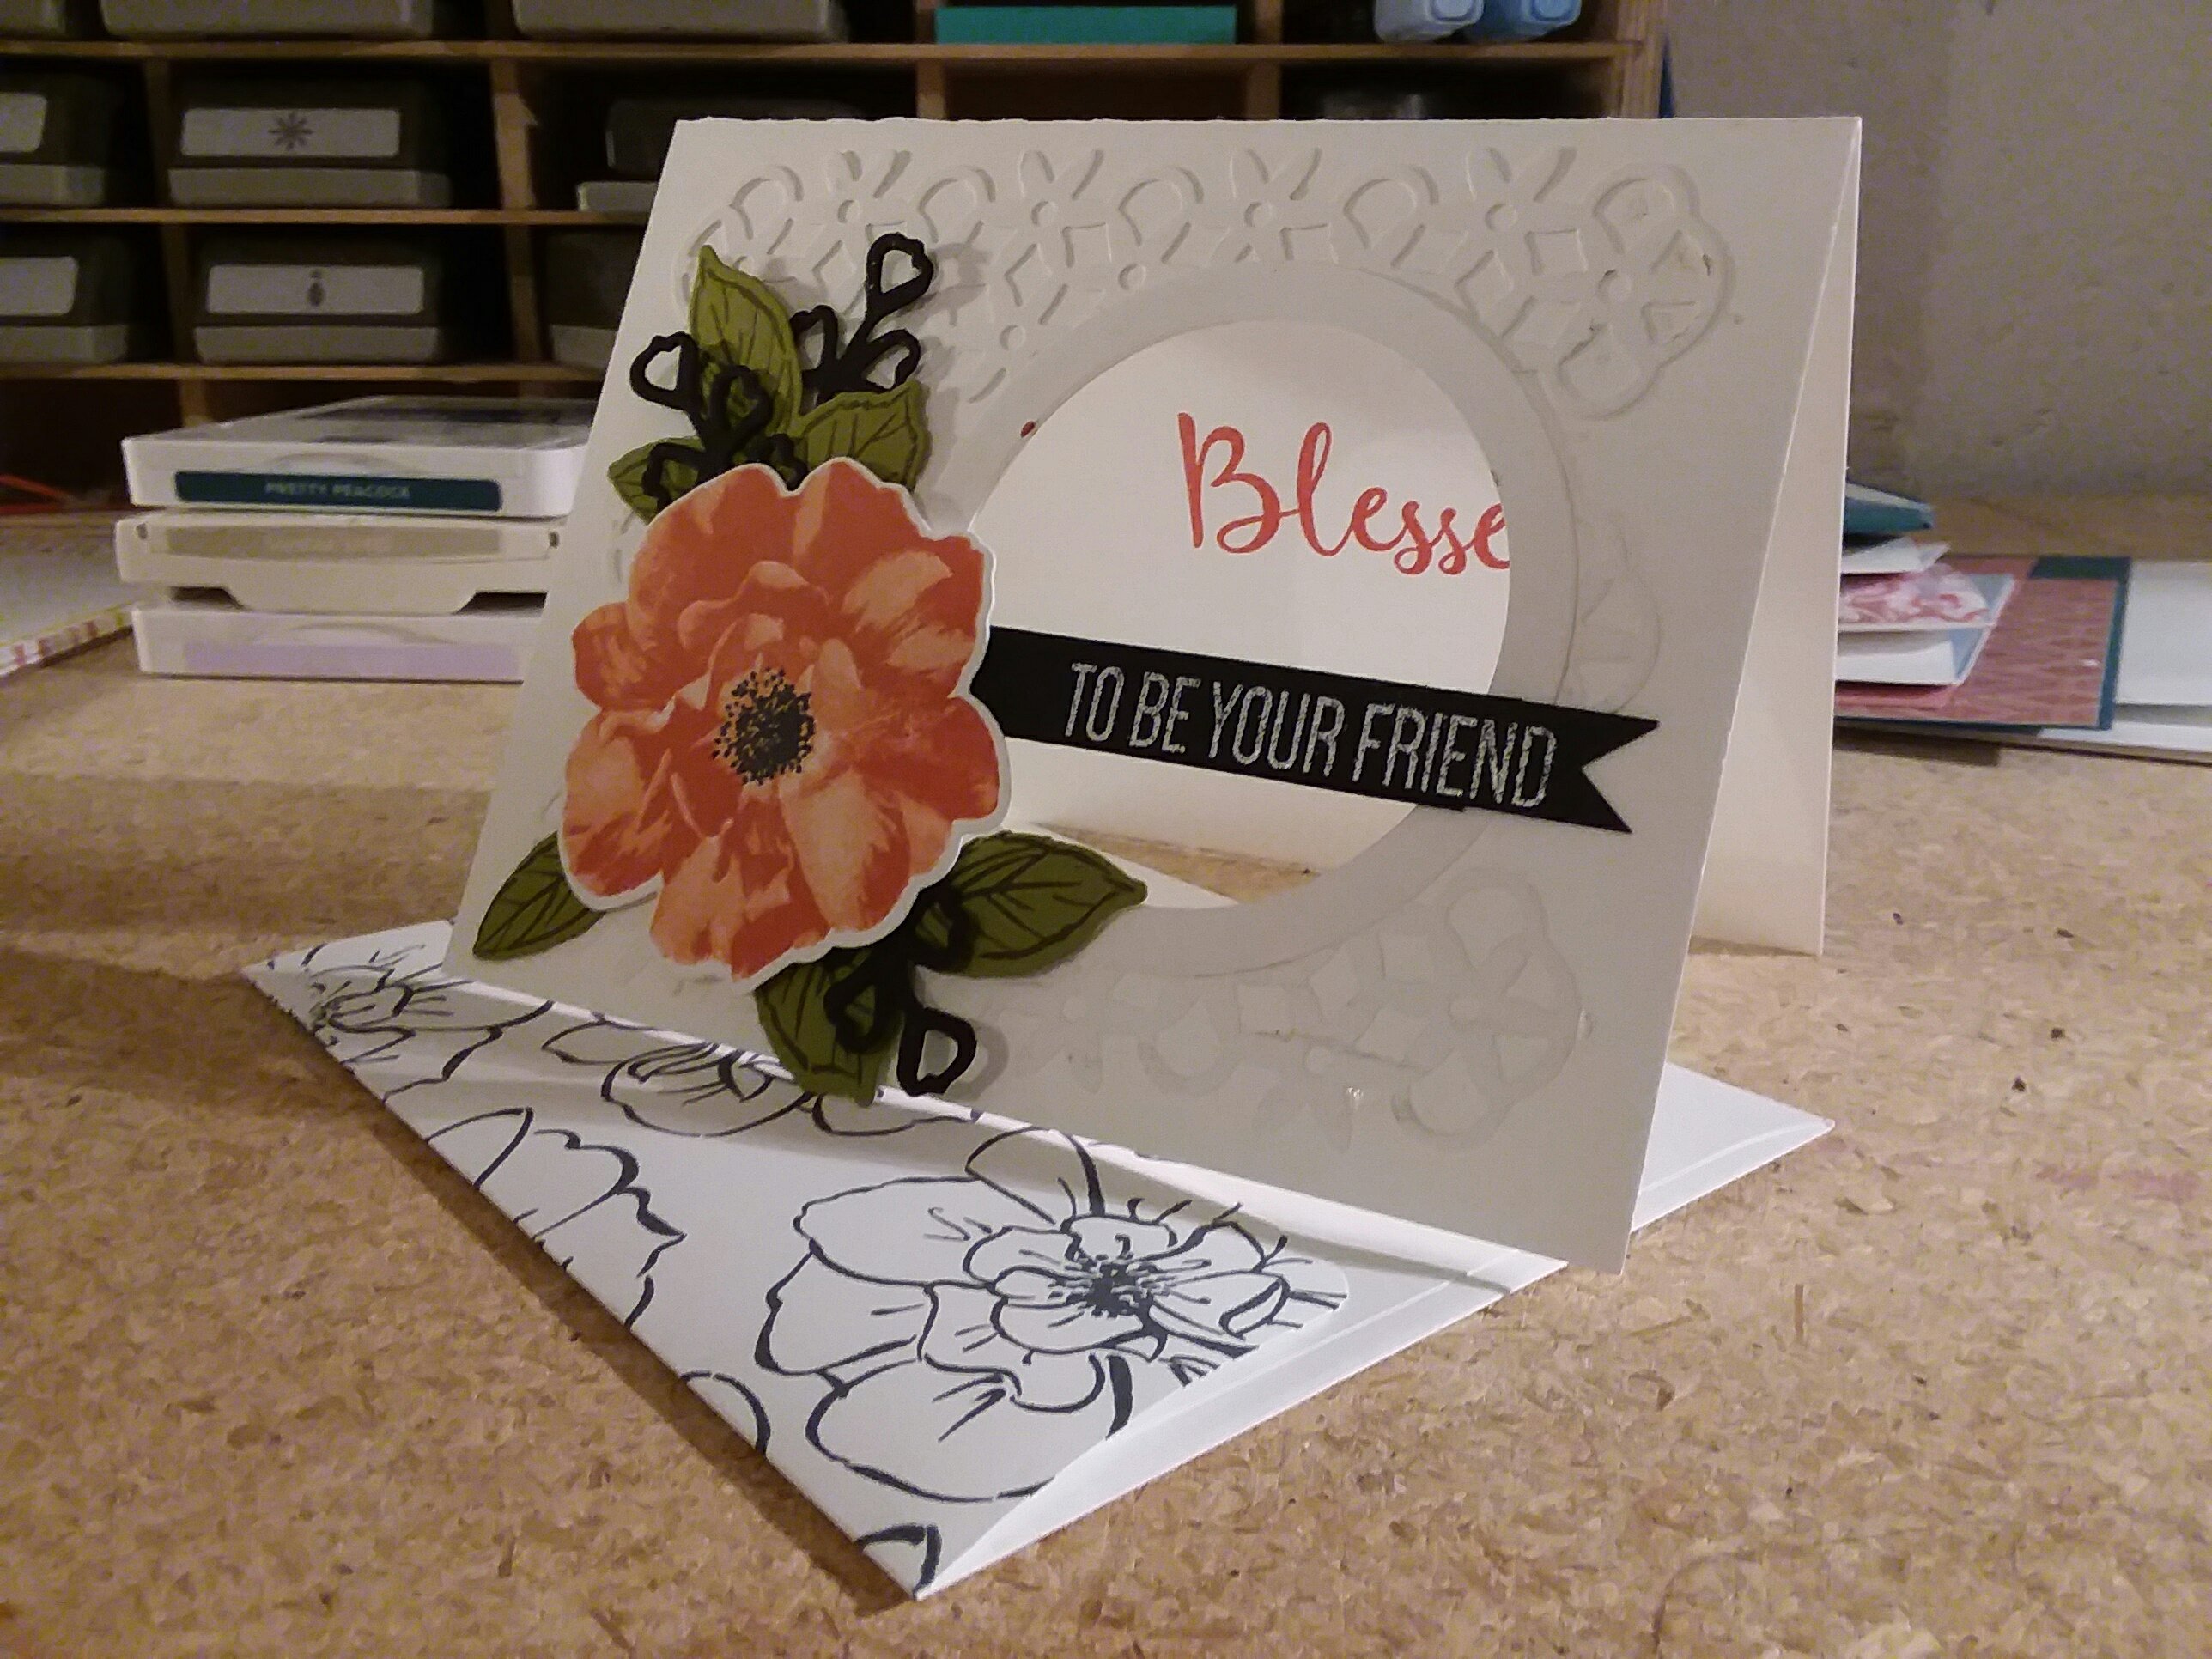
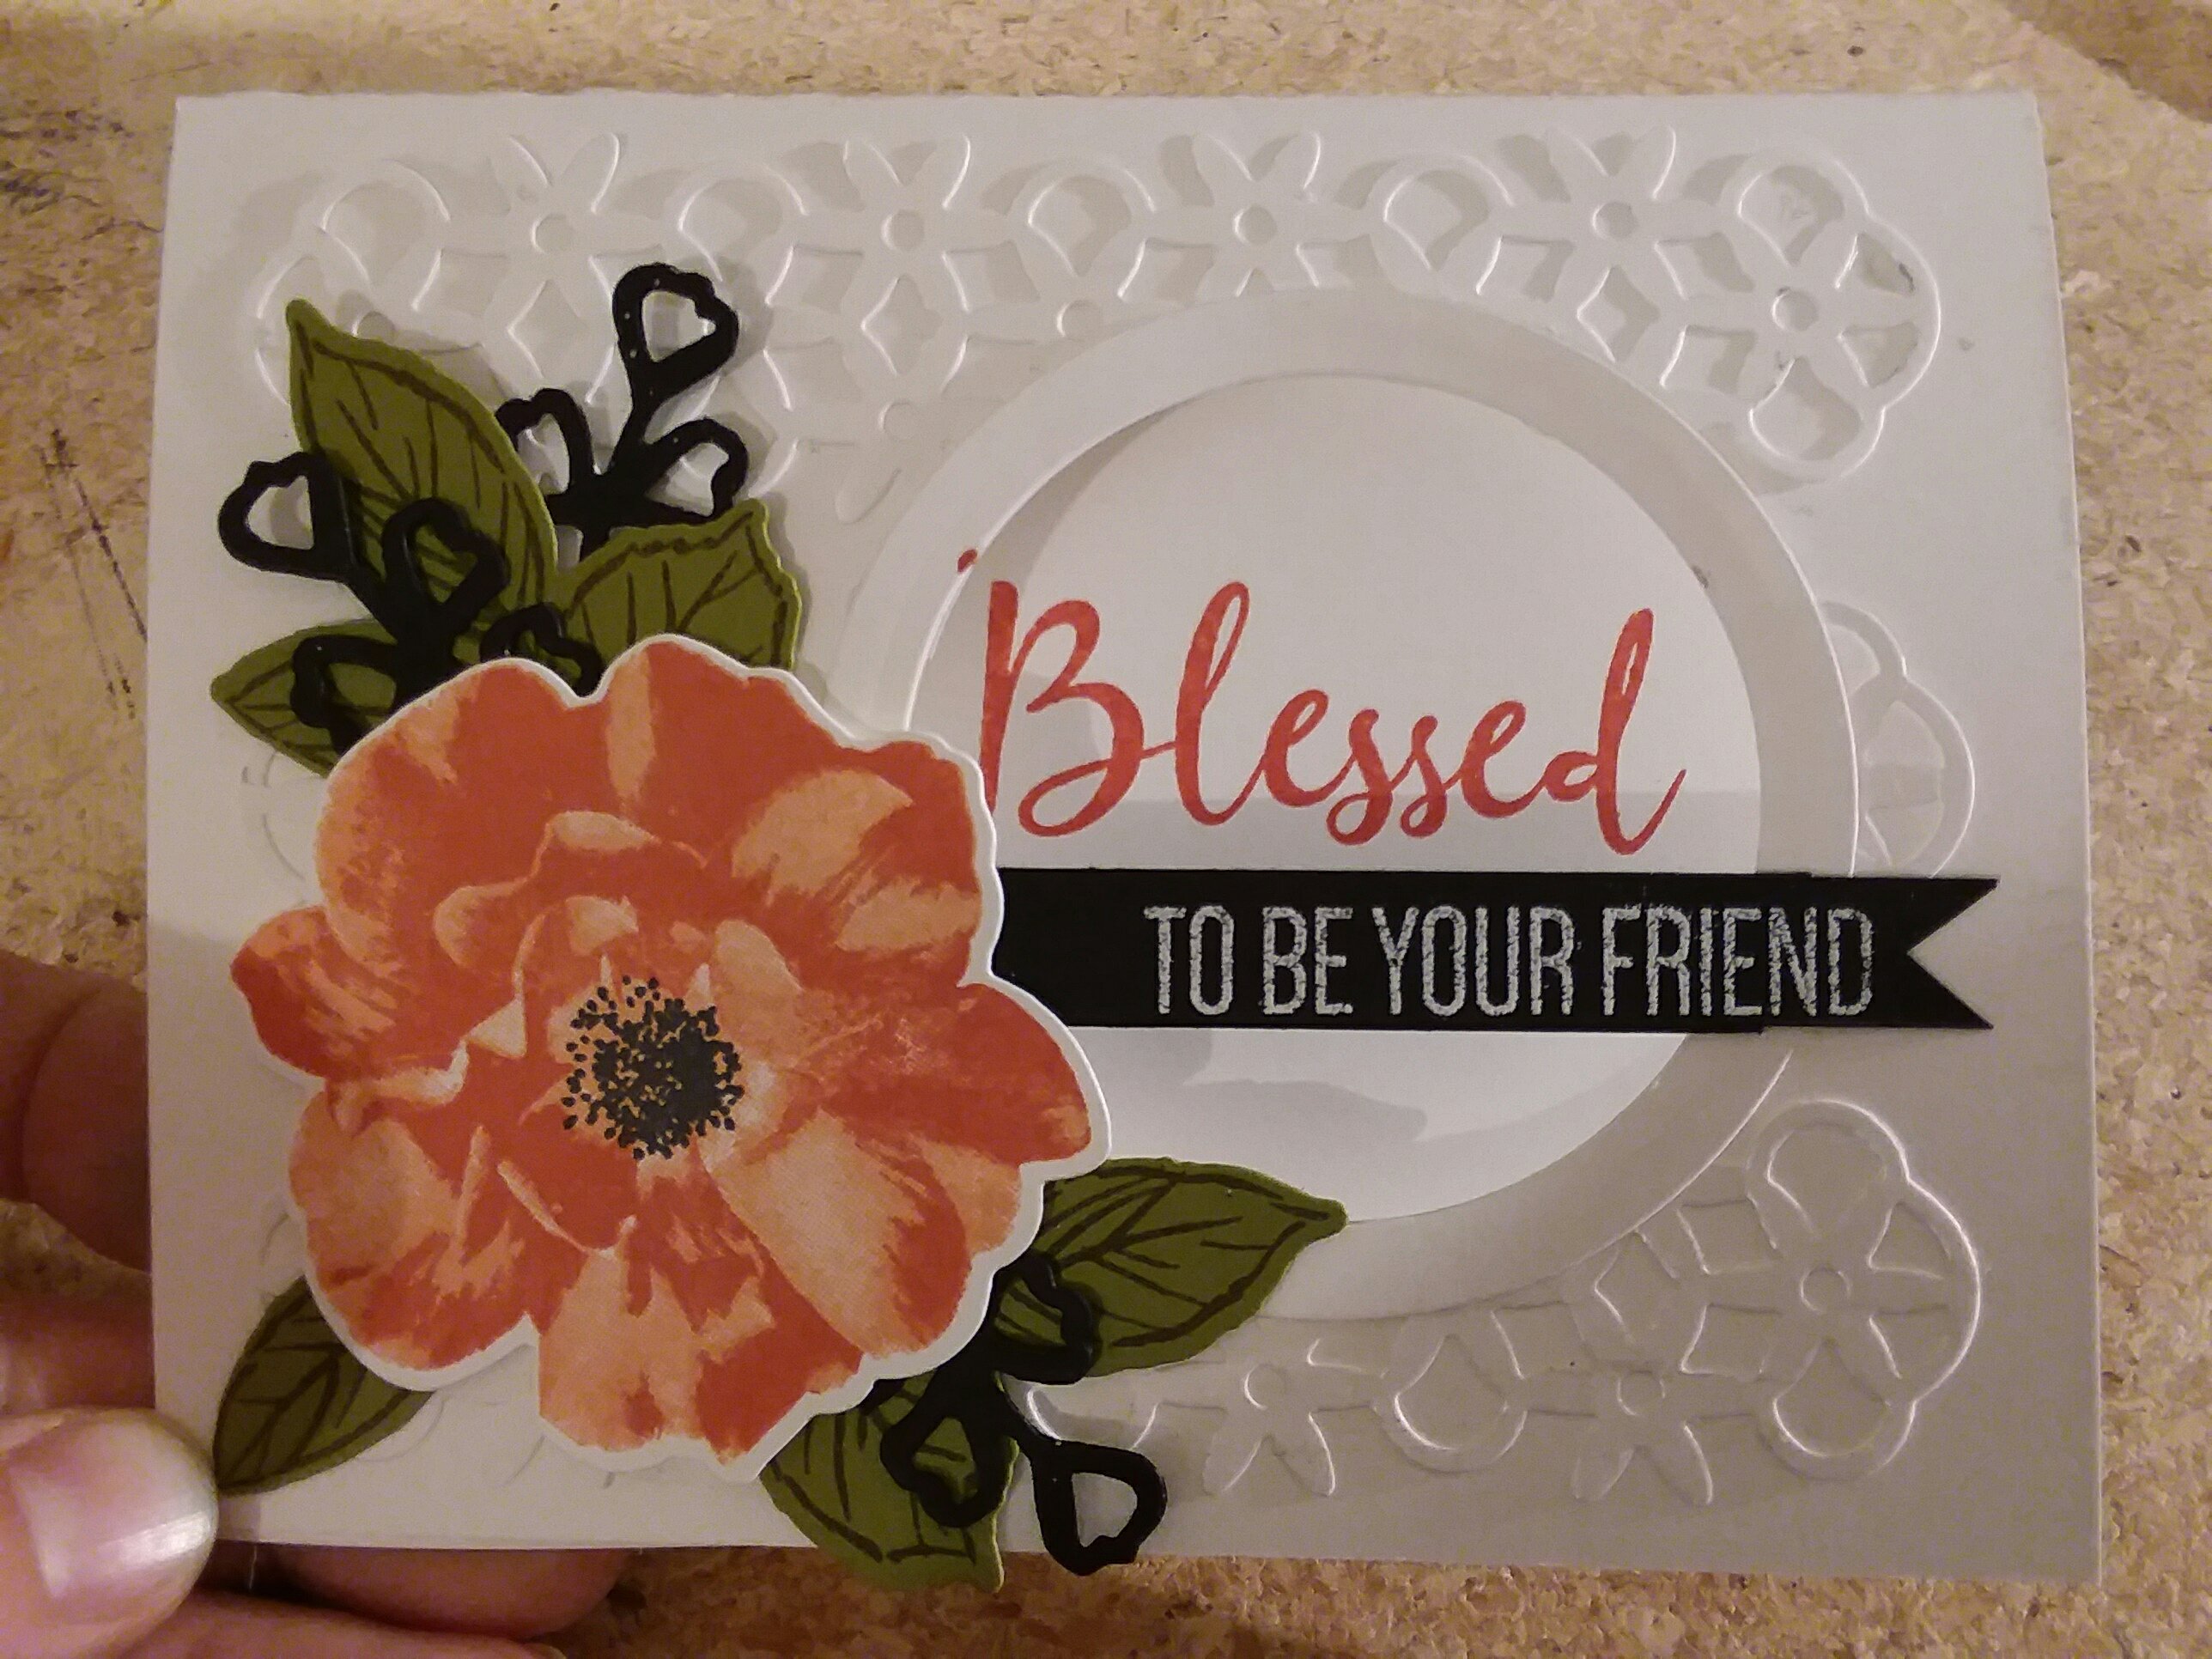
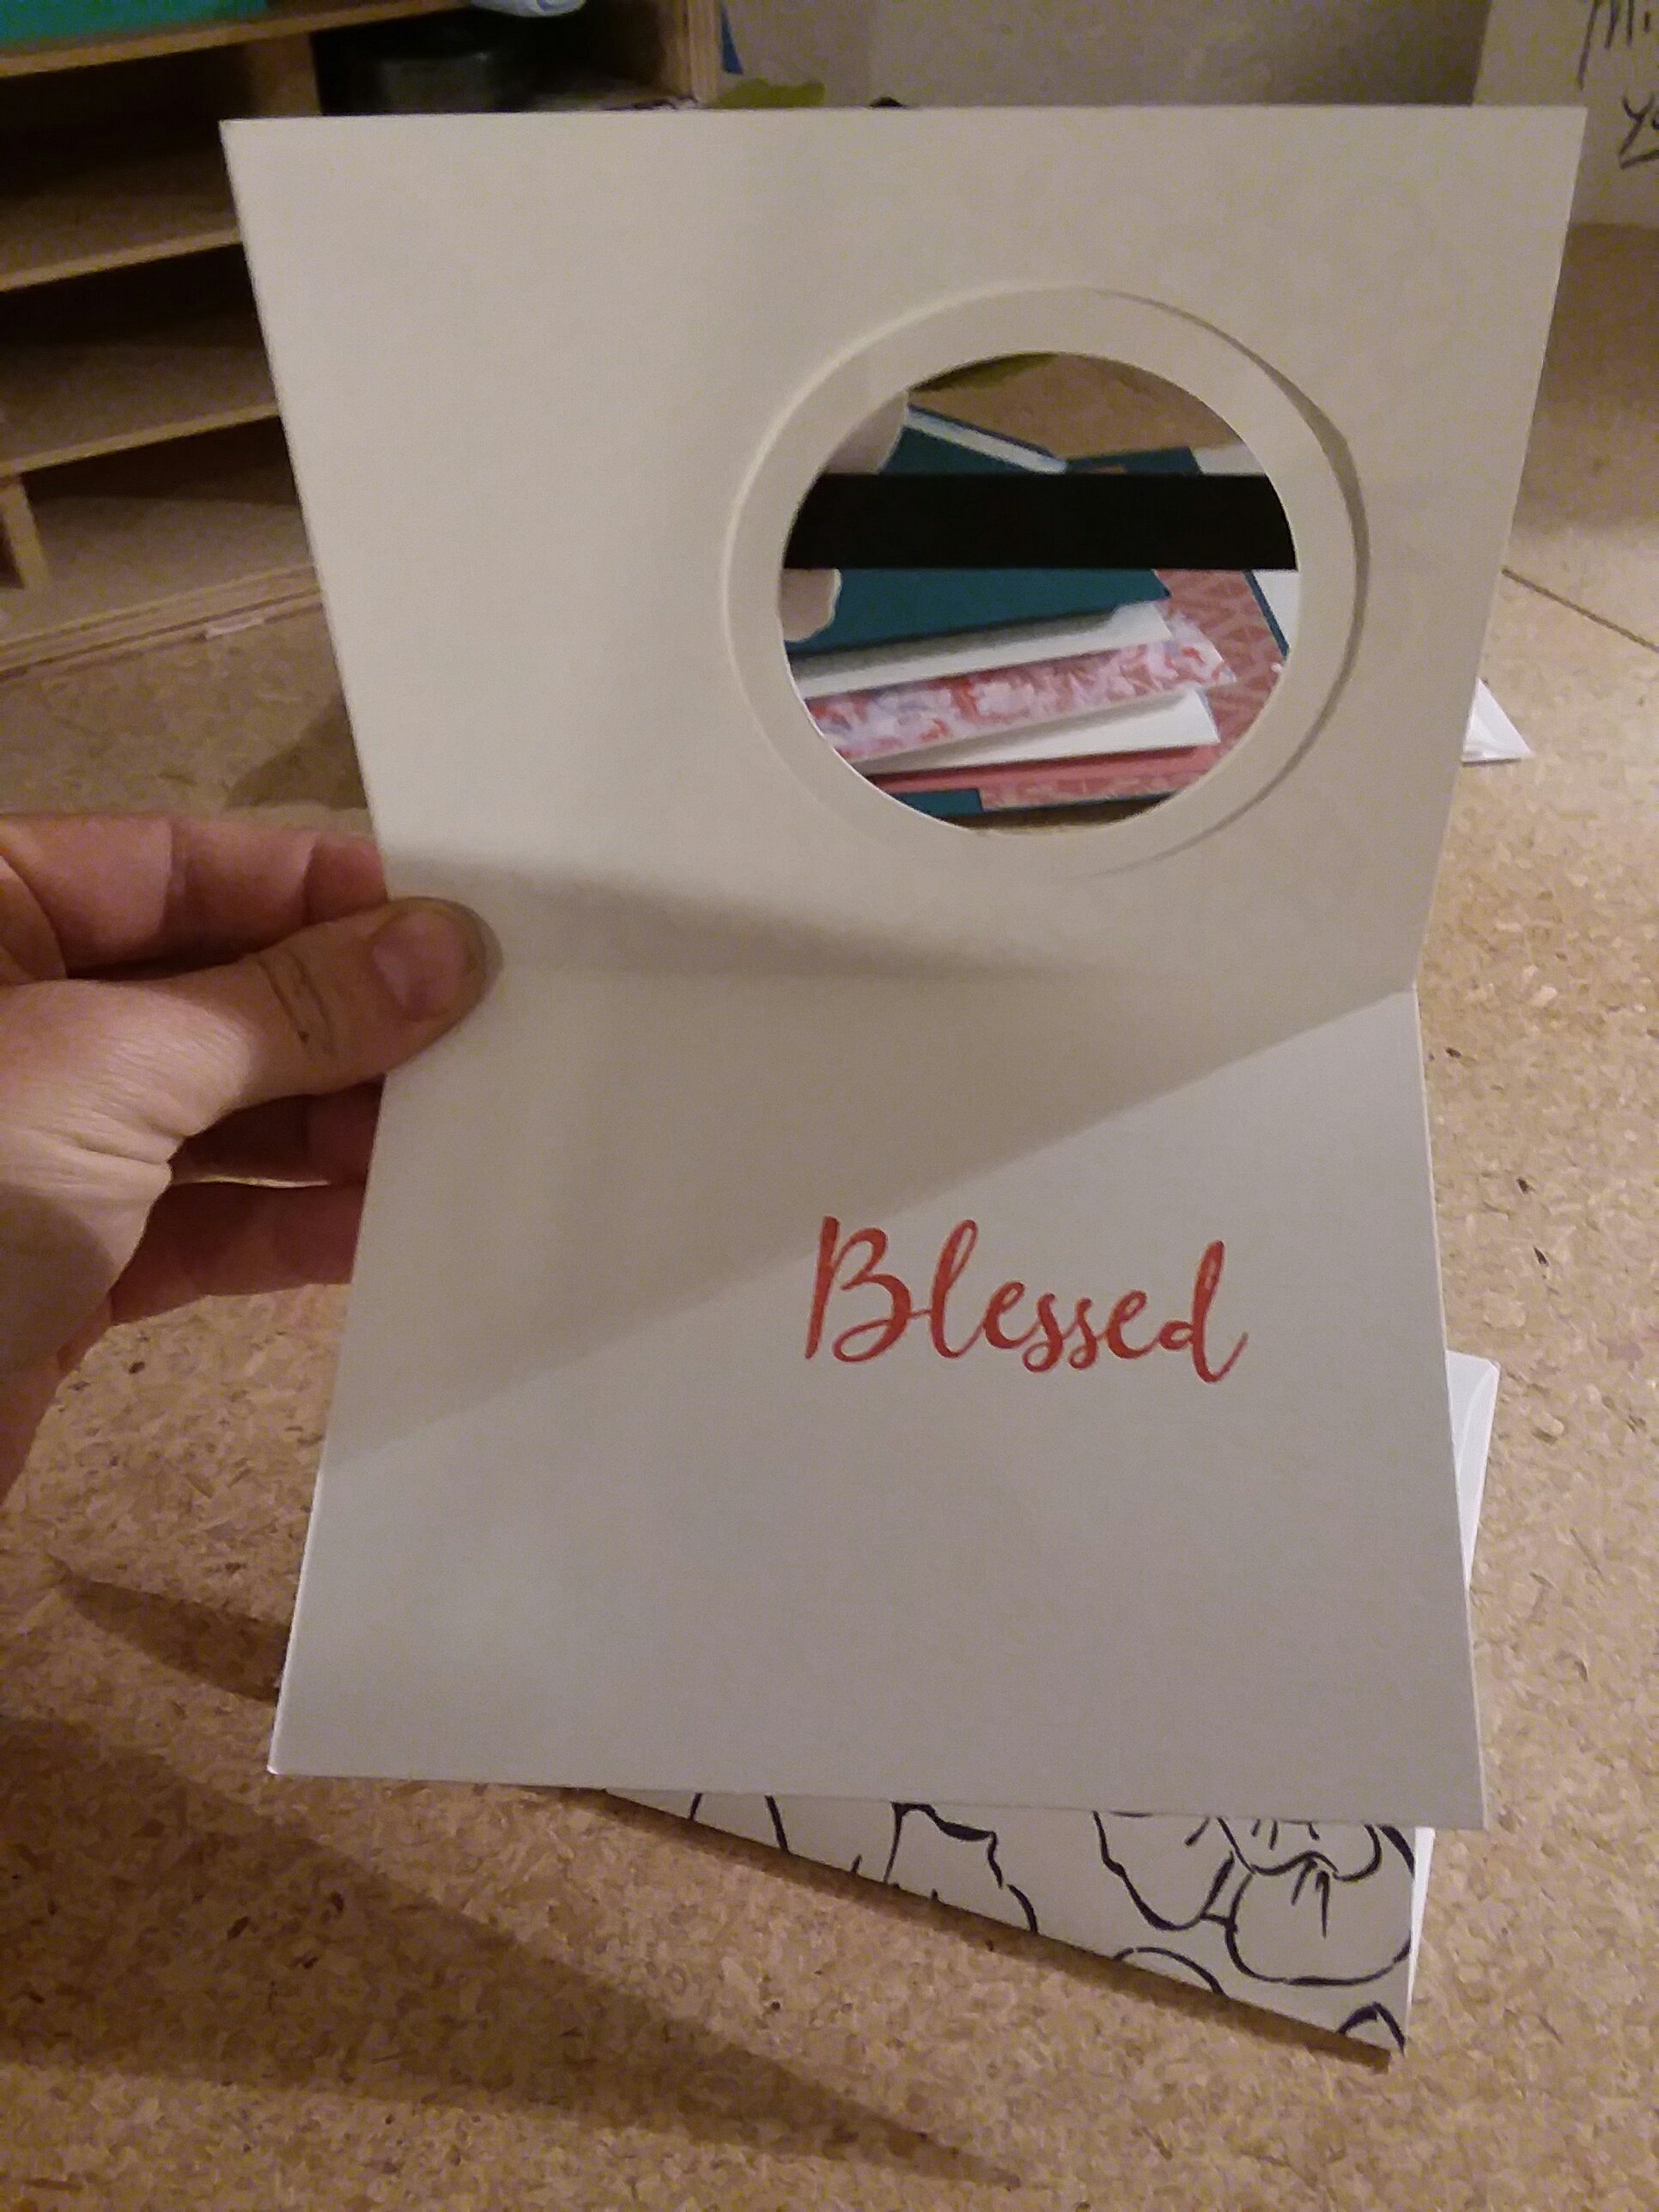
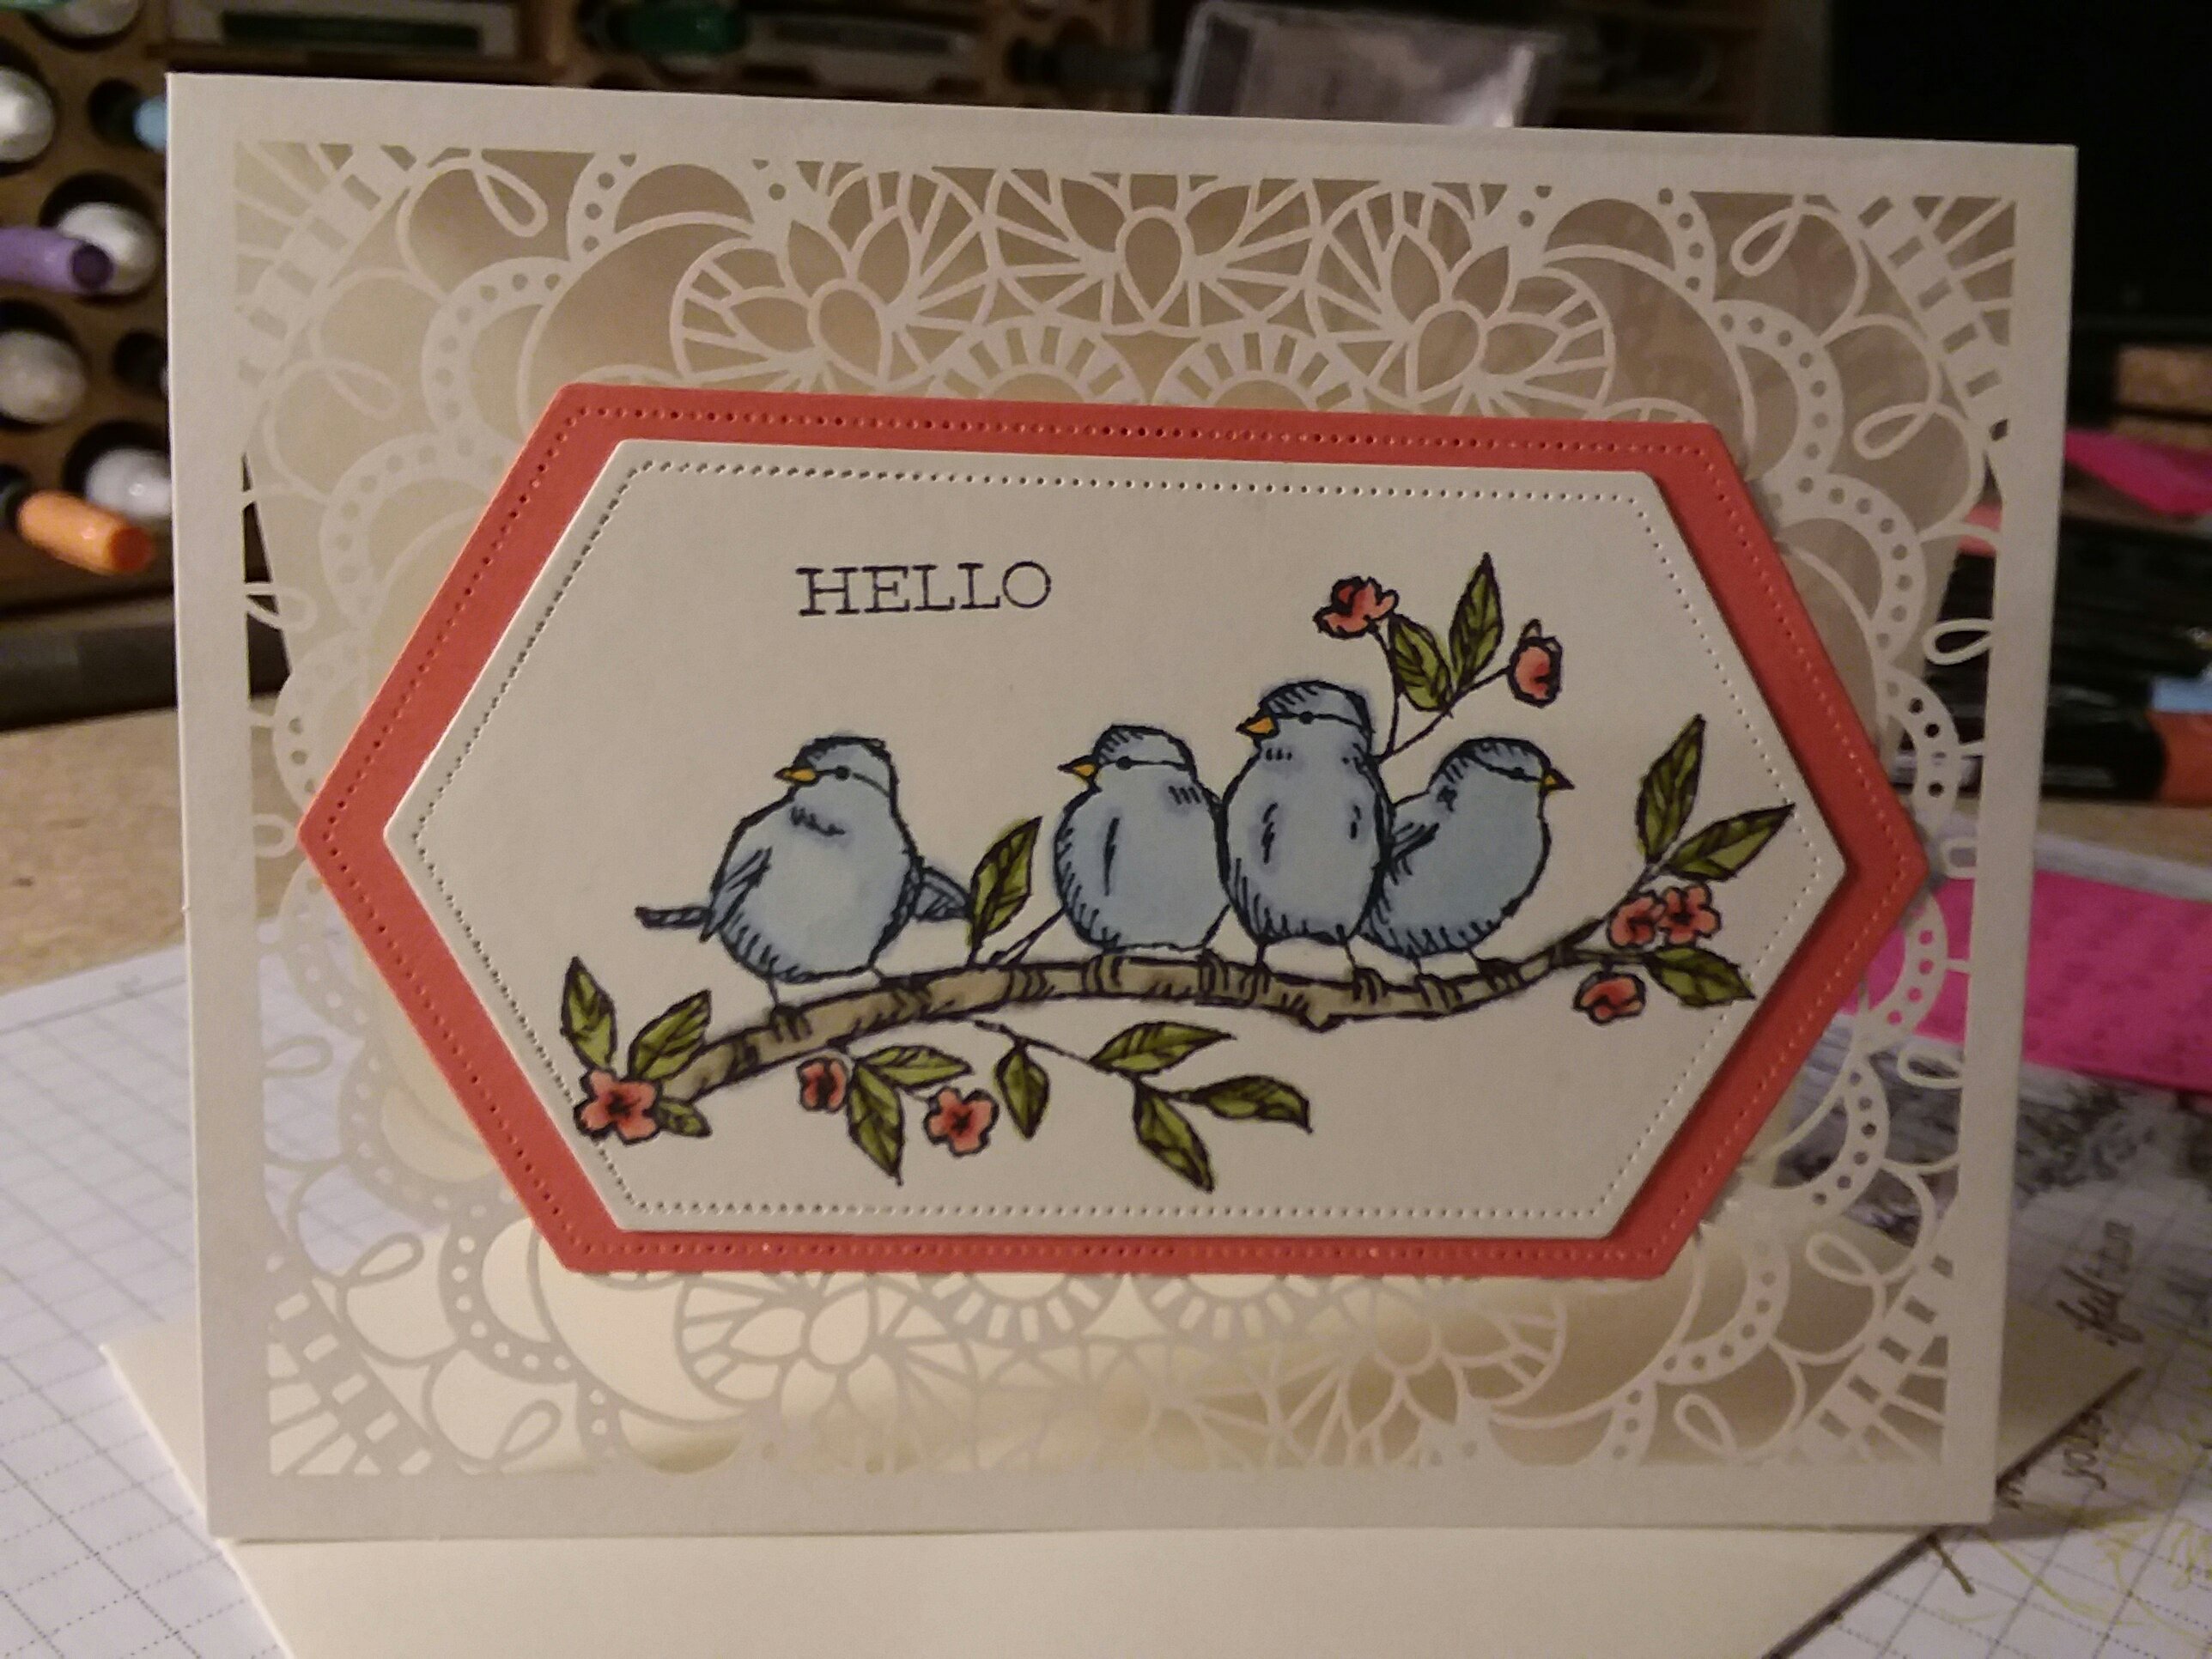
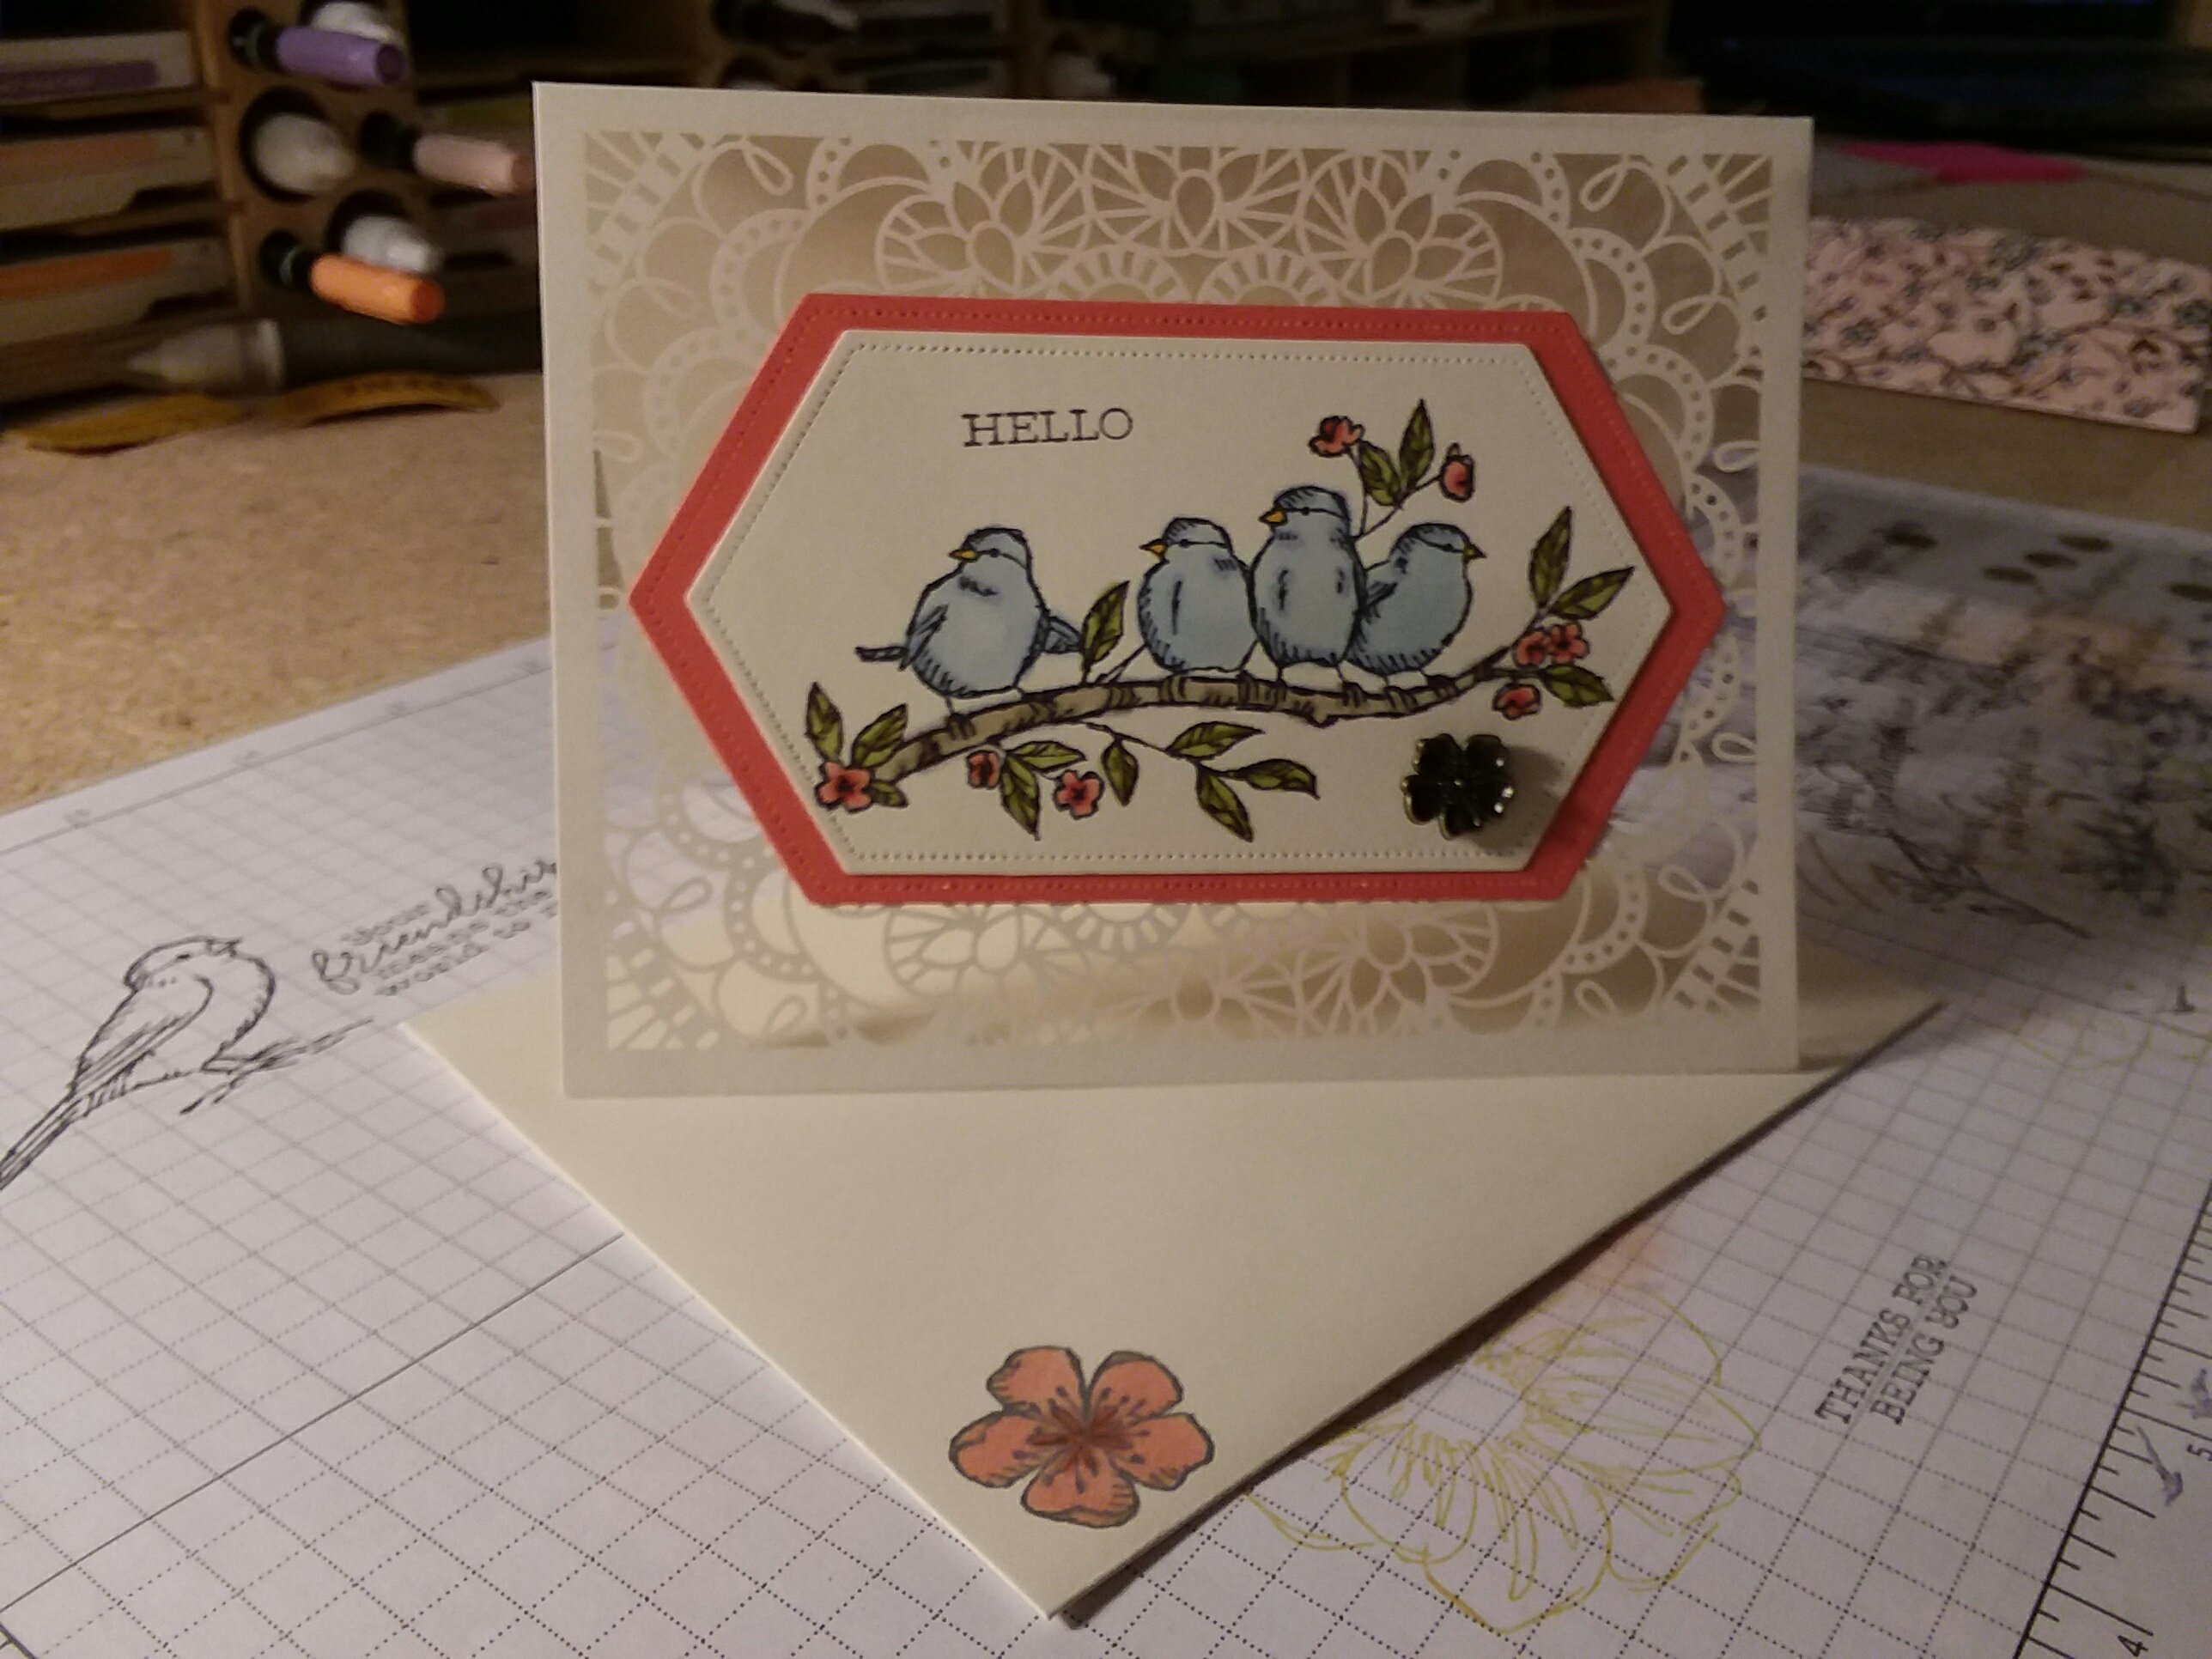
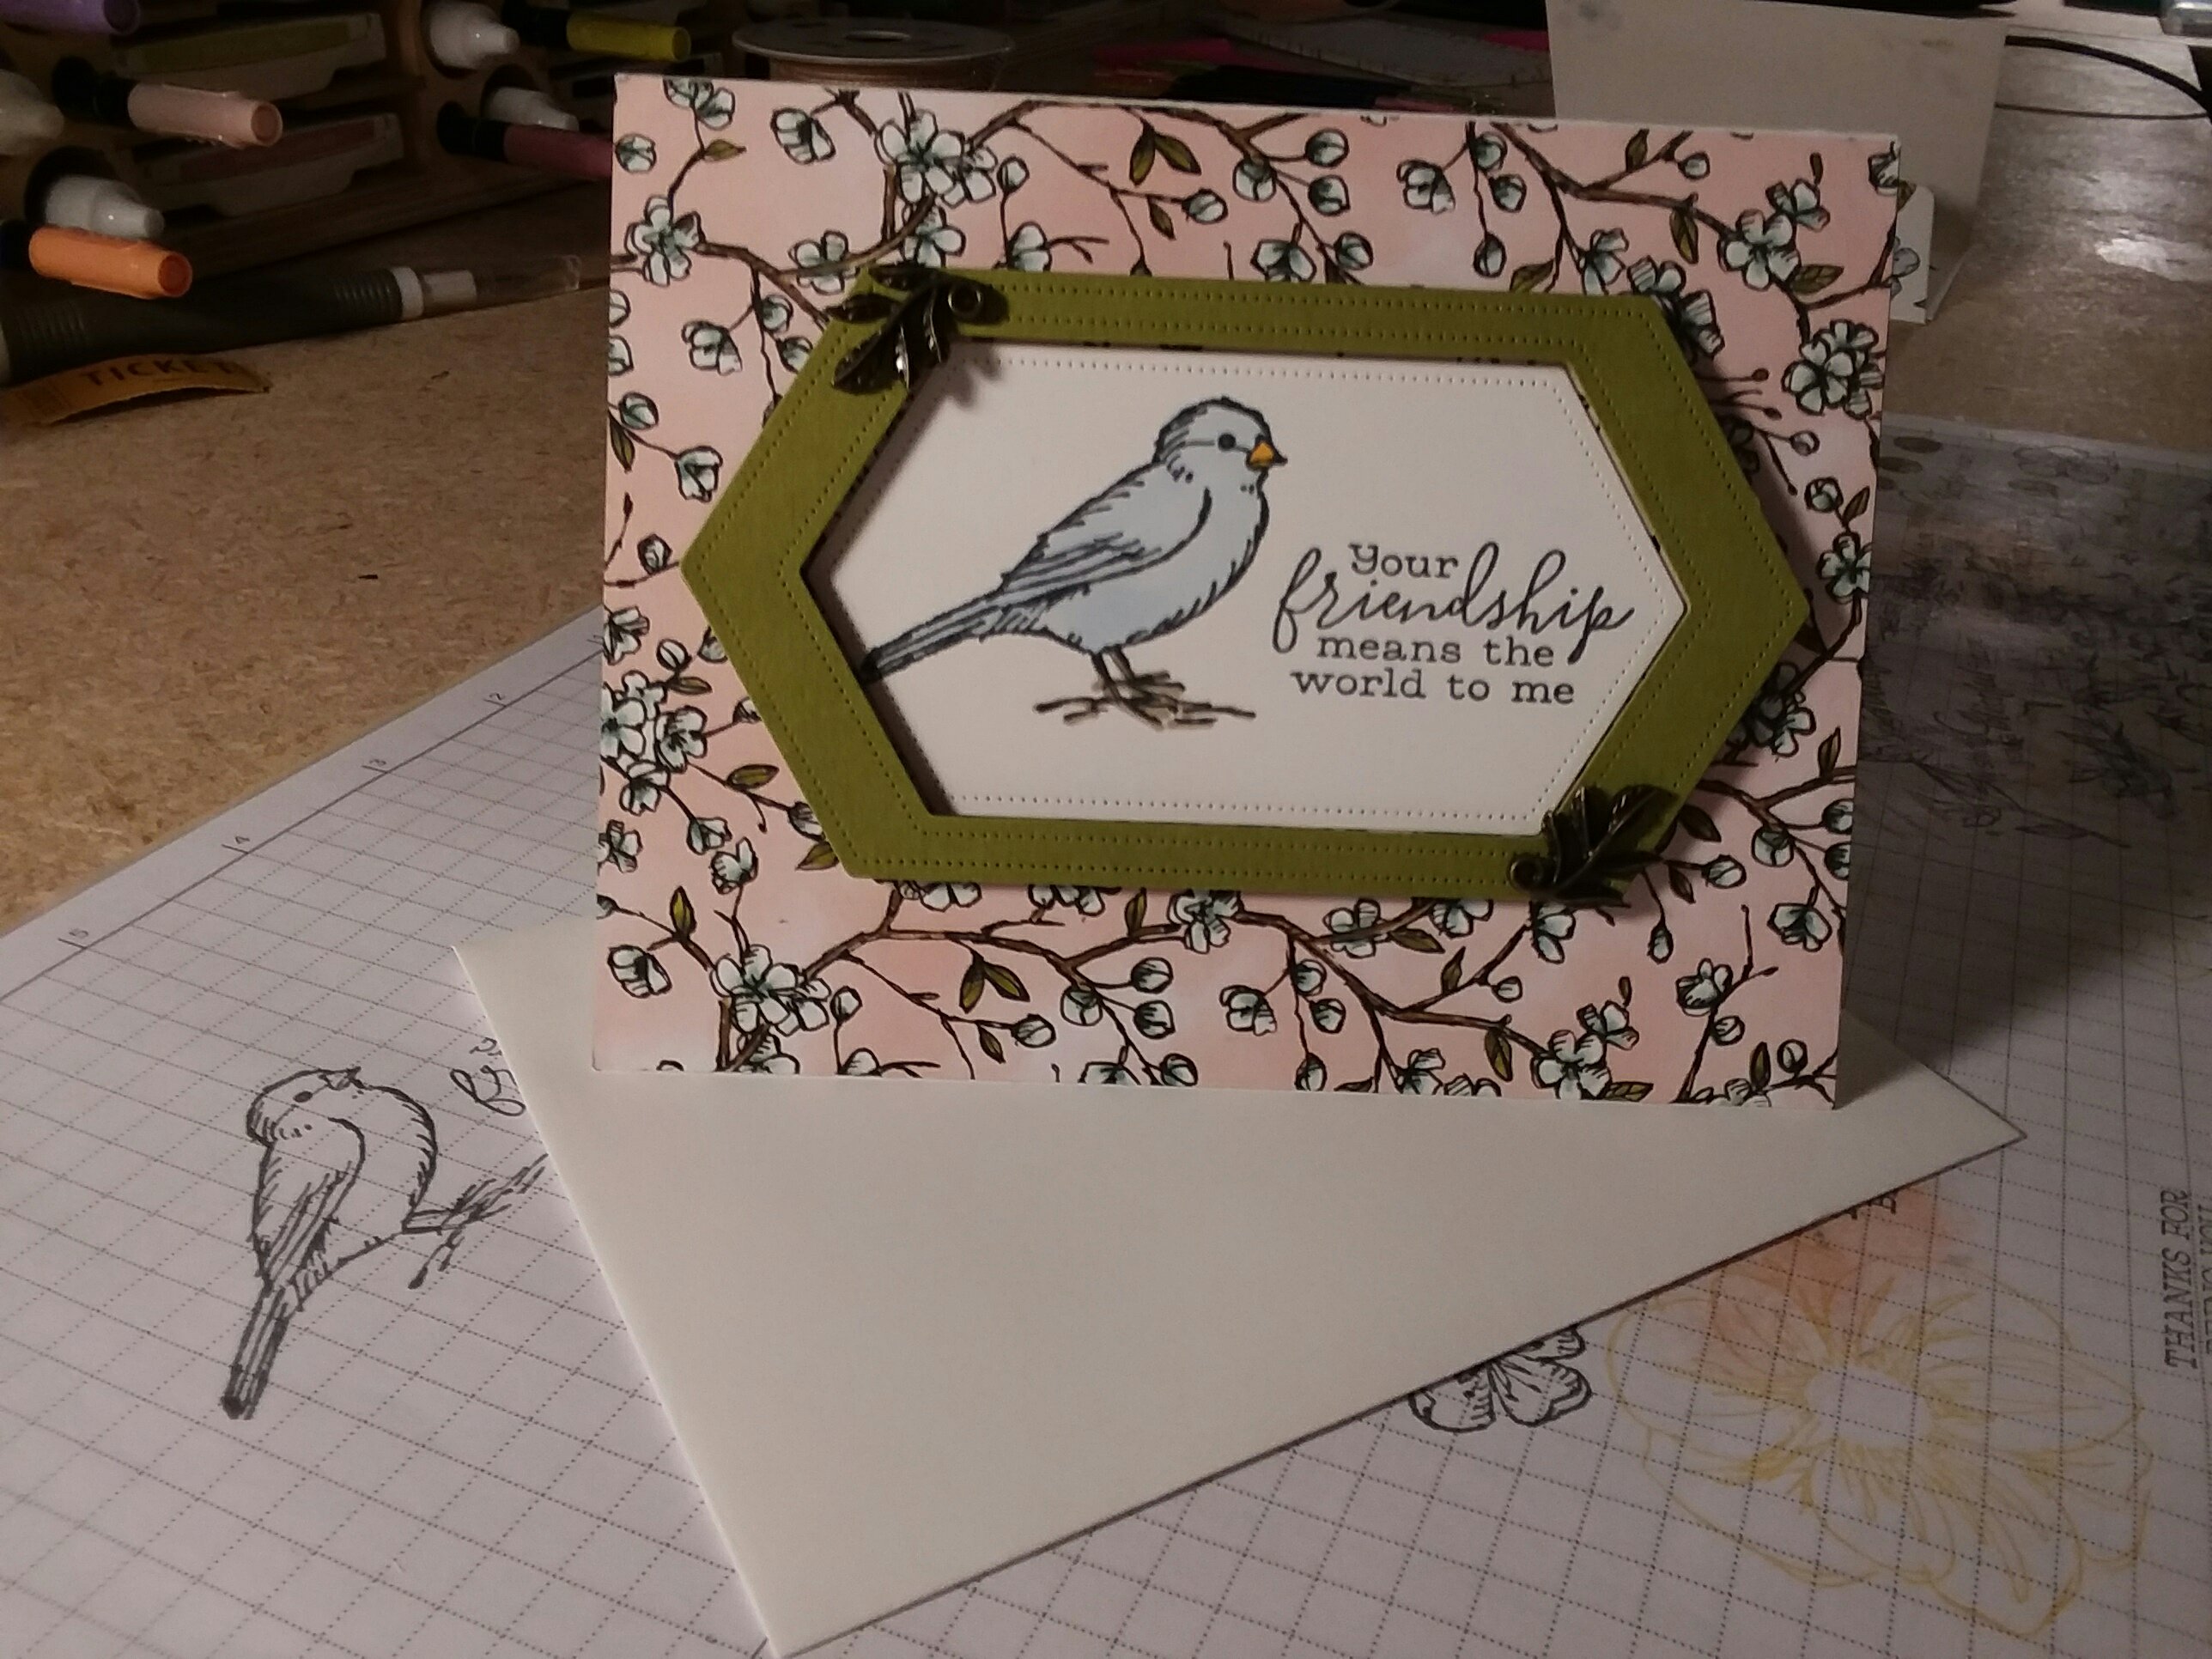
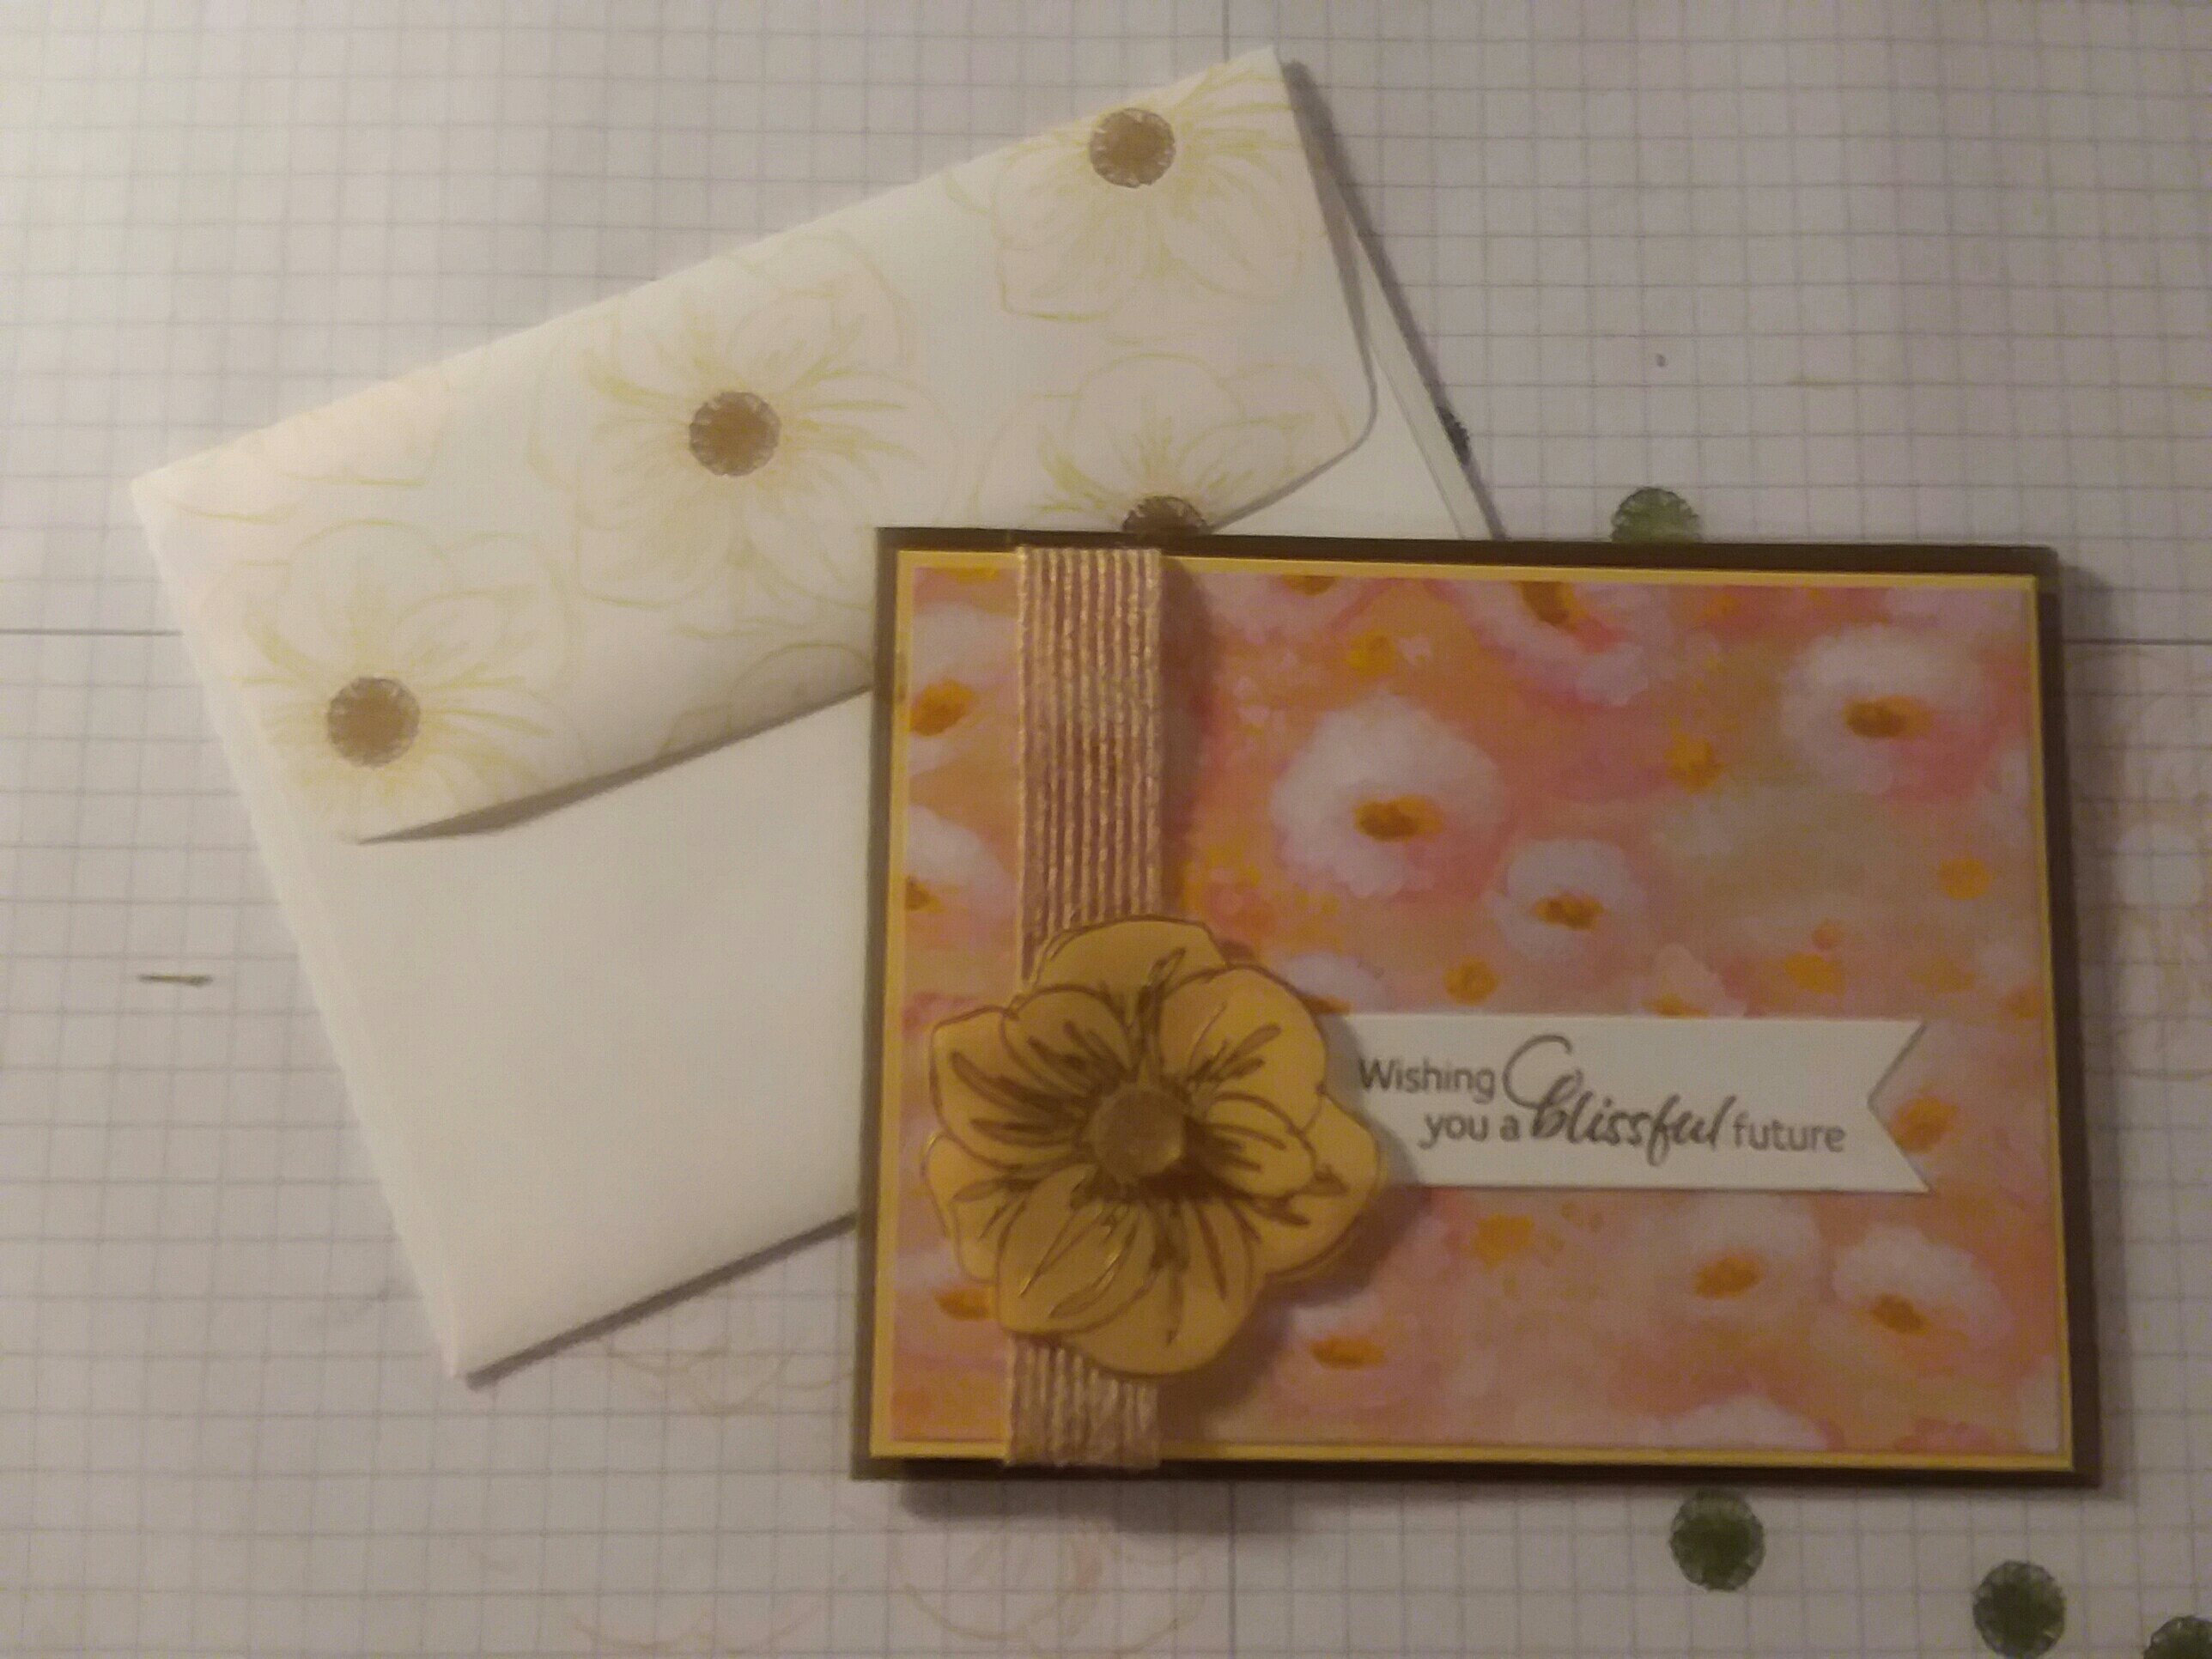
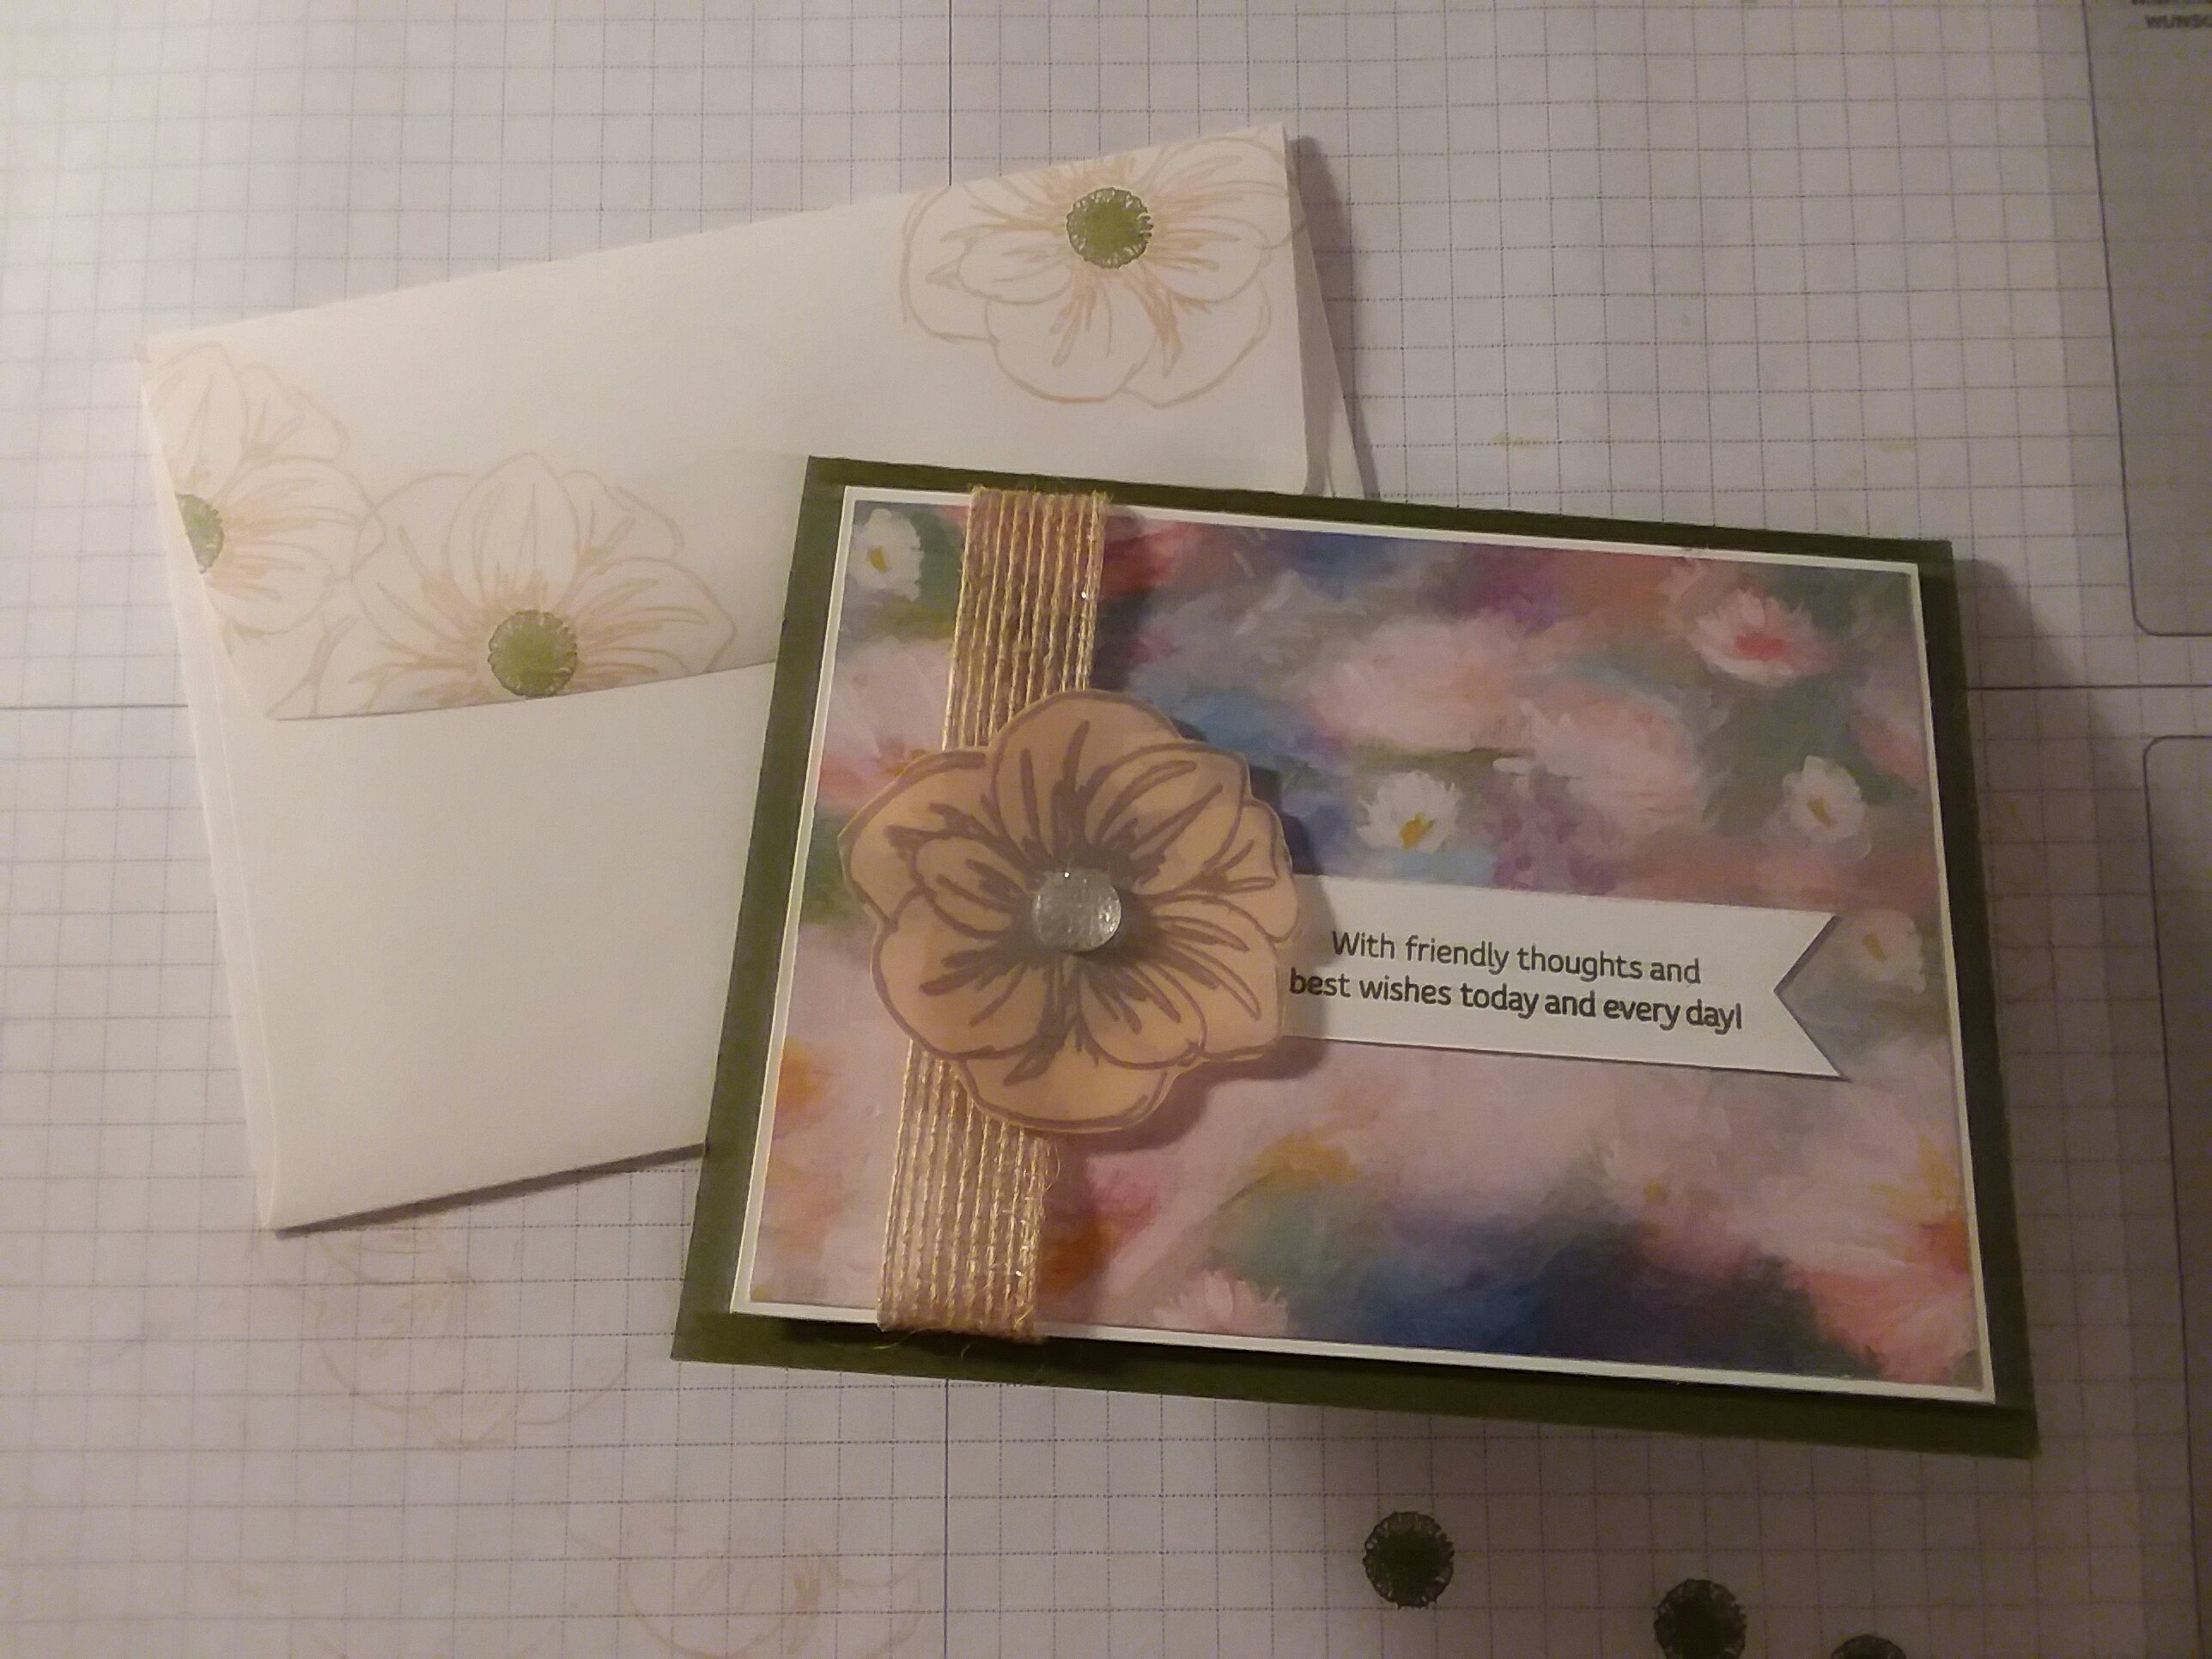
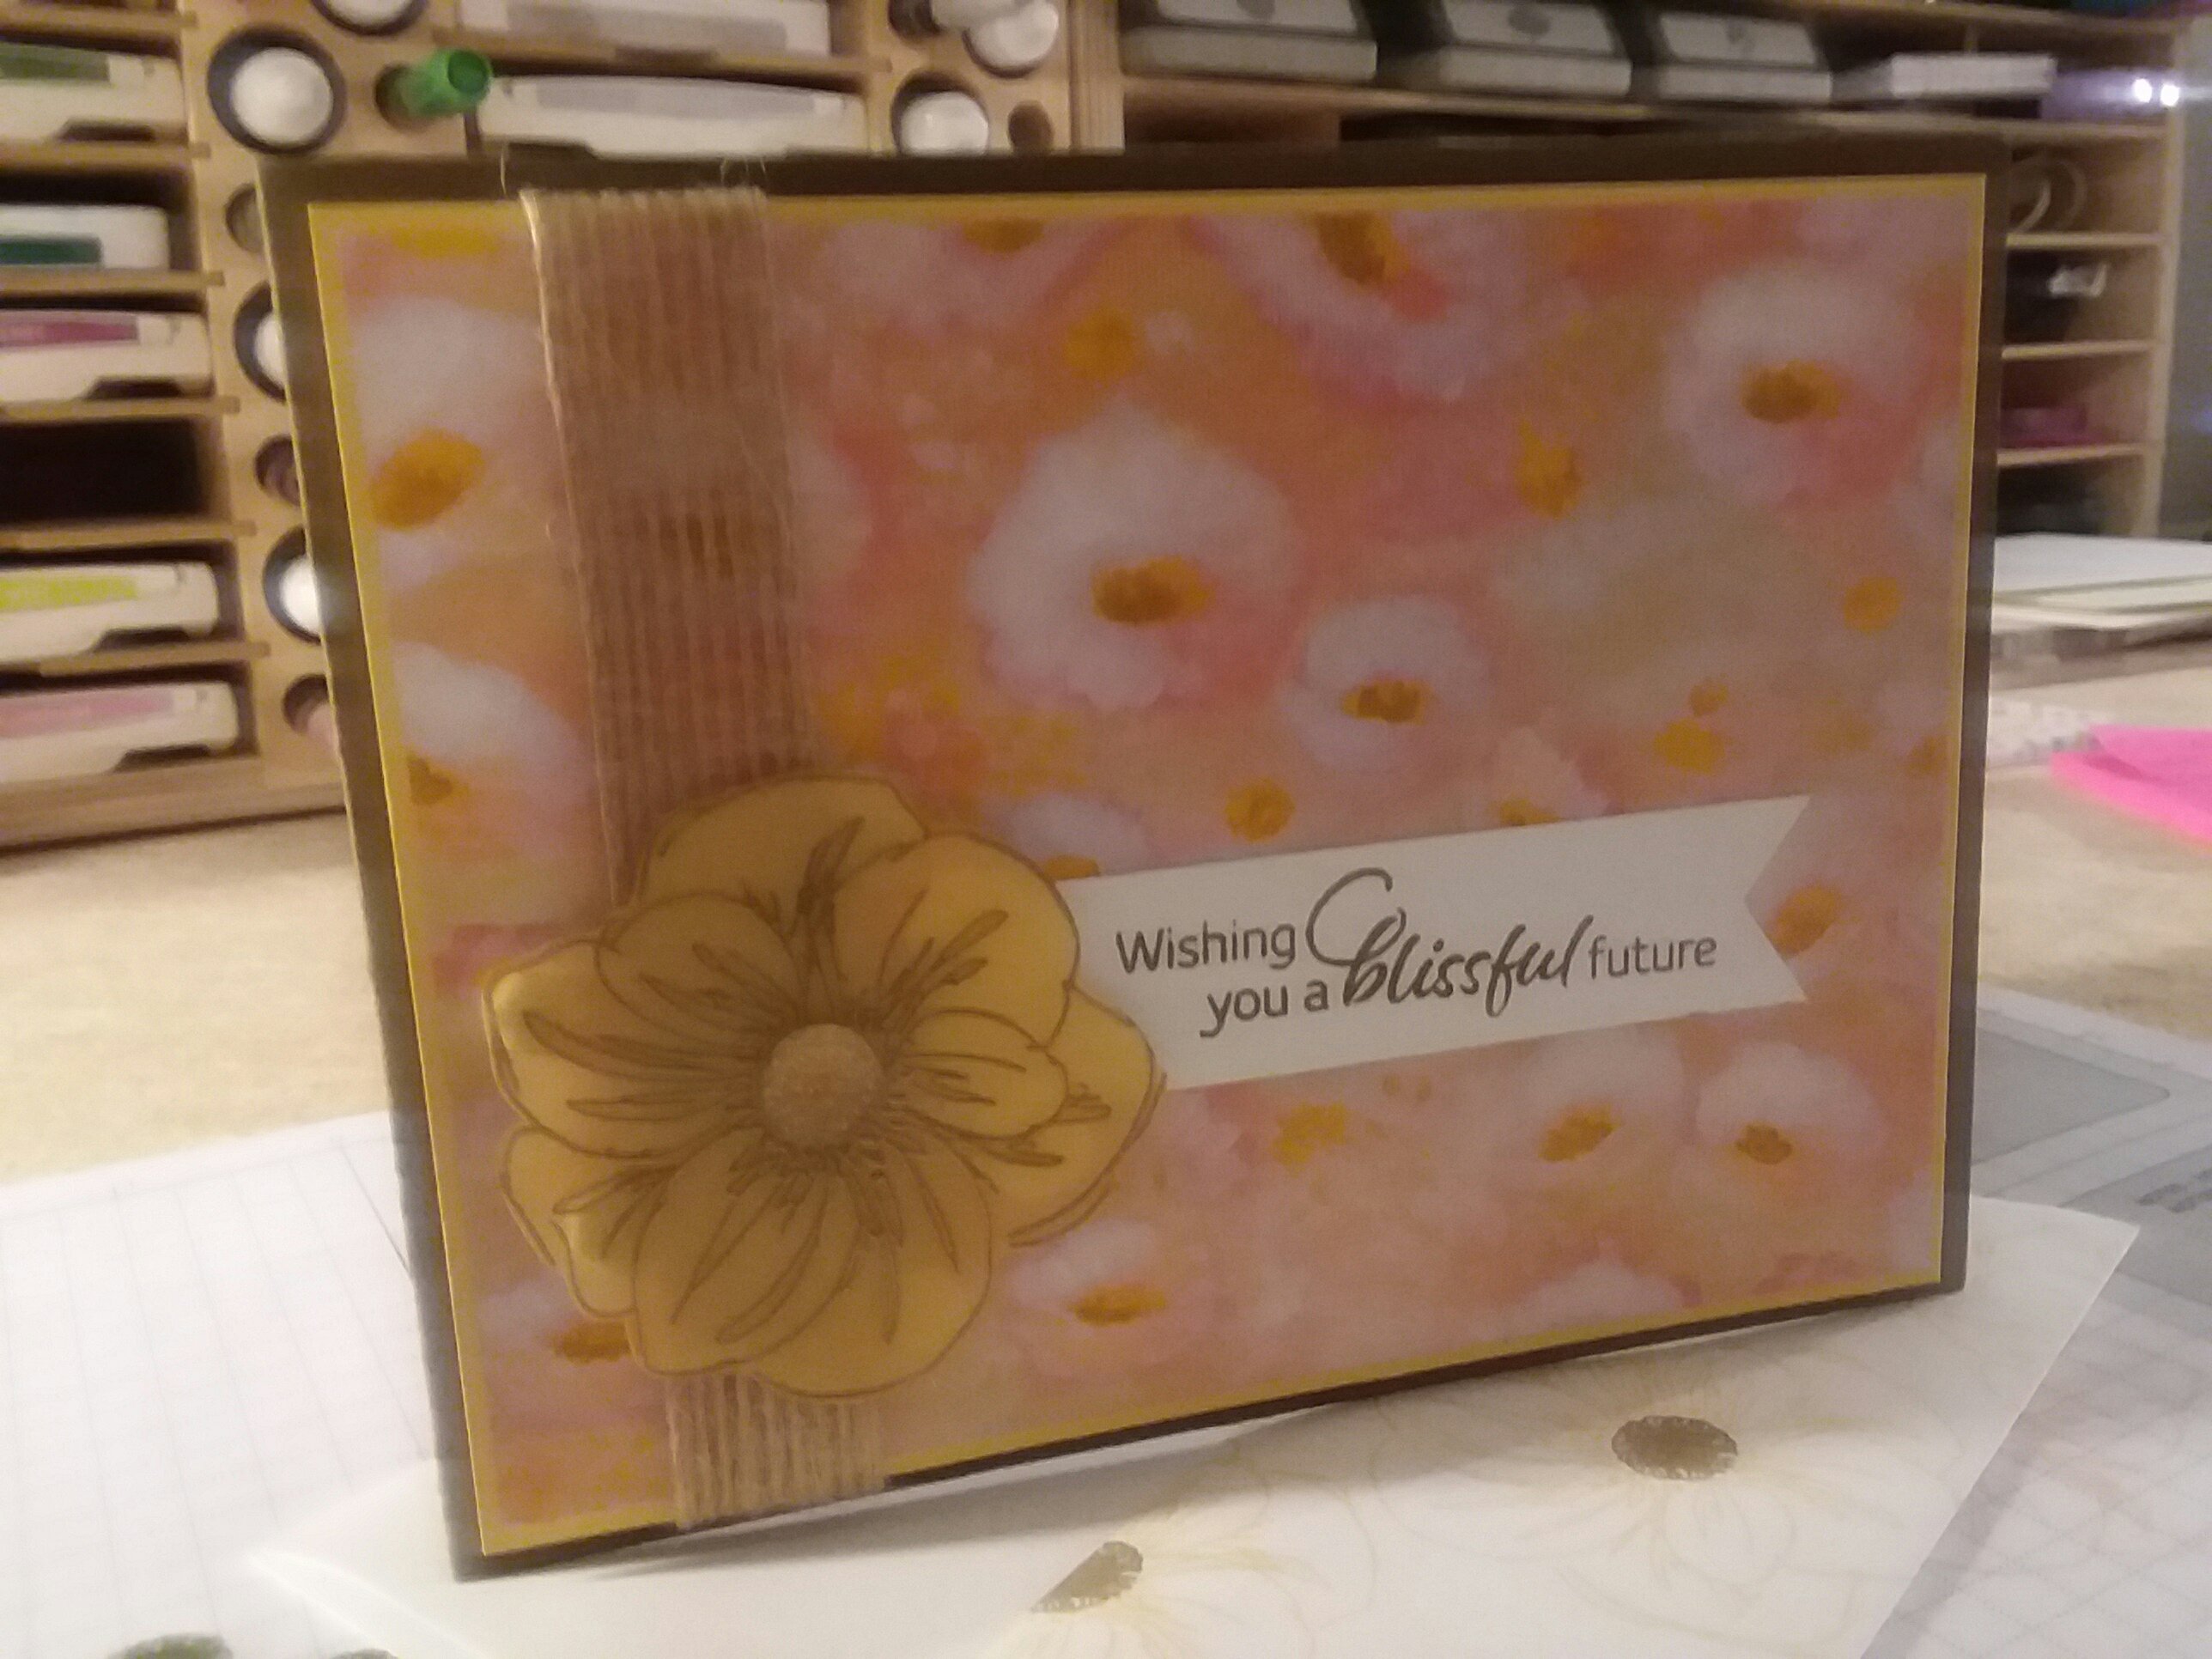
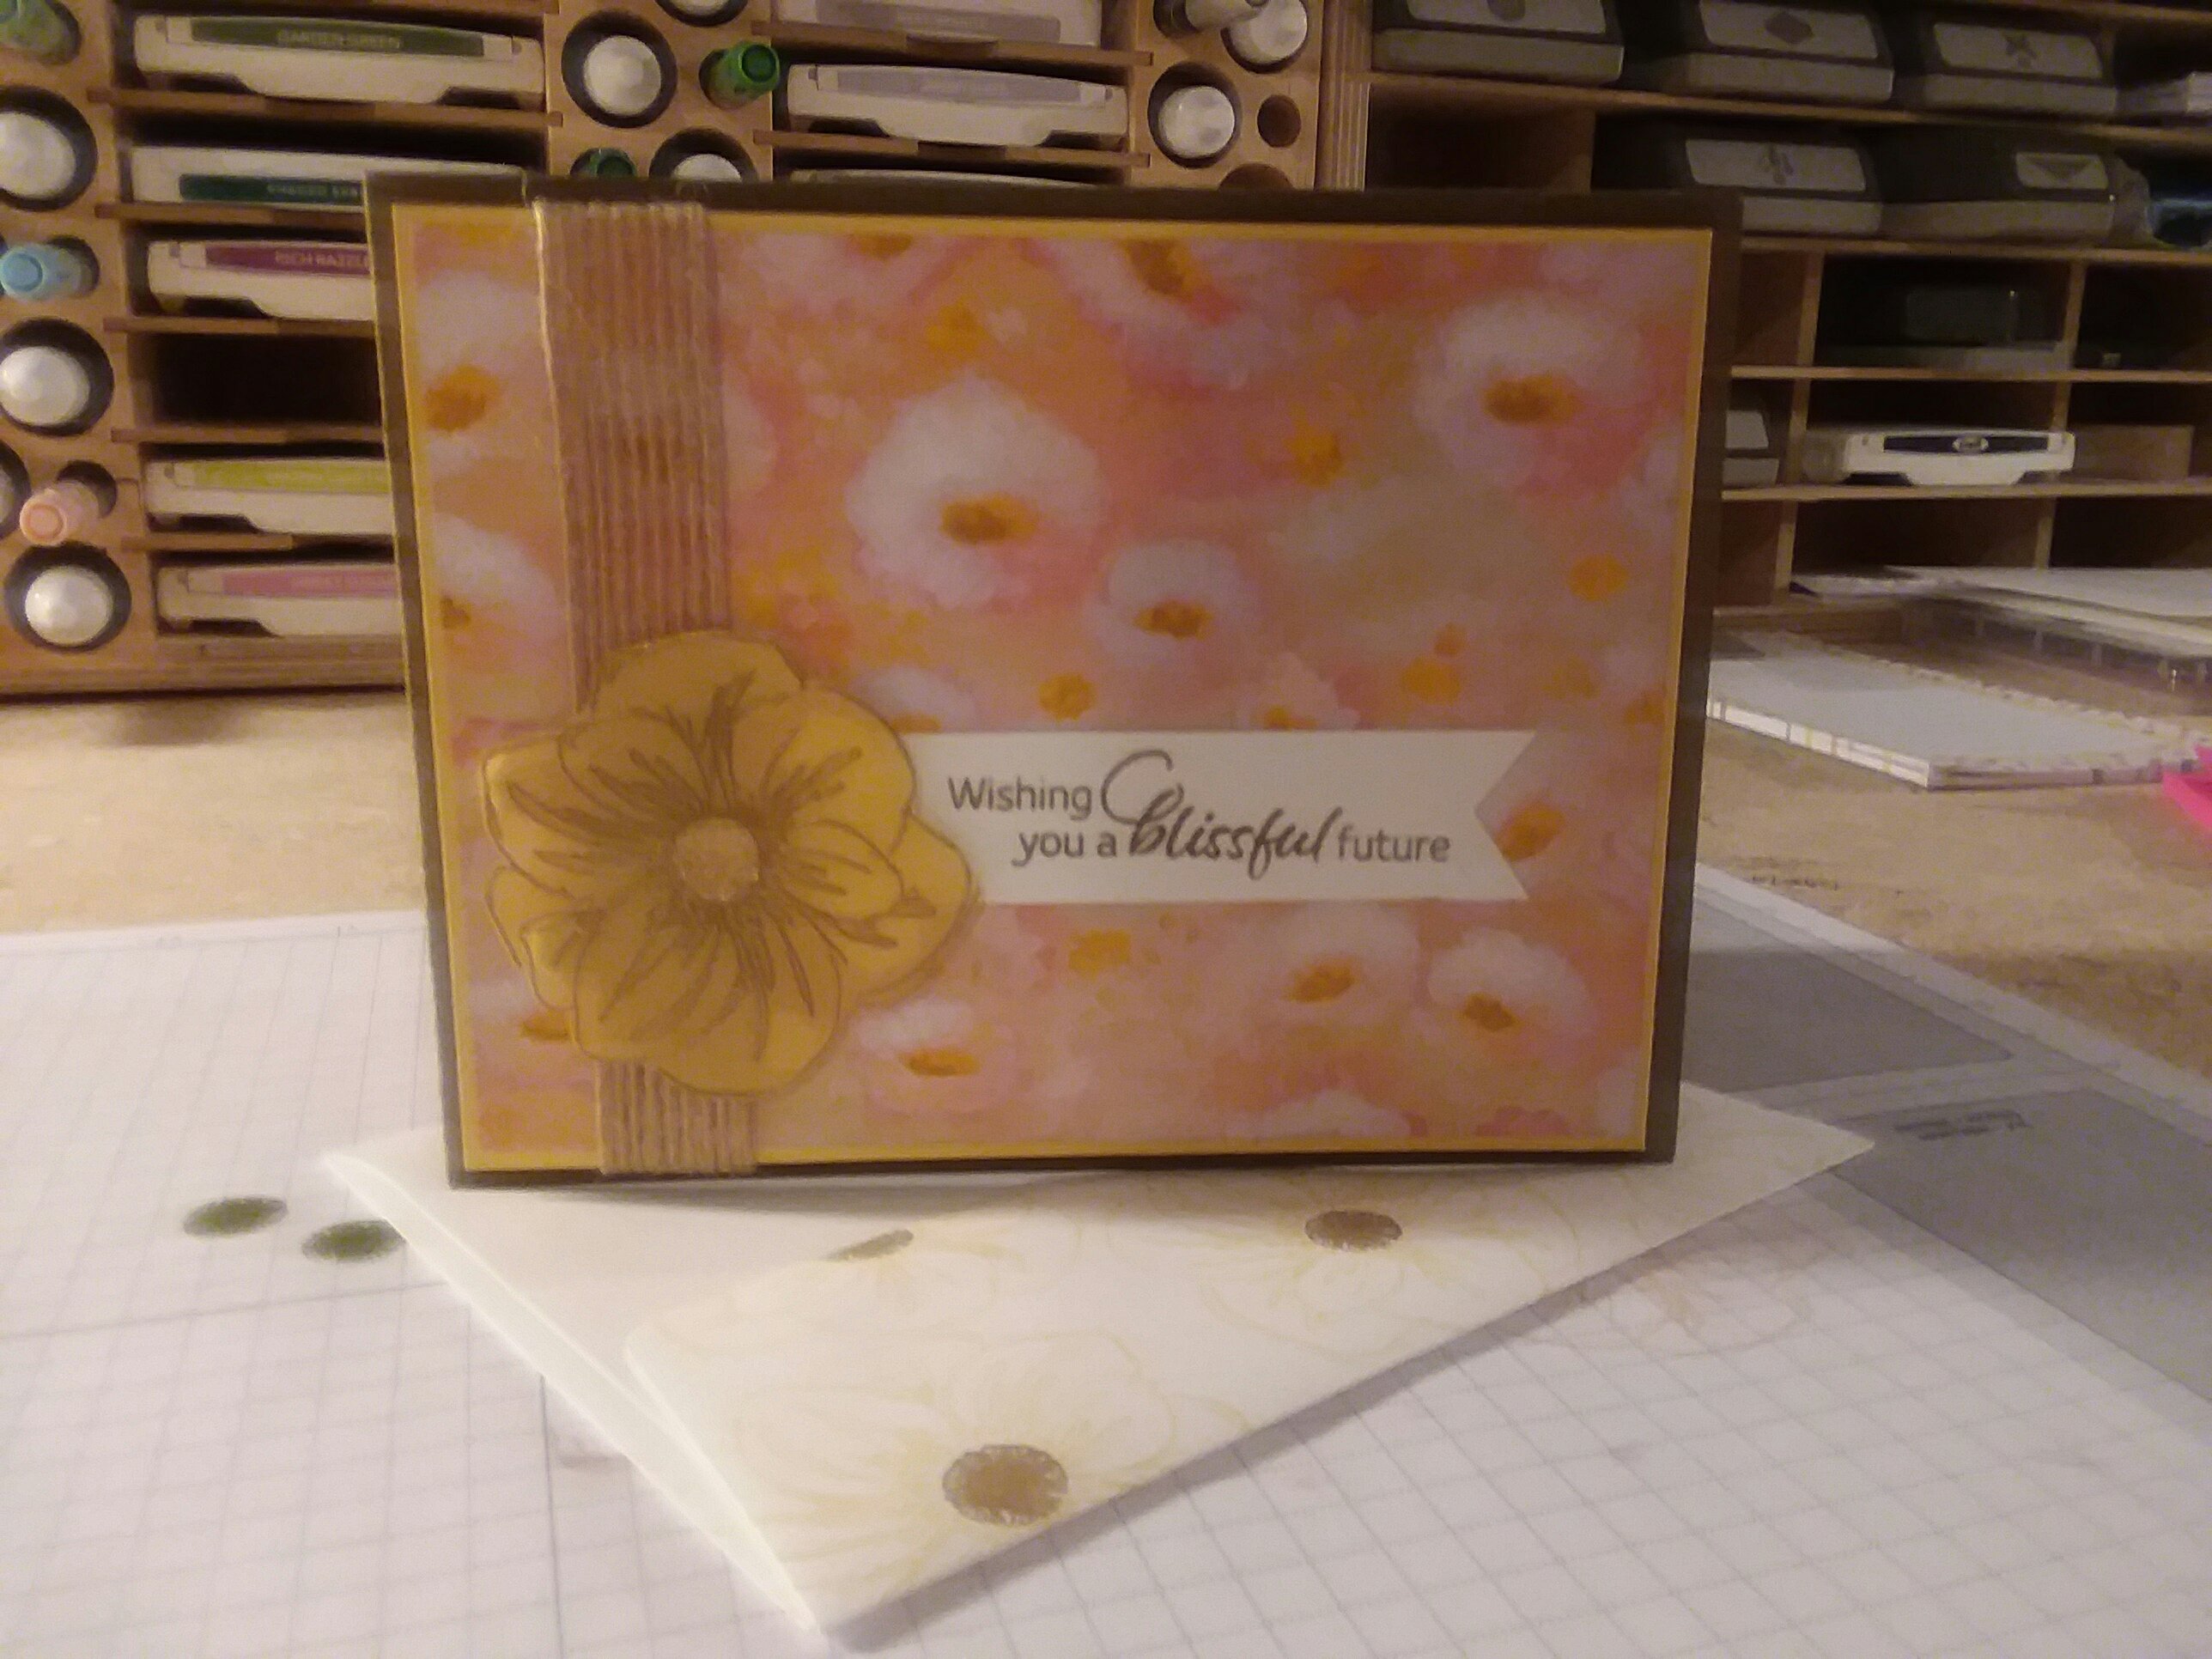
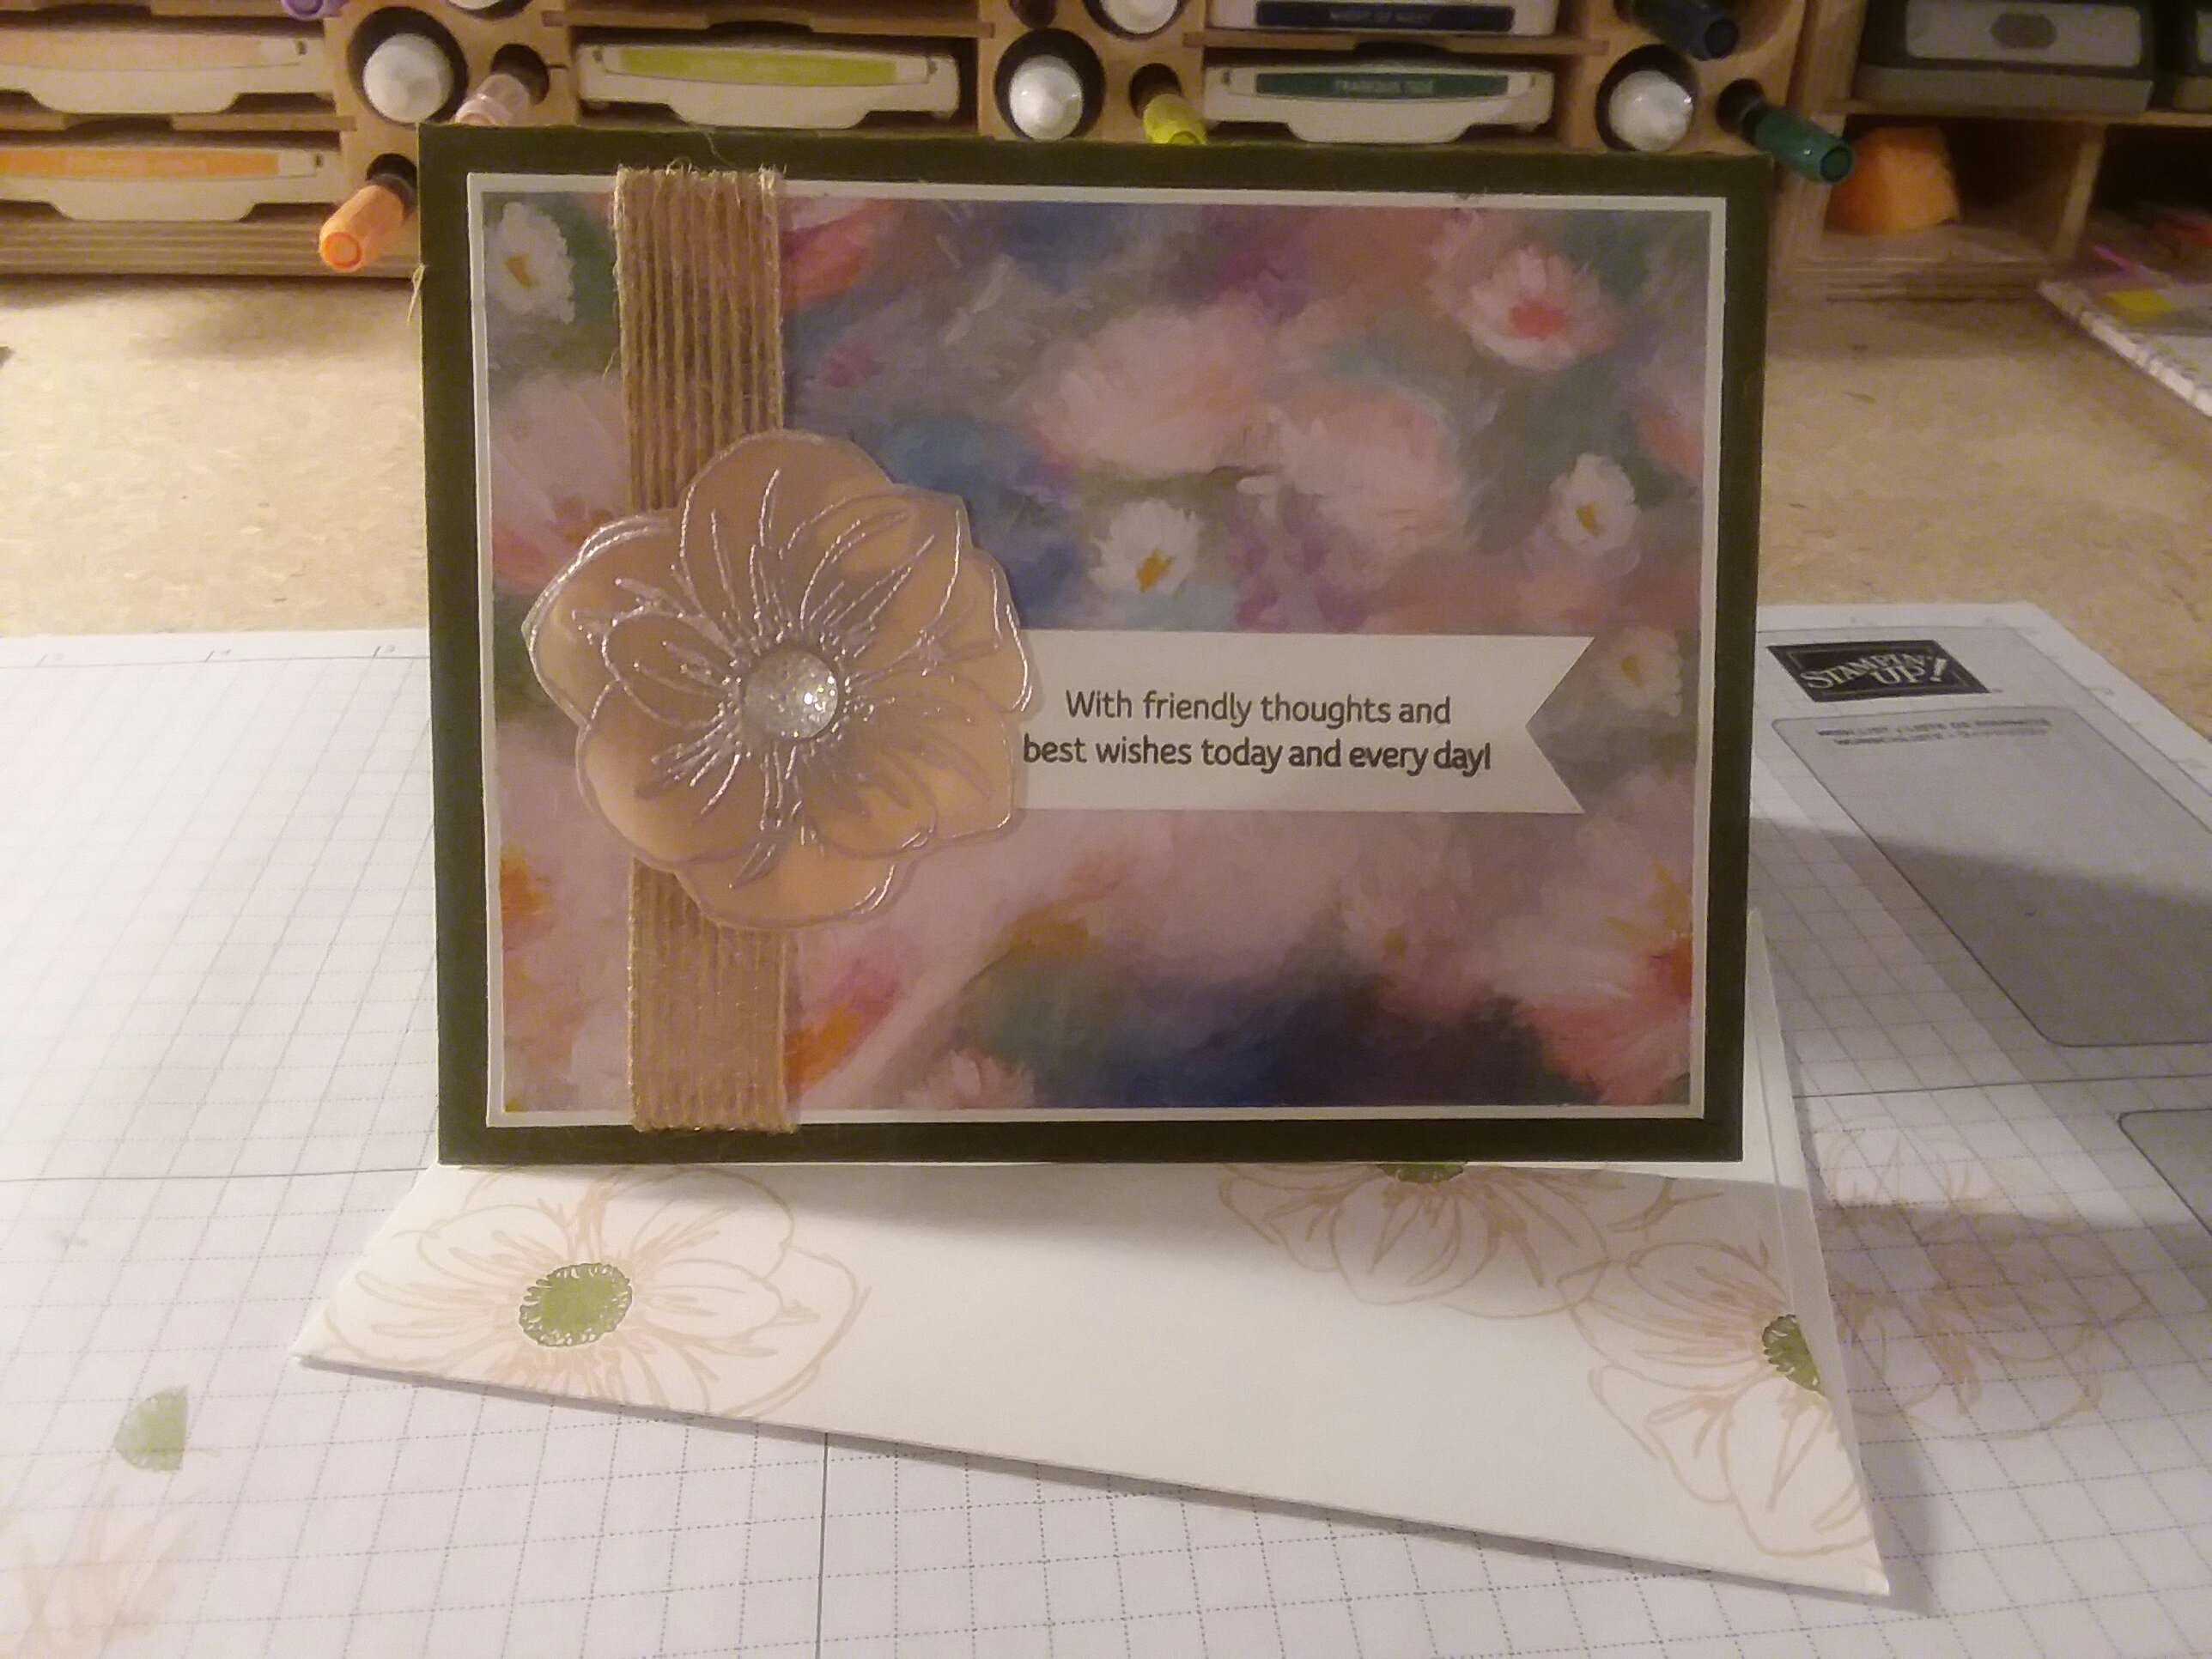
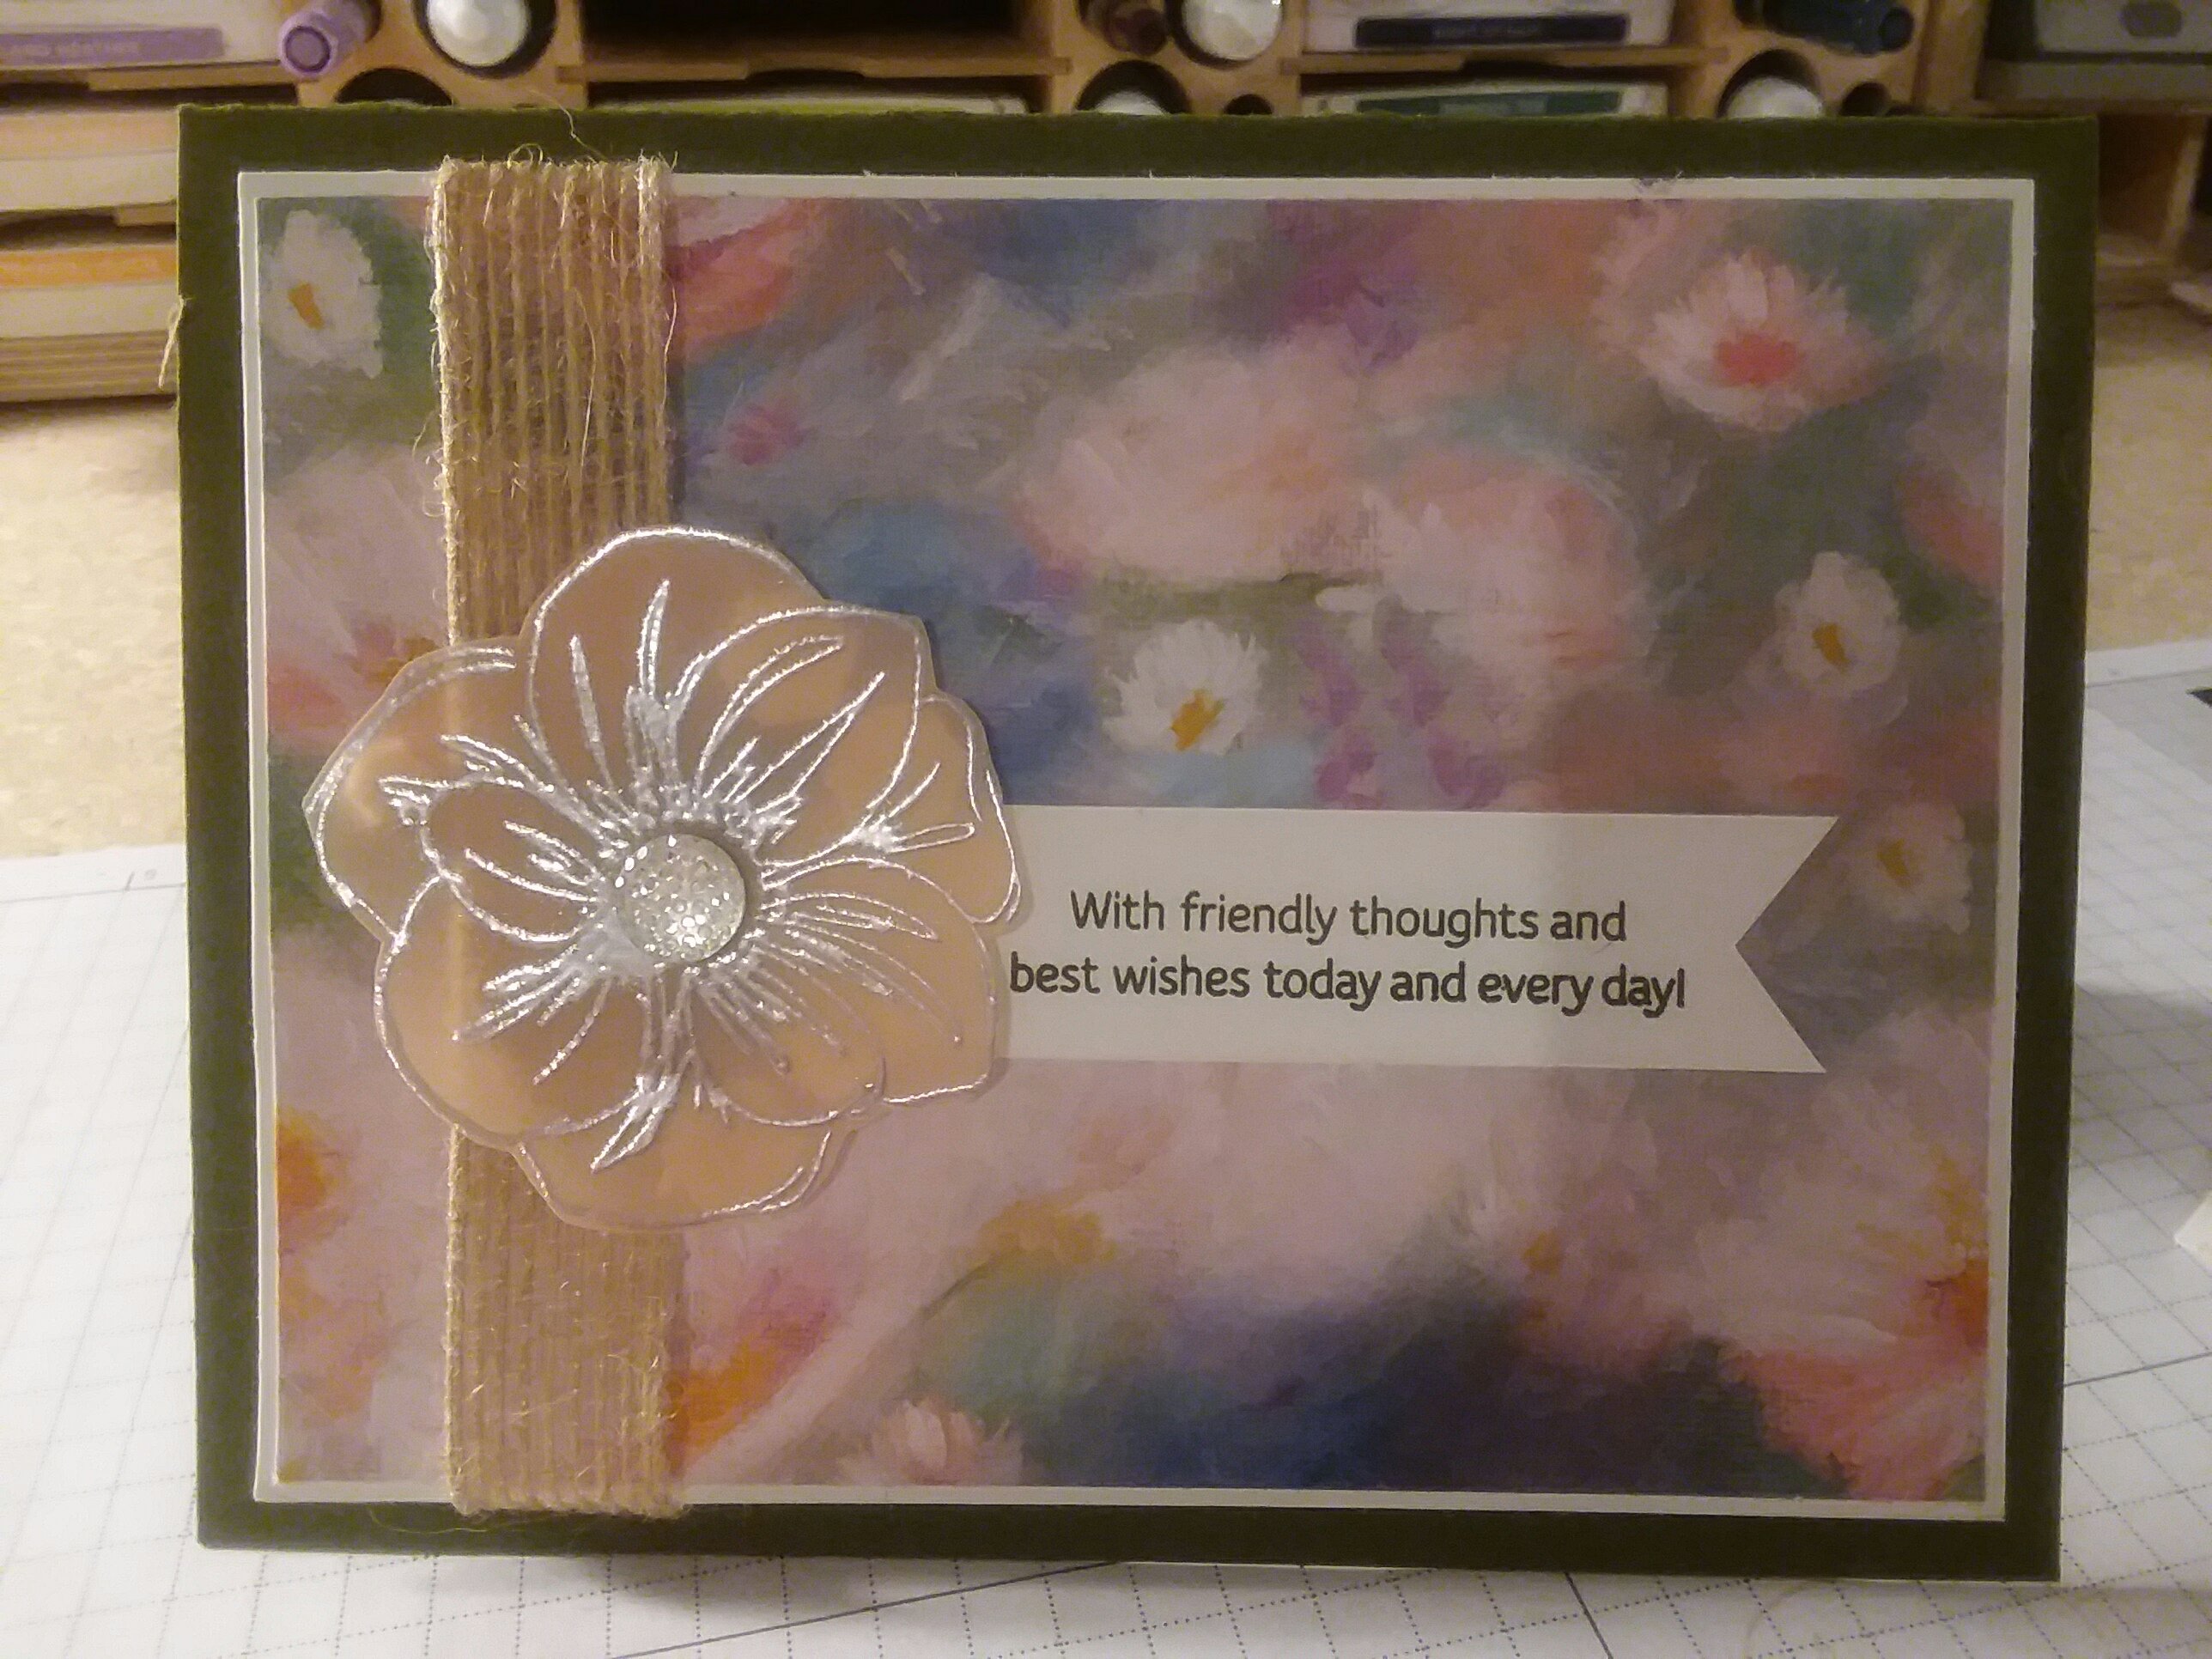
As I state in the video below, I first saw this technique done with a stamped piece of cardstock. I decided to make it a little simpler and use Designer Series Paper instead of stamped cardstock. I made a bunch of anniversary cards with fancy DSP designs using this die cut technique and it was pretty fast and easy. The DSP I used on this card is called Flower & Field and is from the Sale-A-Bration brochure. You can earn it for FREE with a $50 purchase. It cannot be purchased directly. You can find it on p. 10 of the Sale-A-Bration Brochure.

Side View

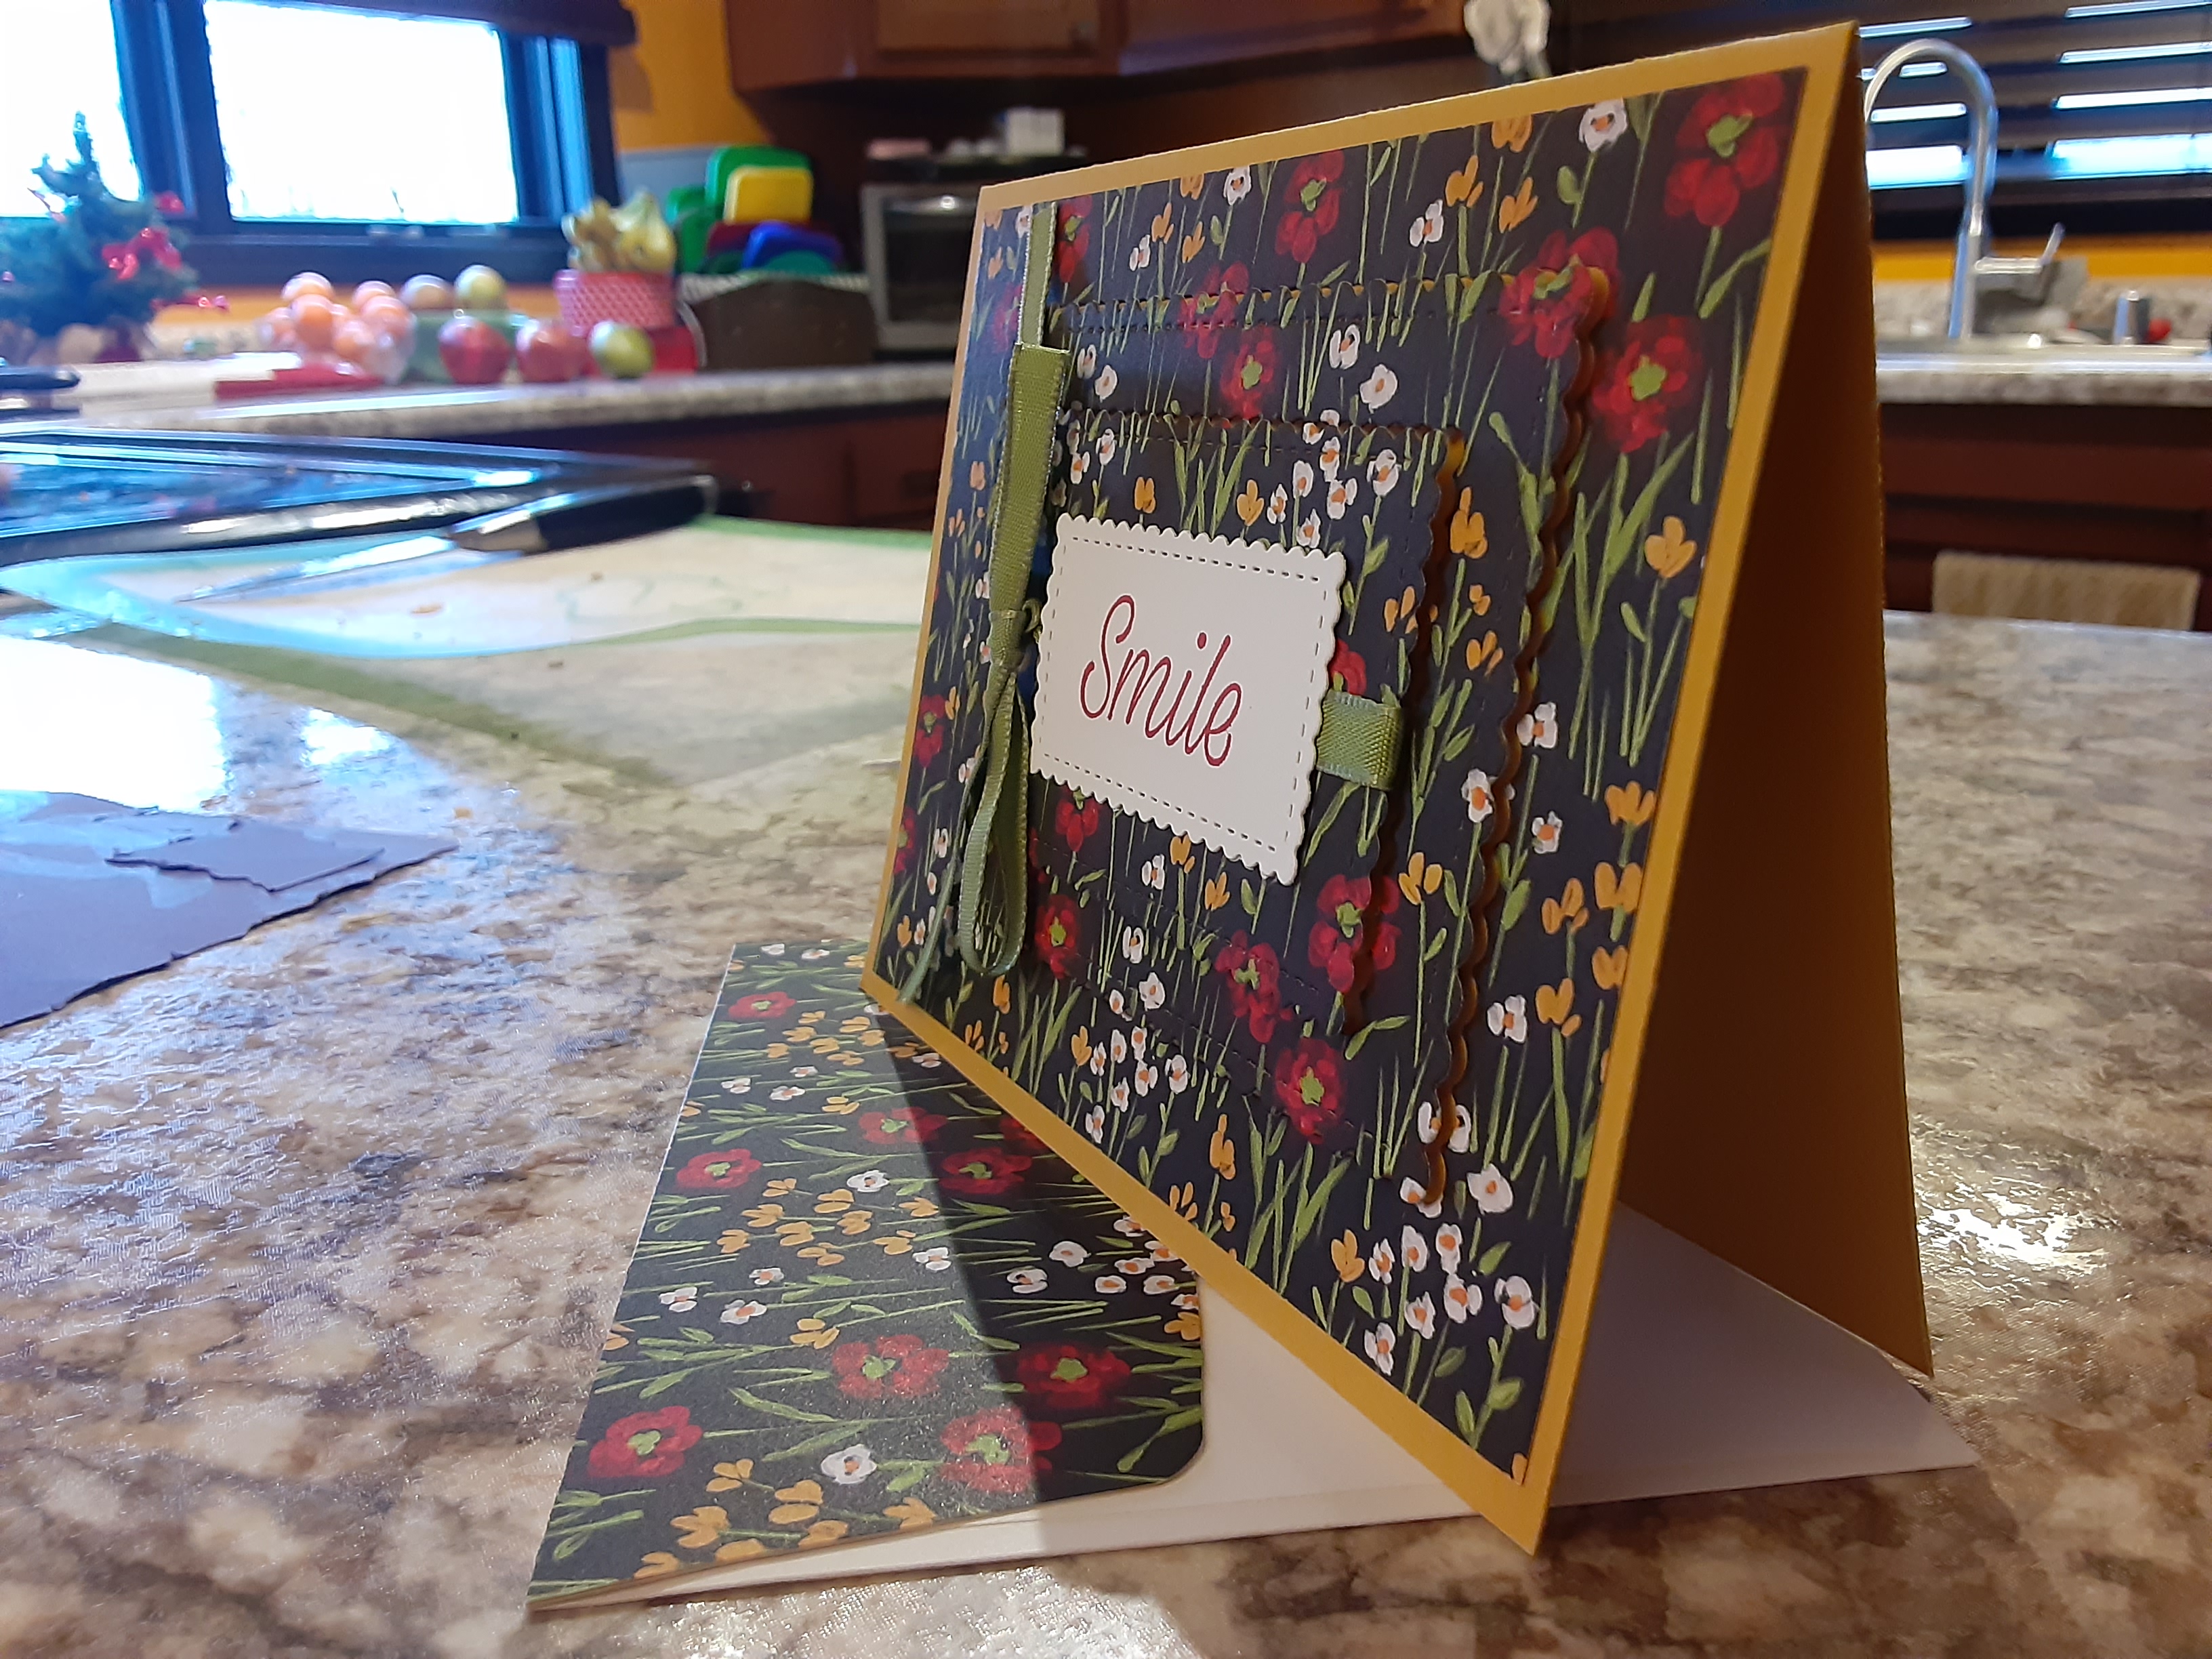
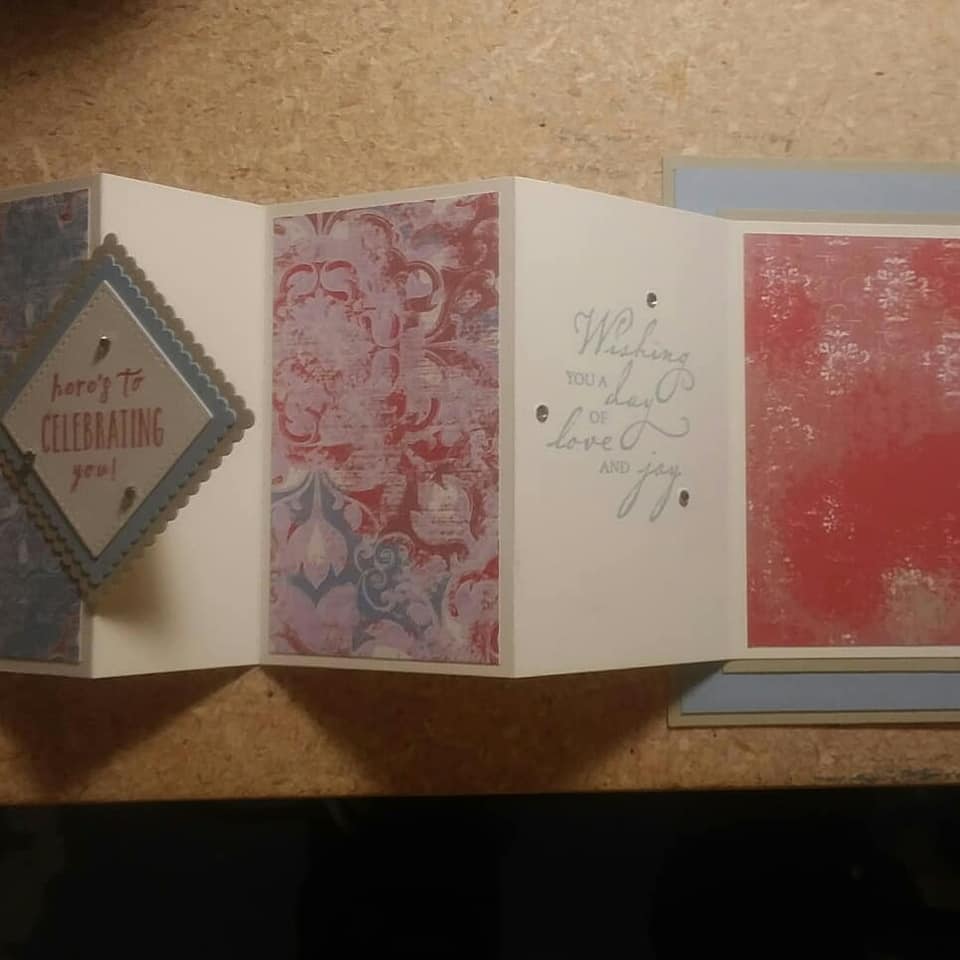
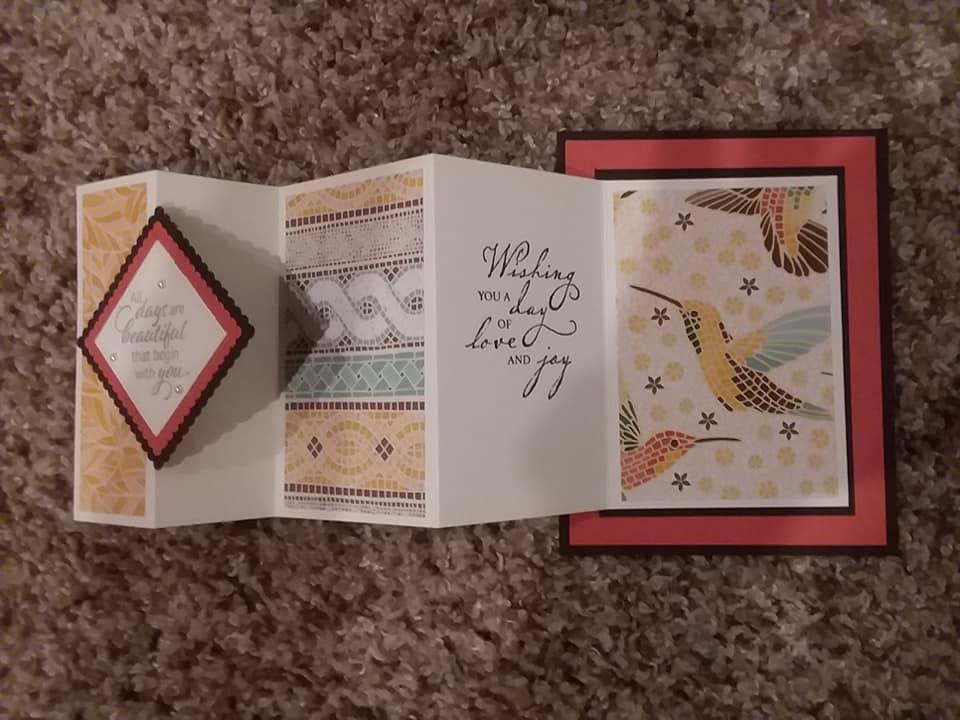
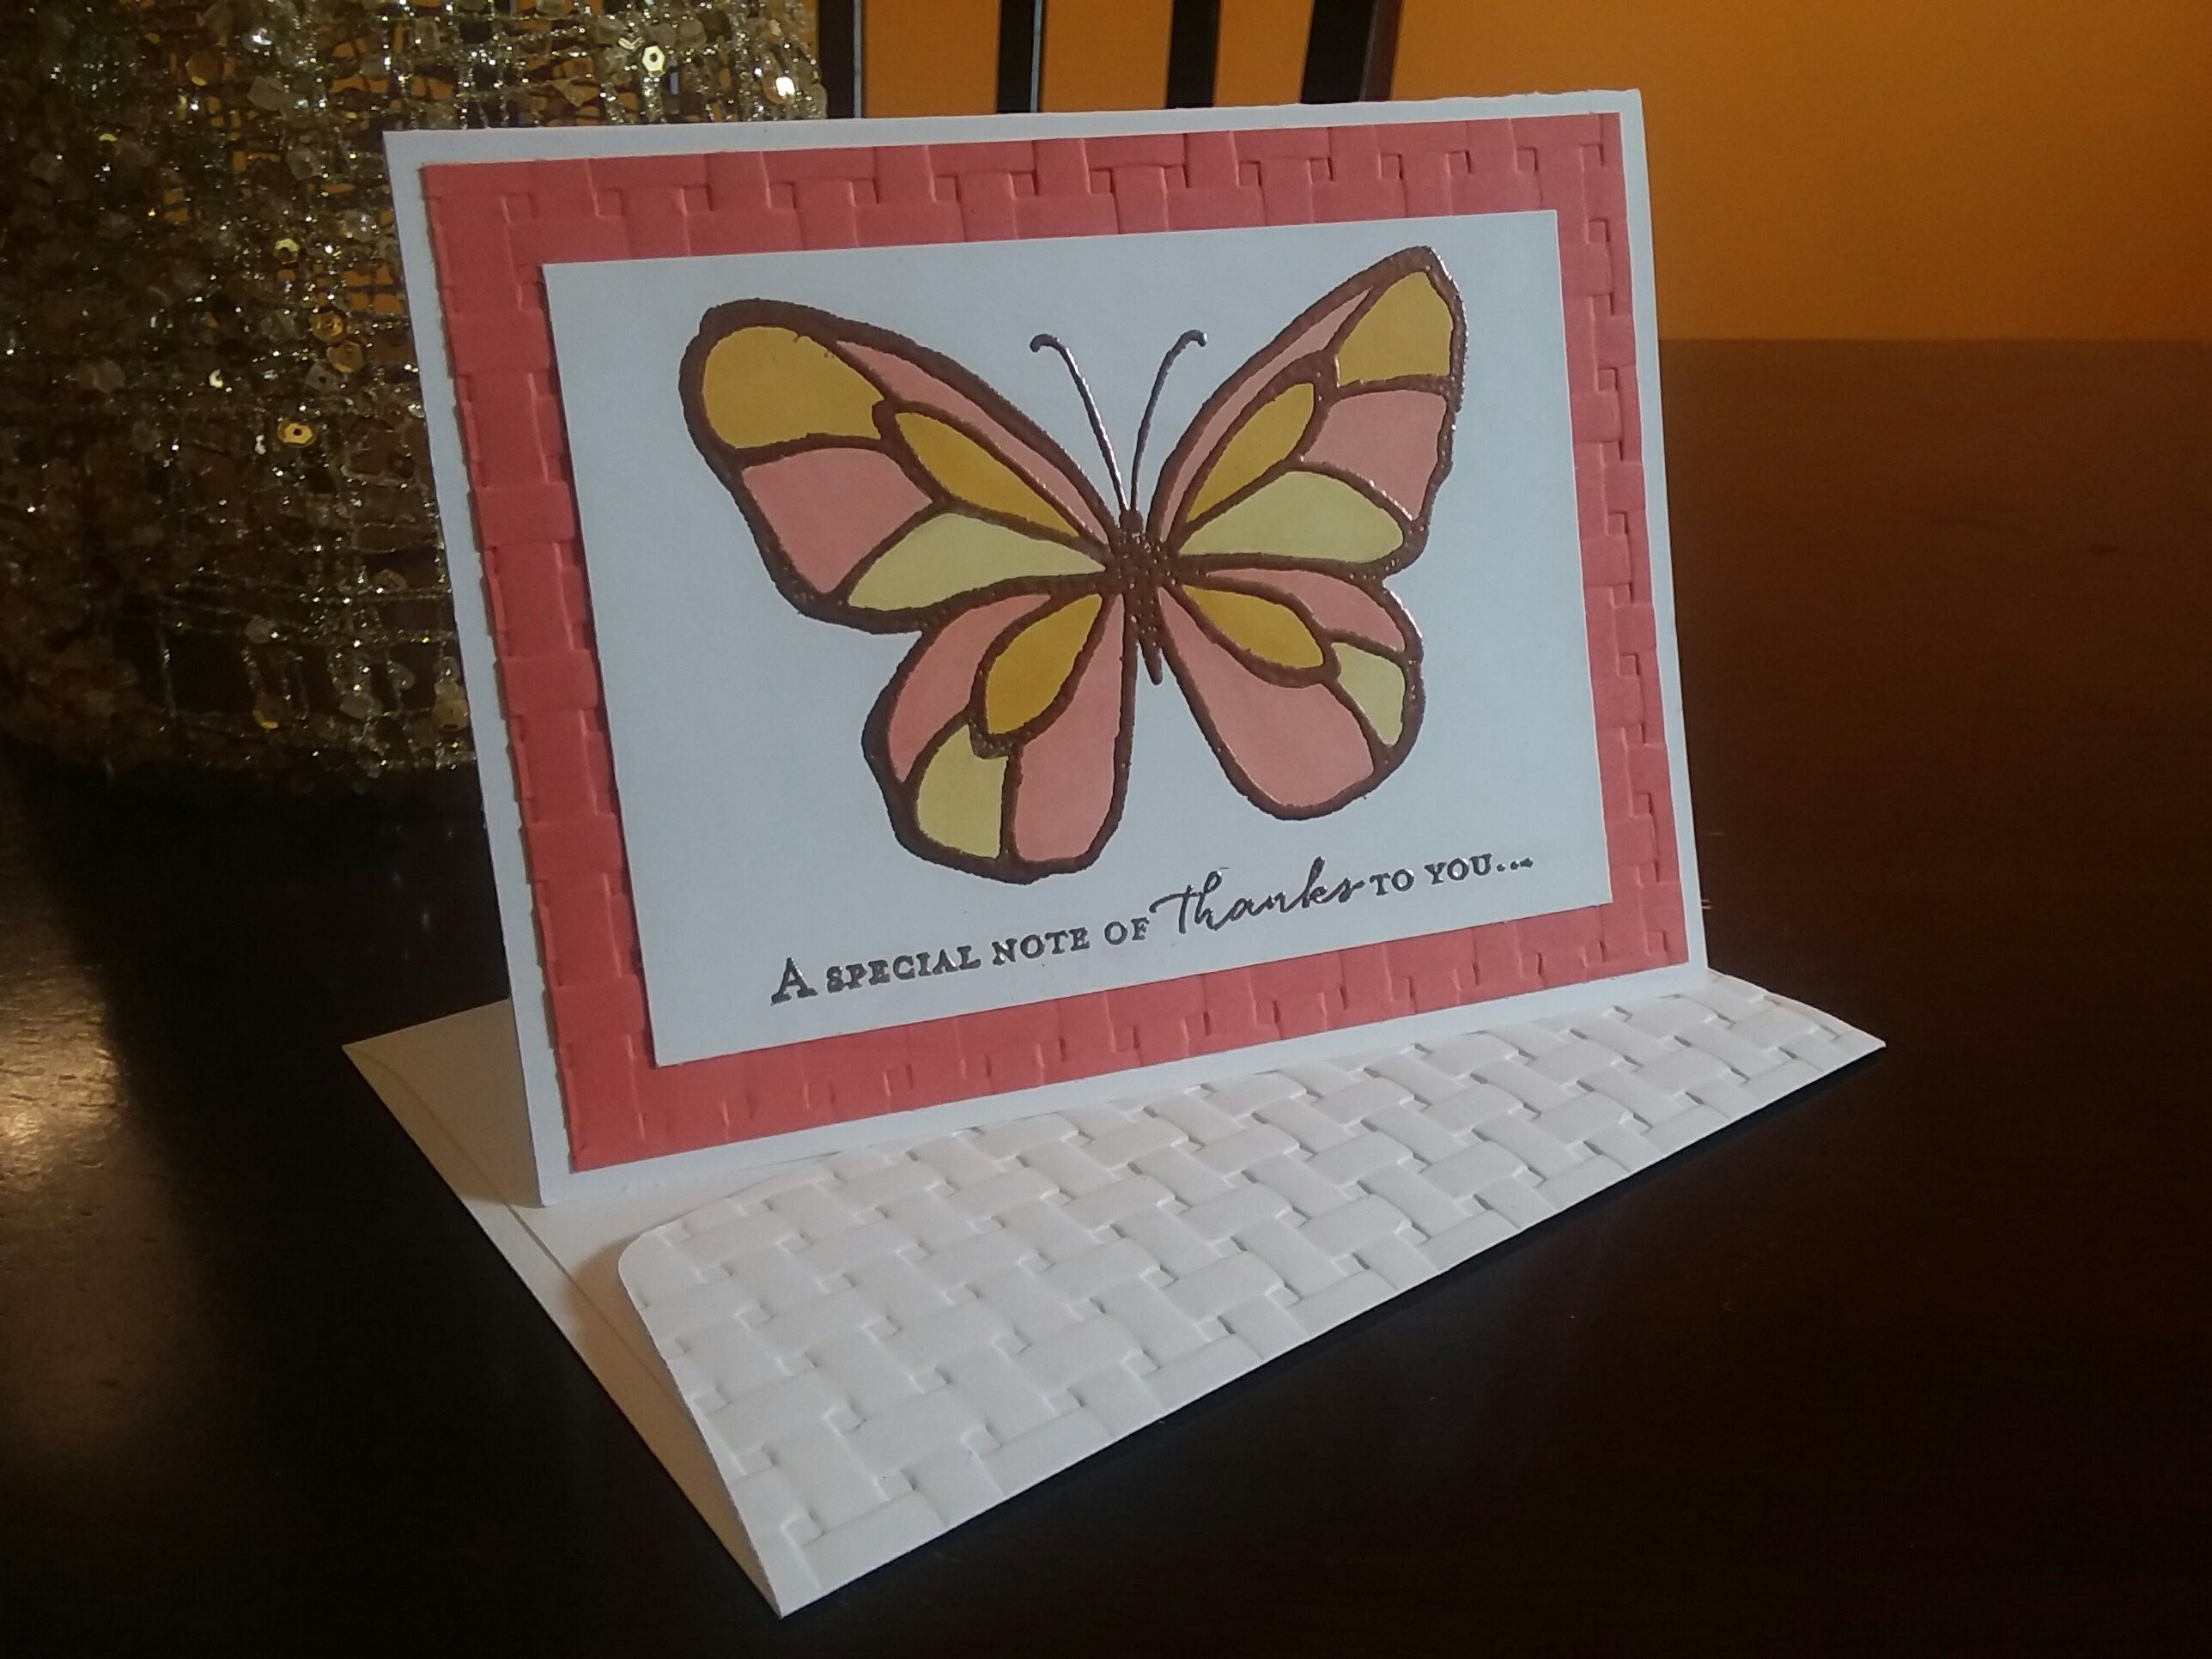
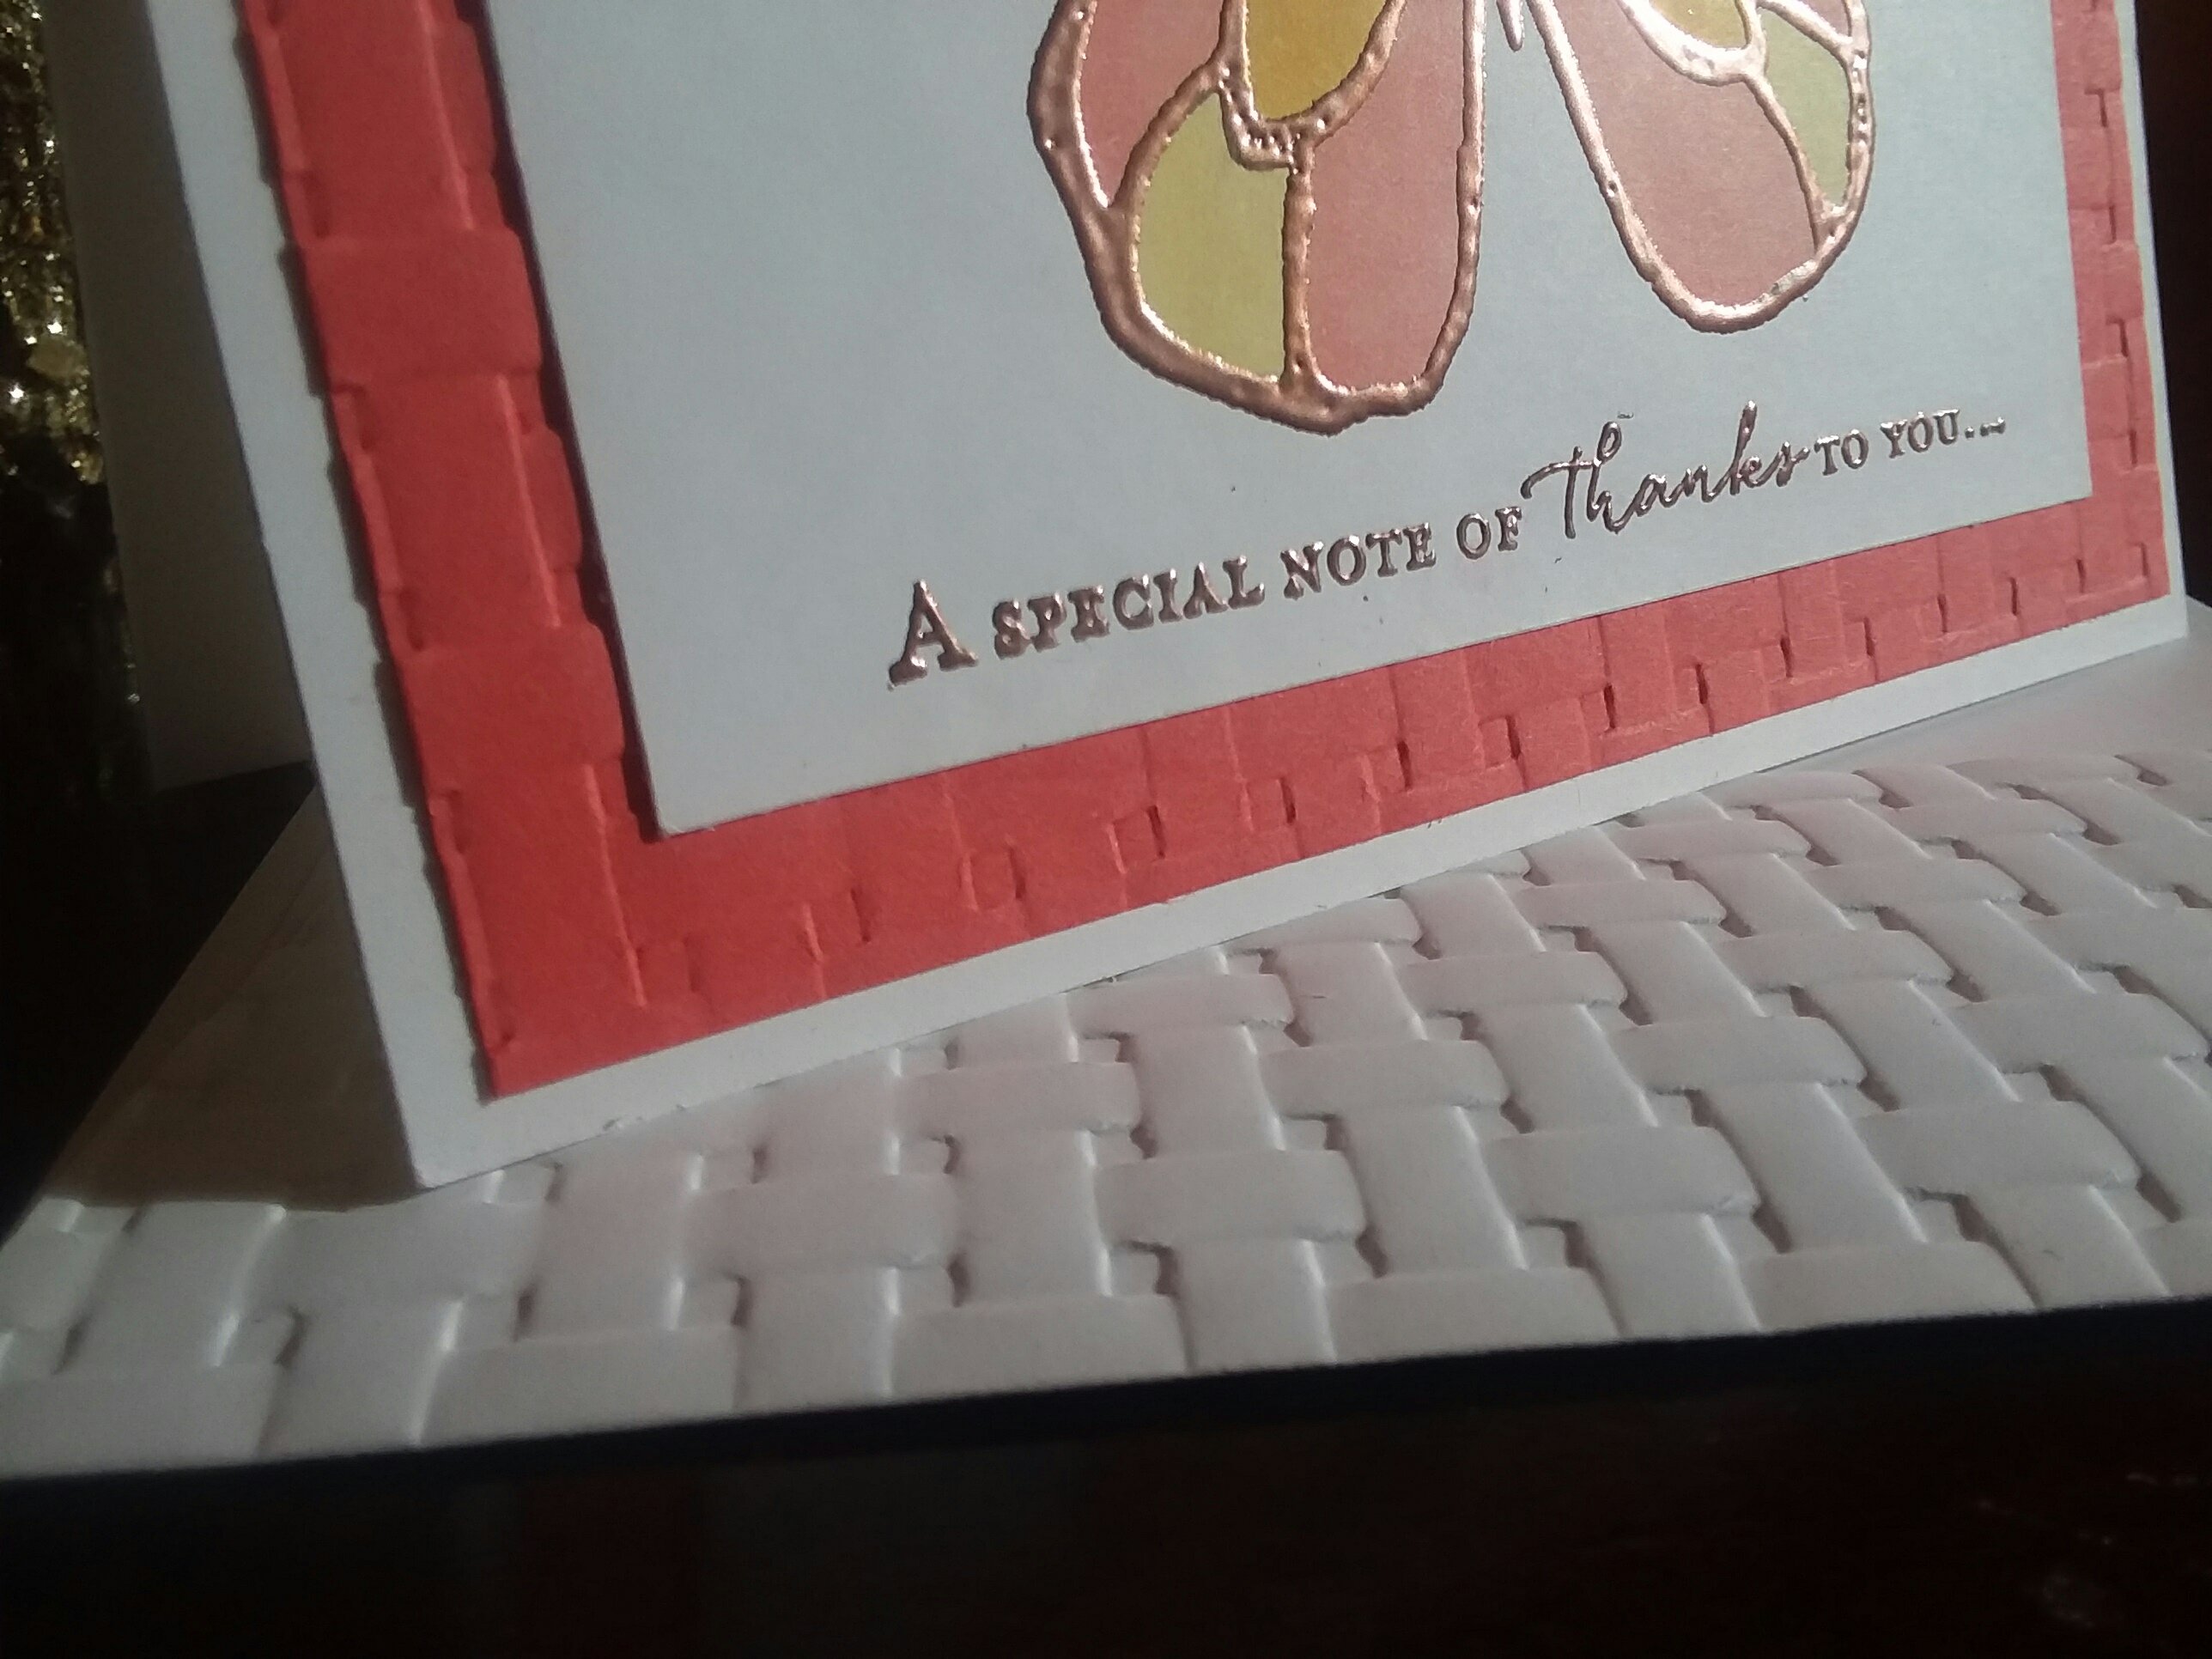
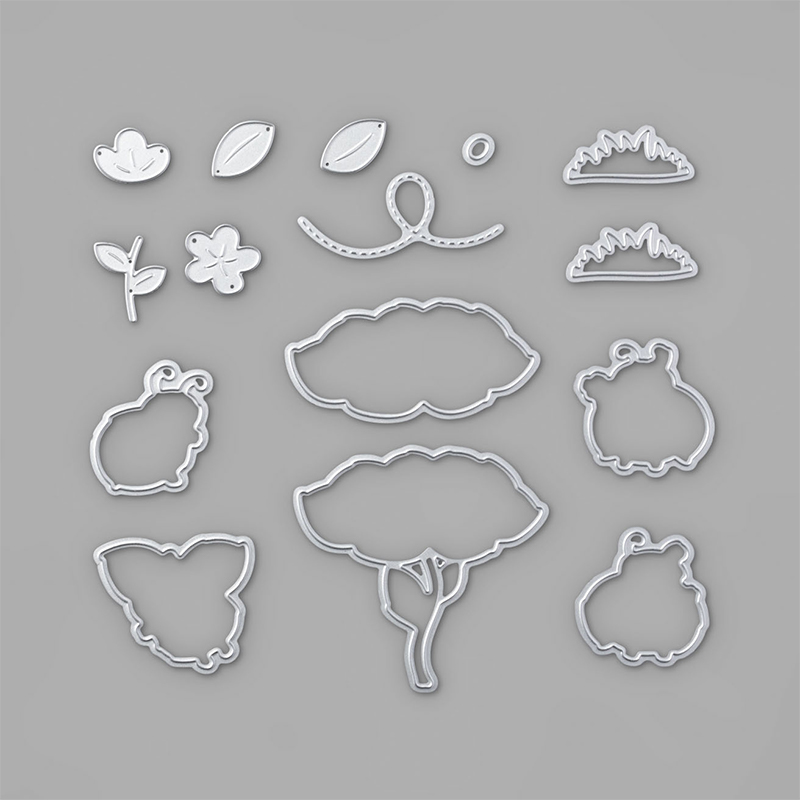
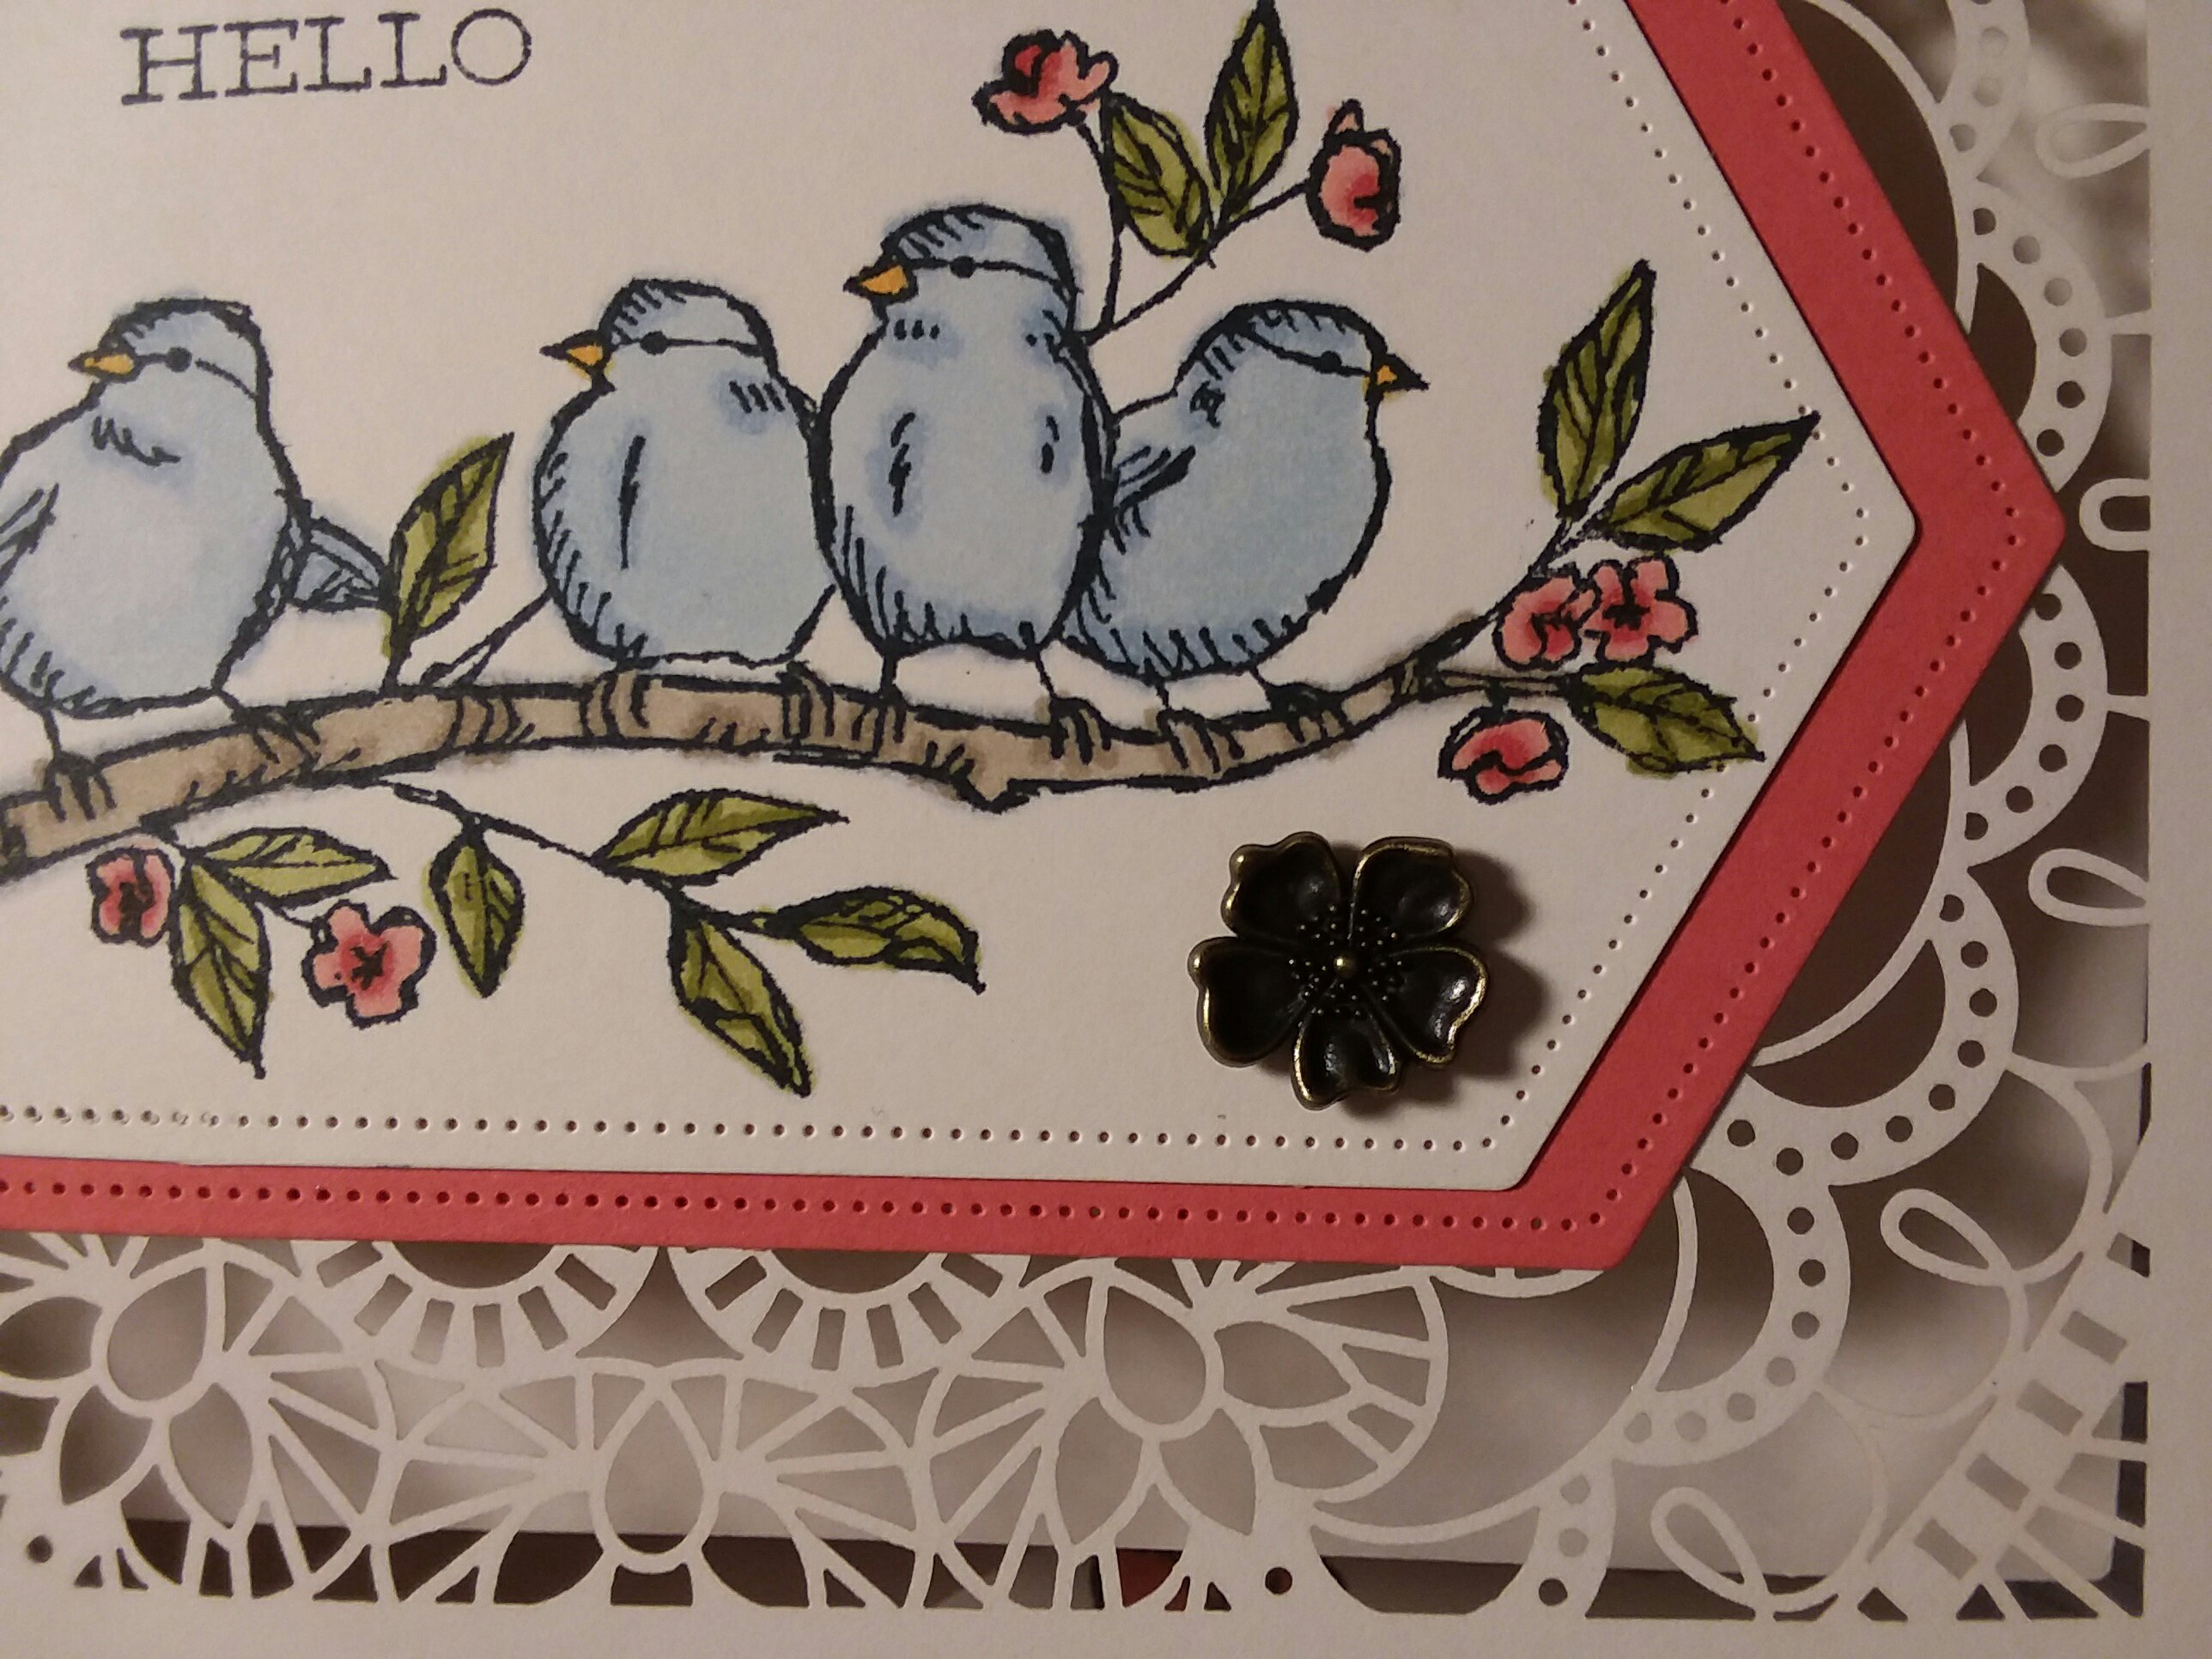
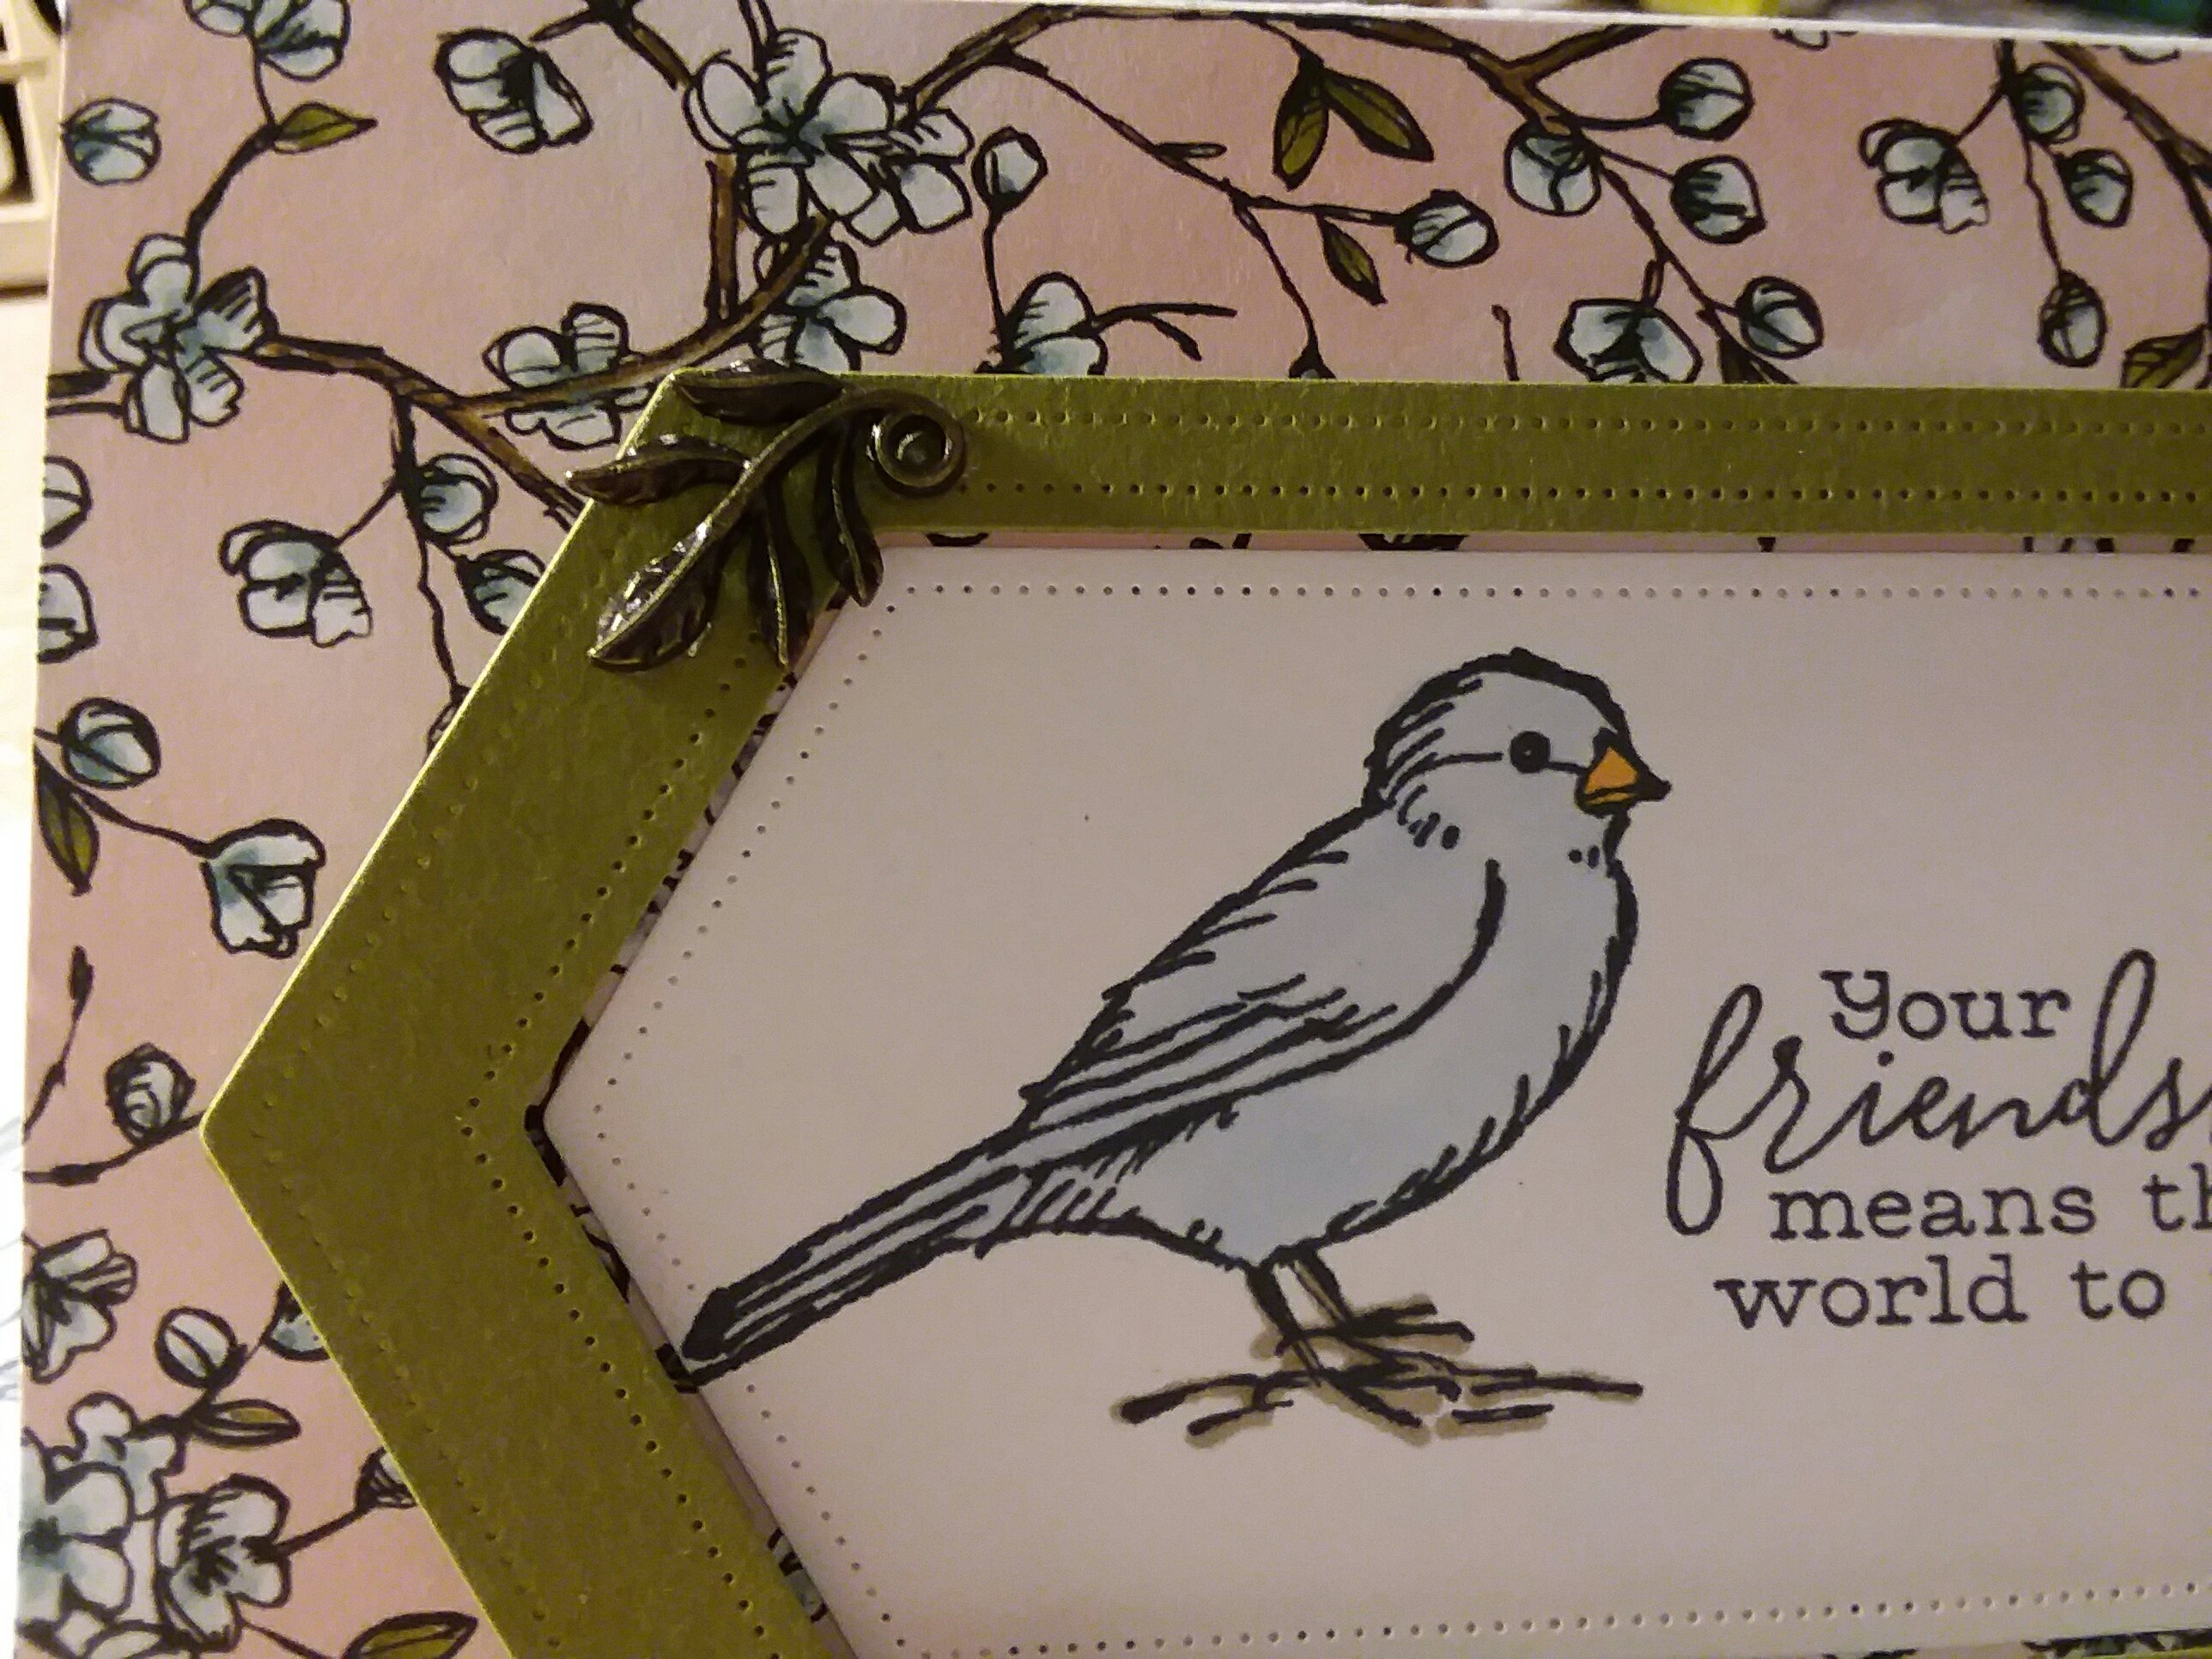
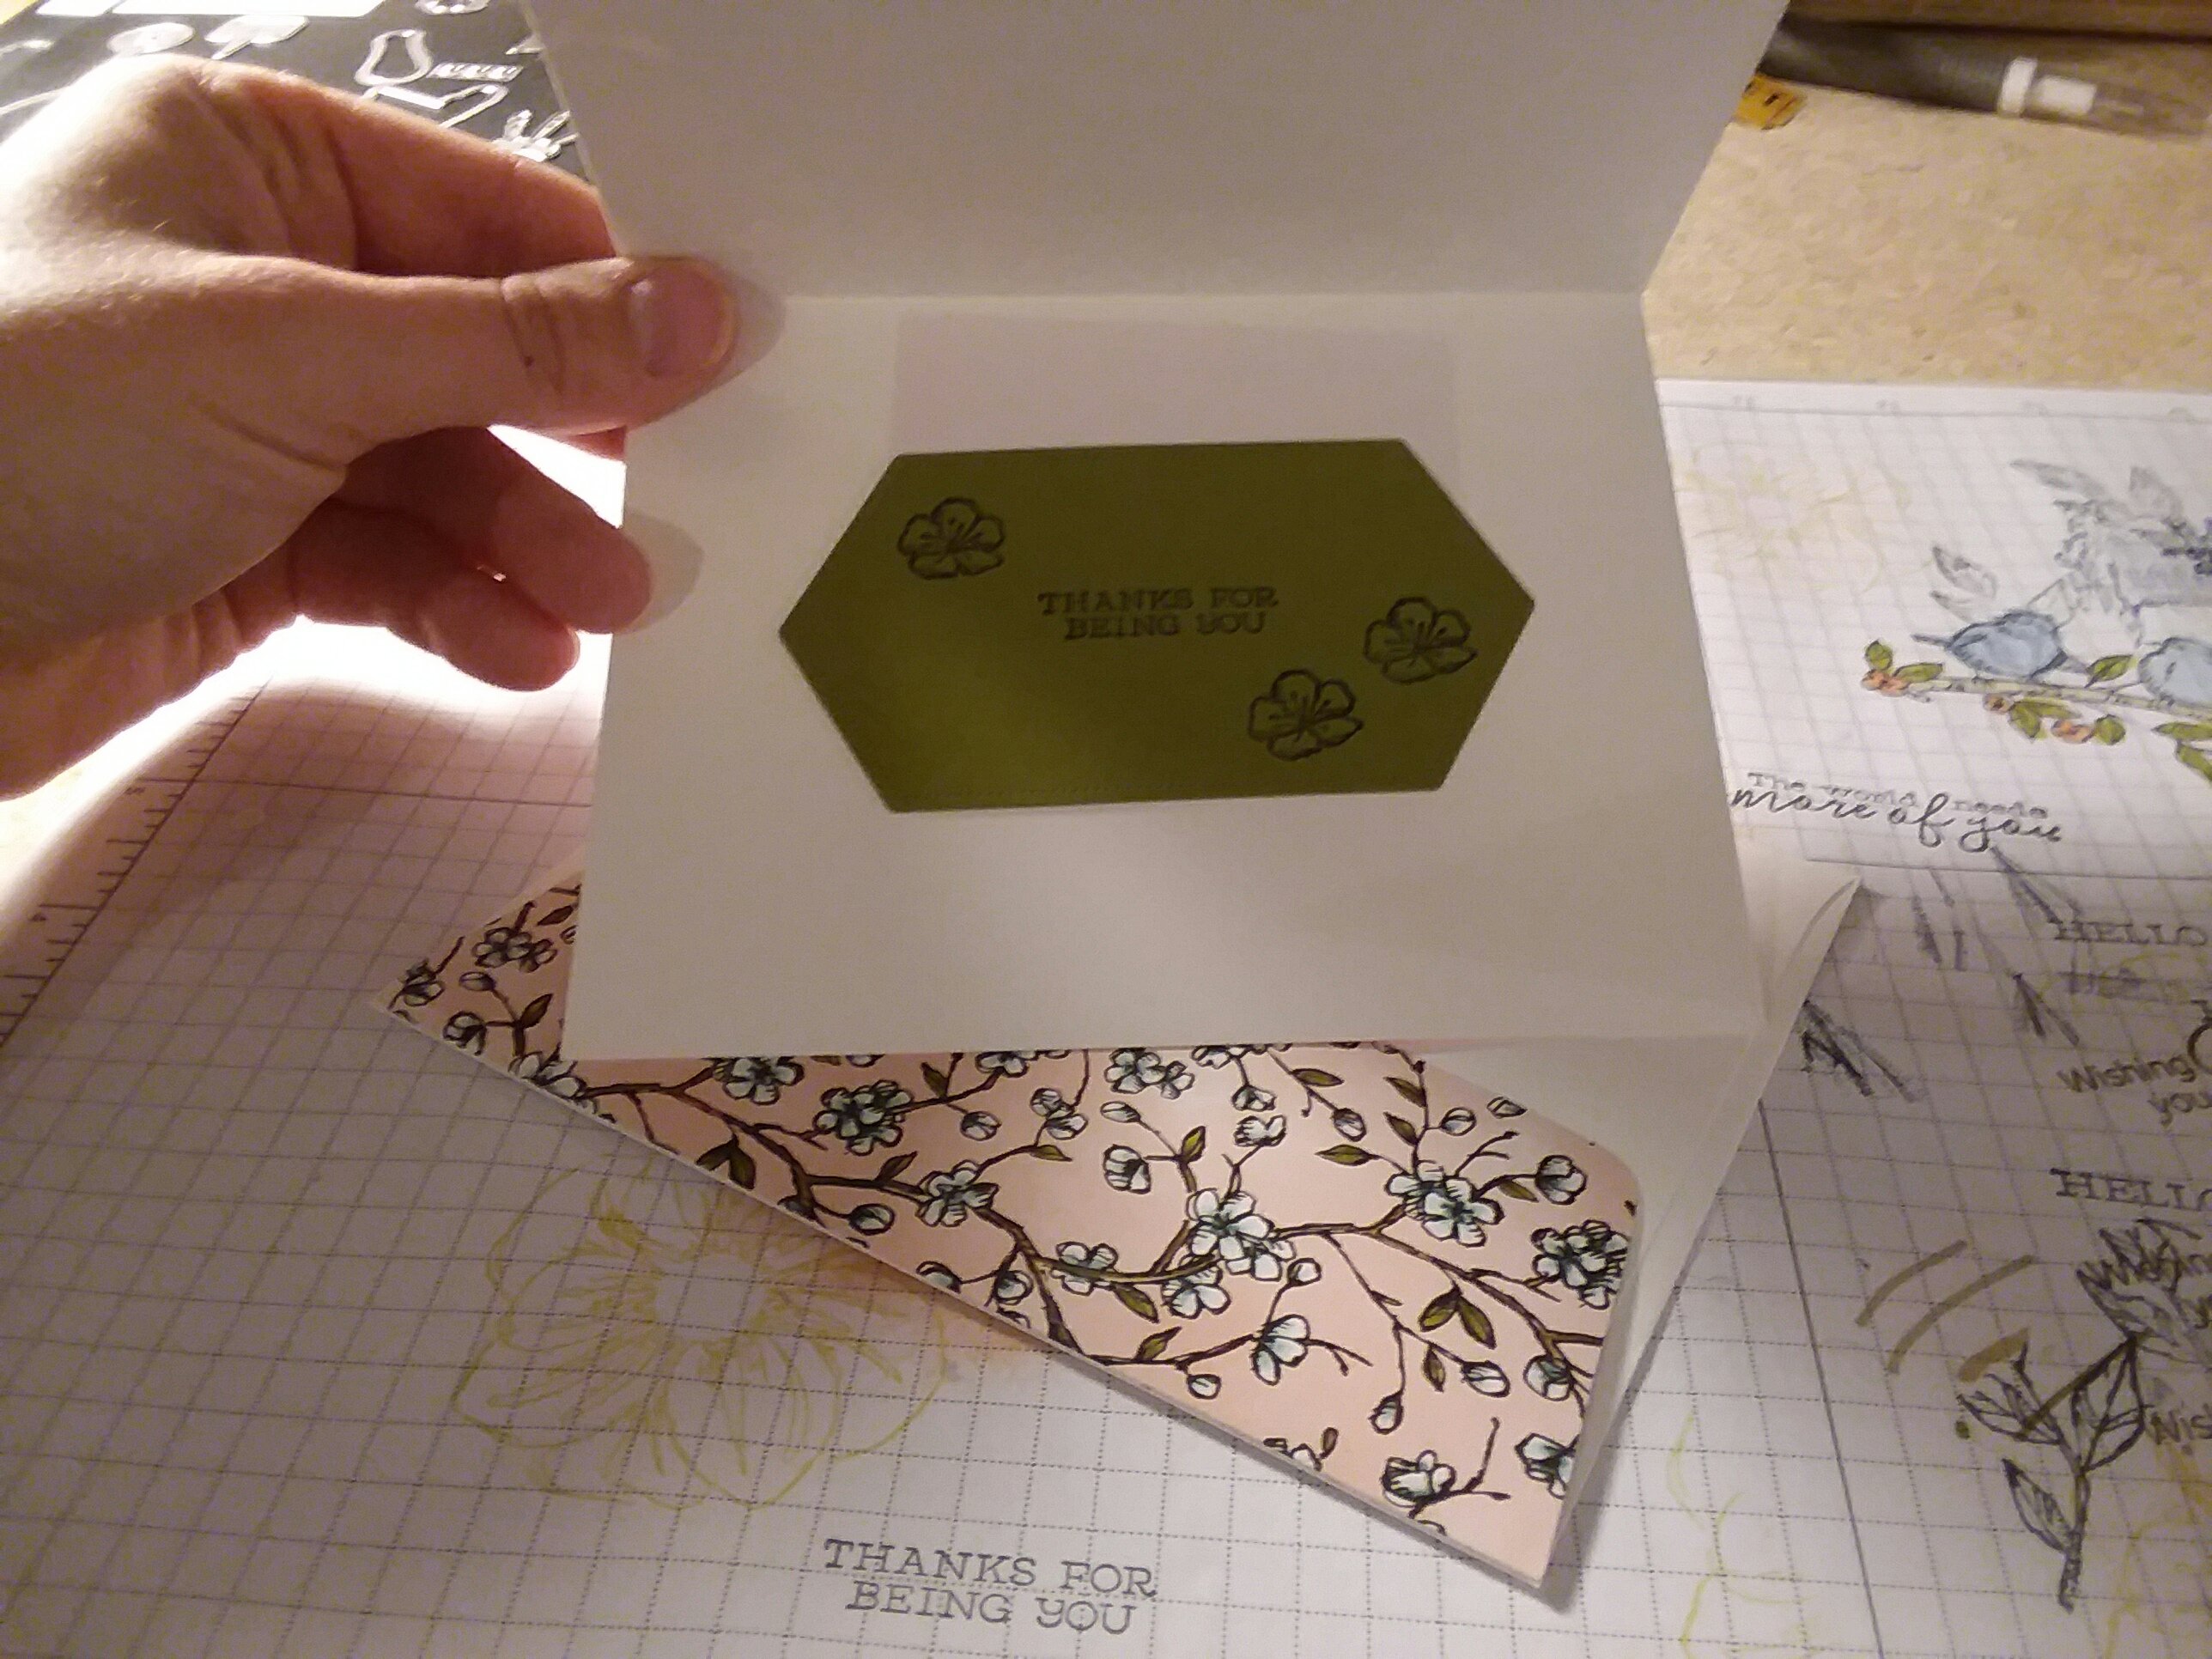
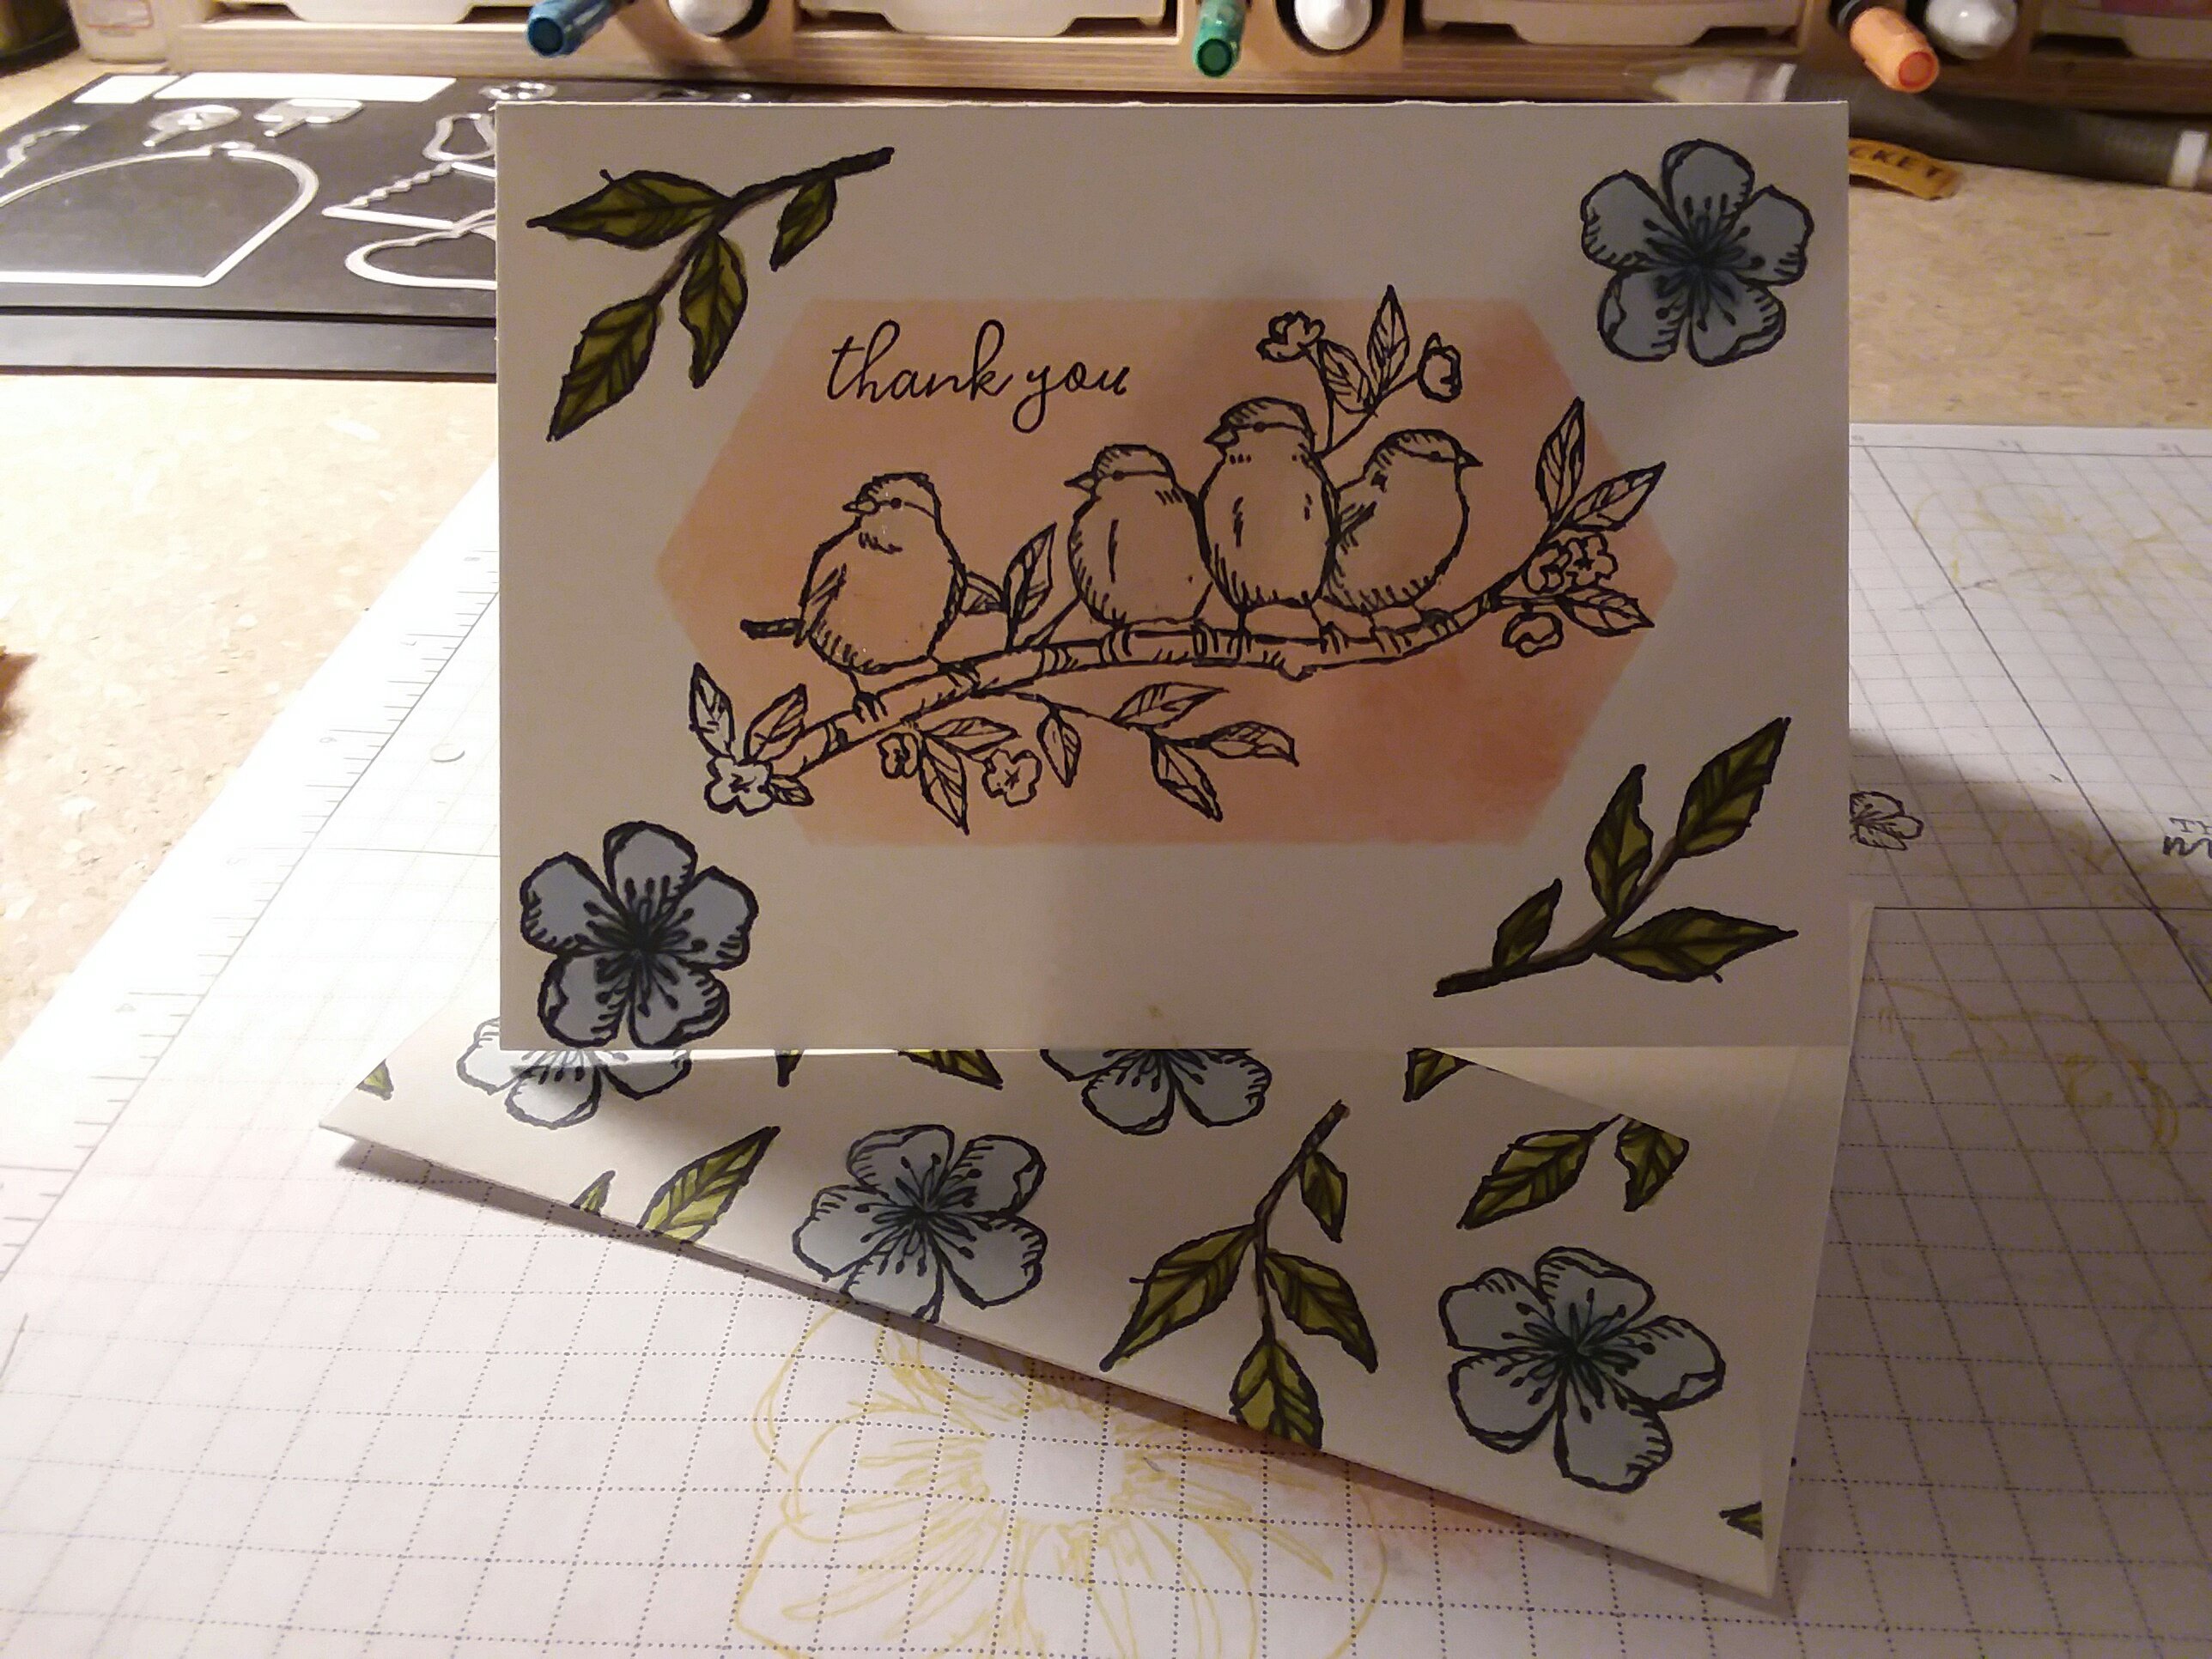
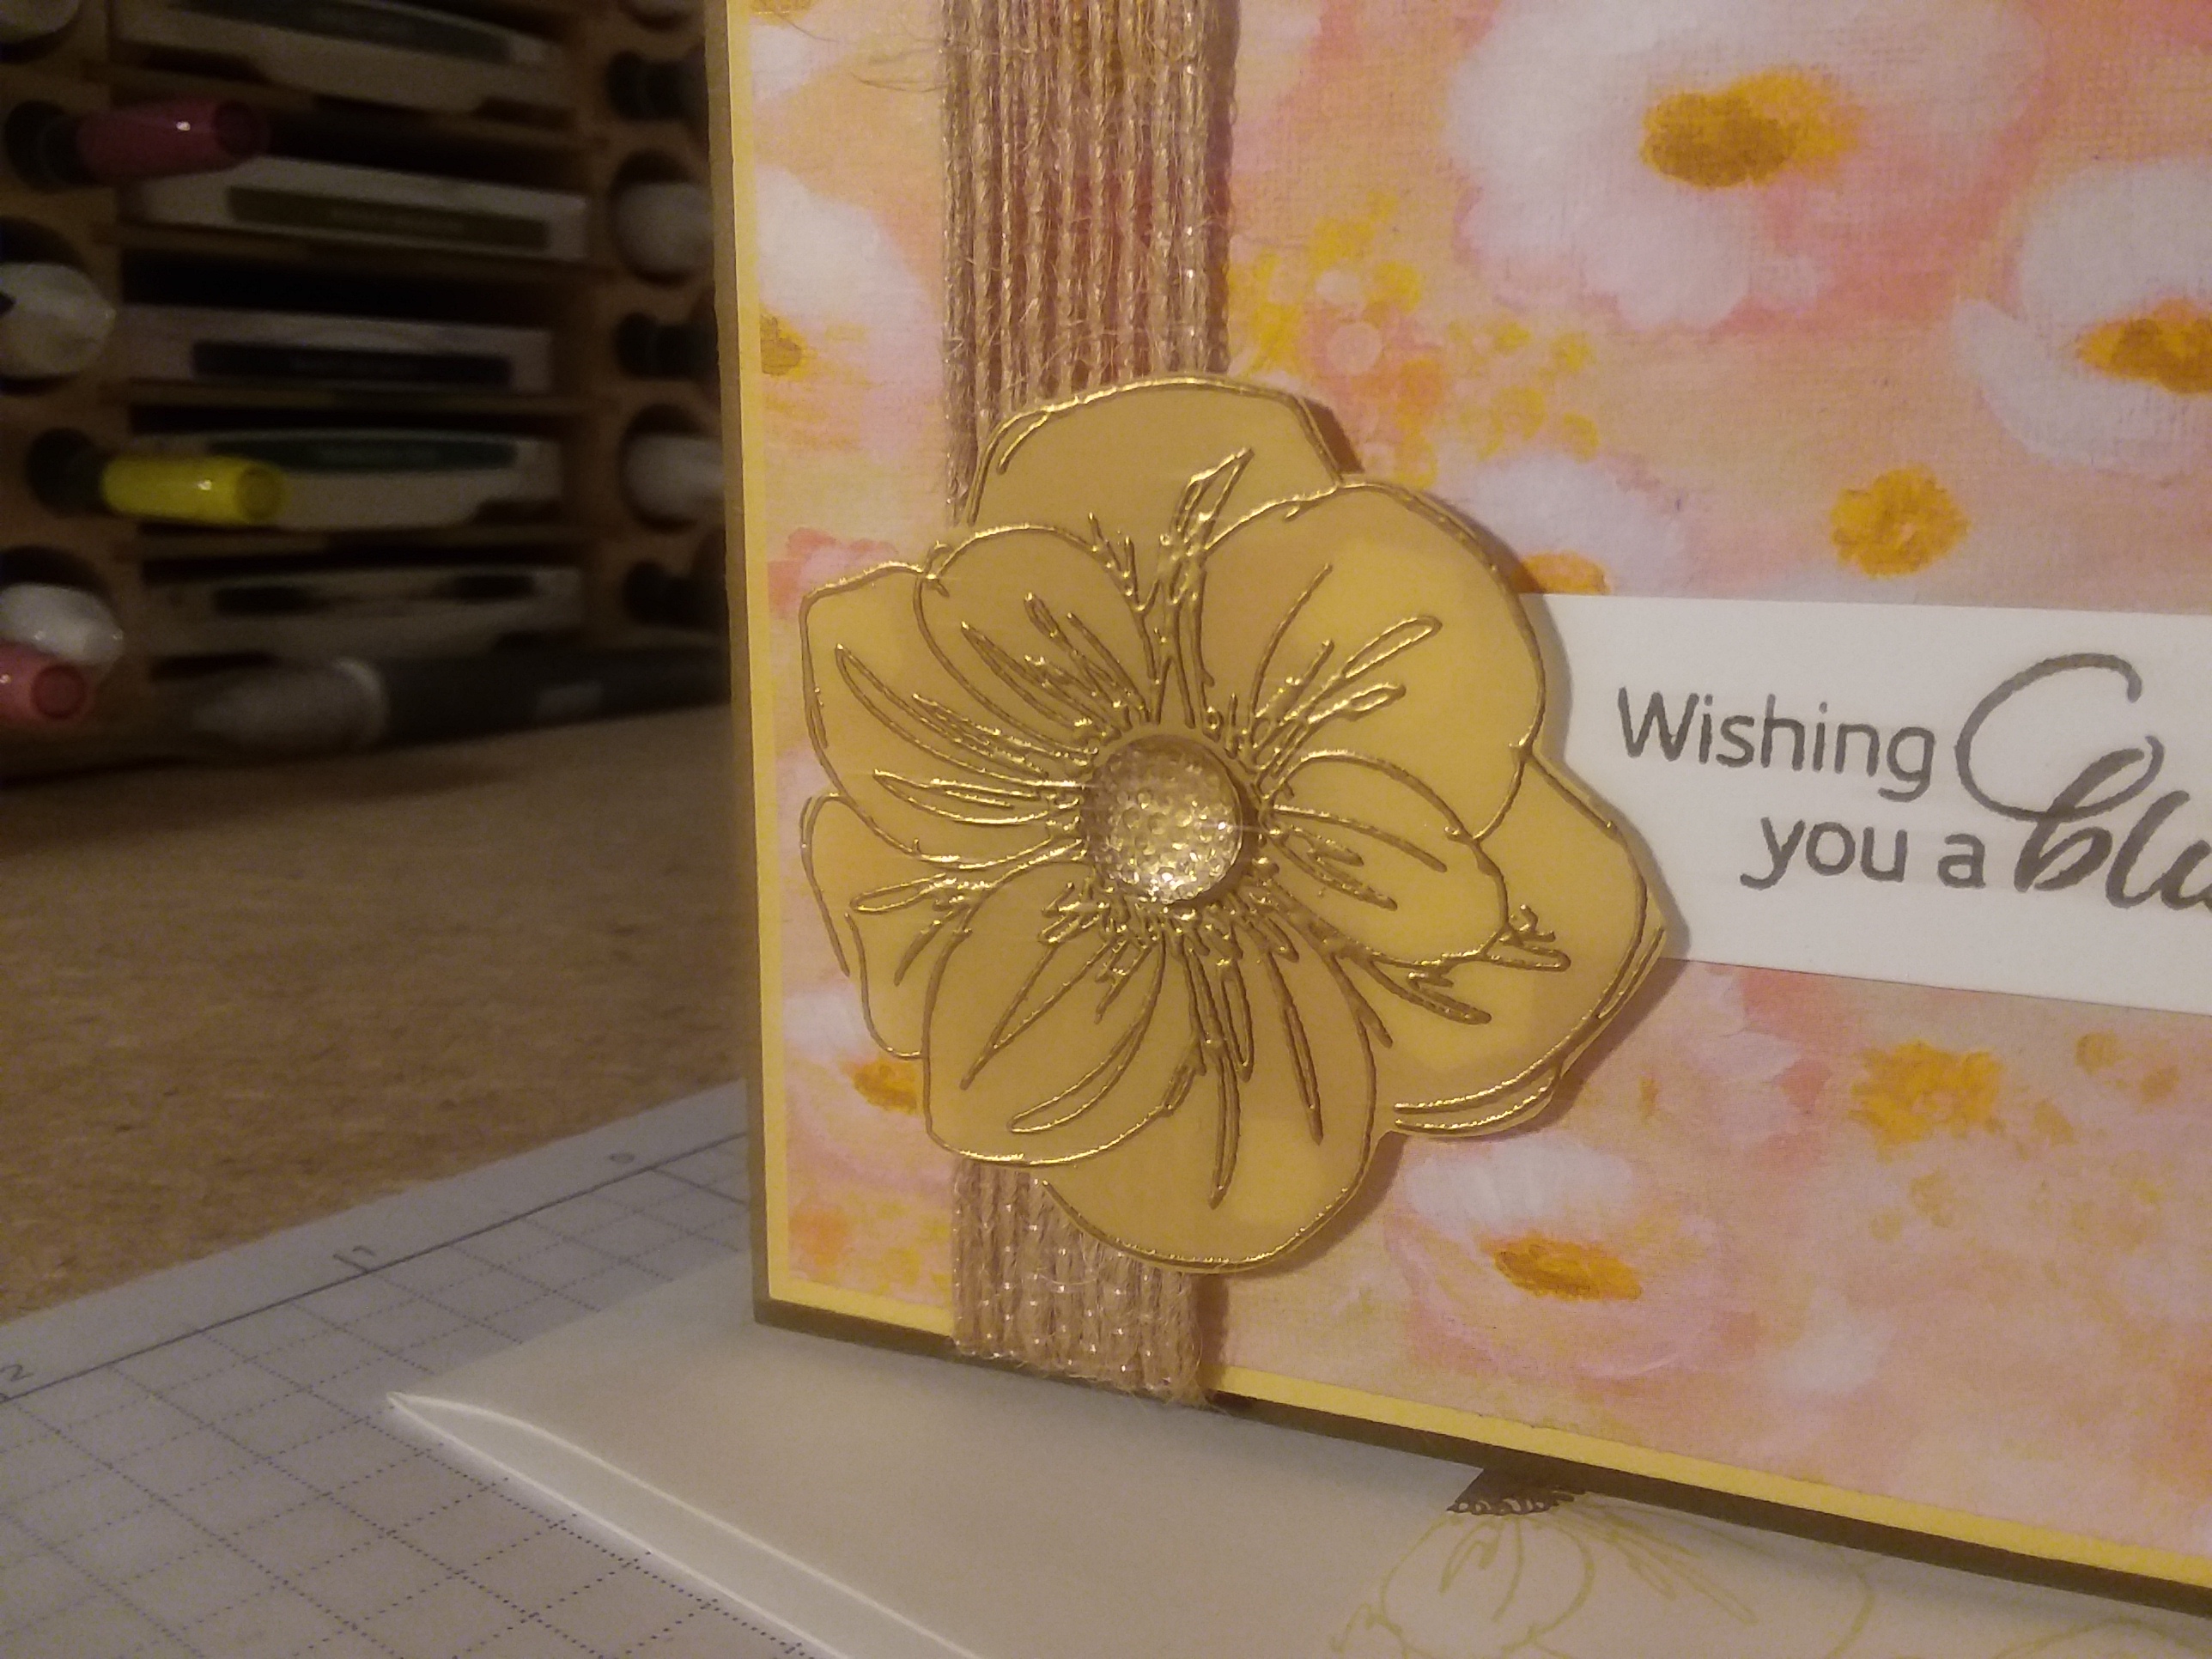
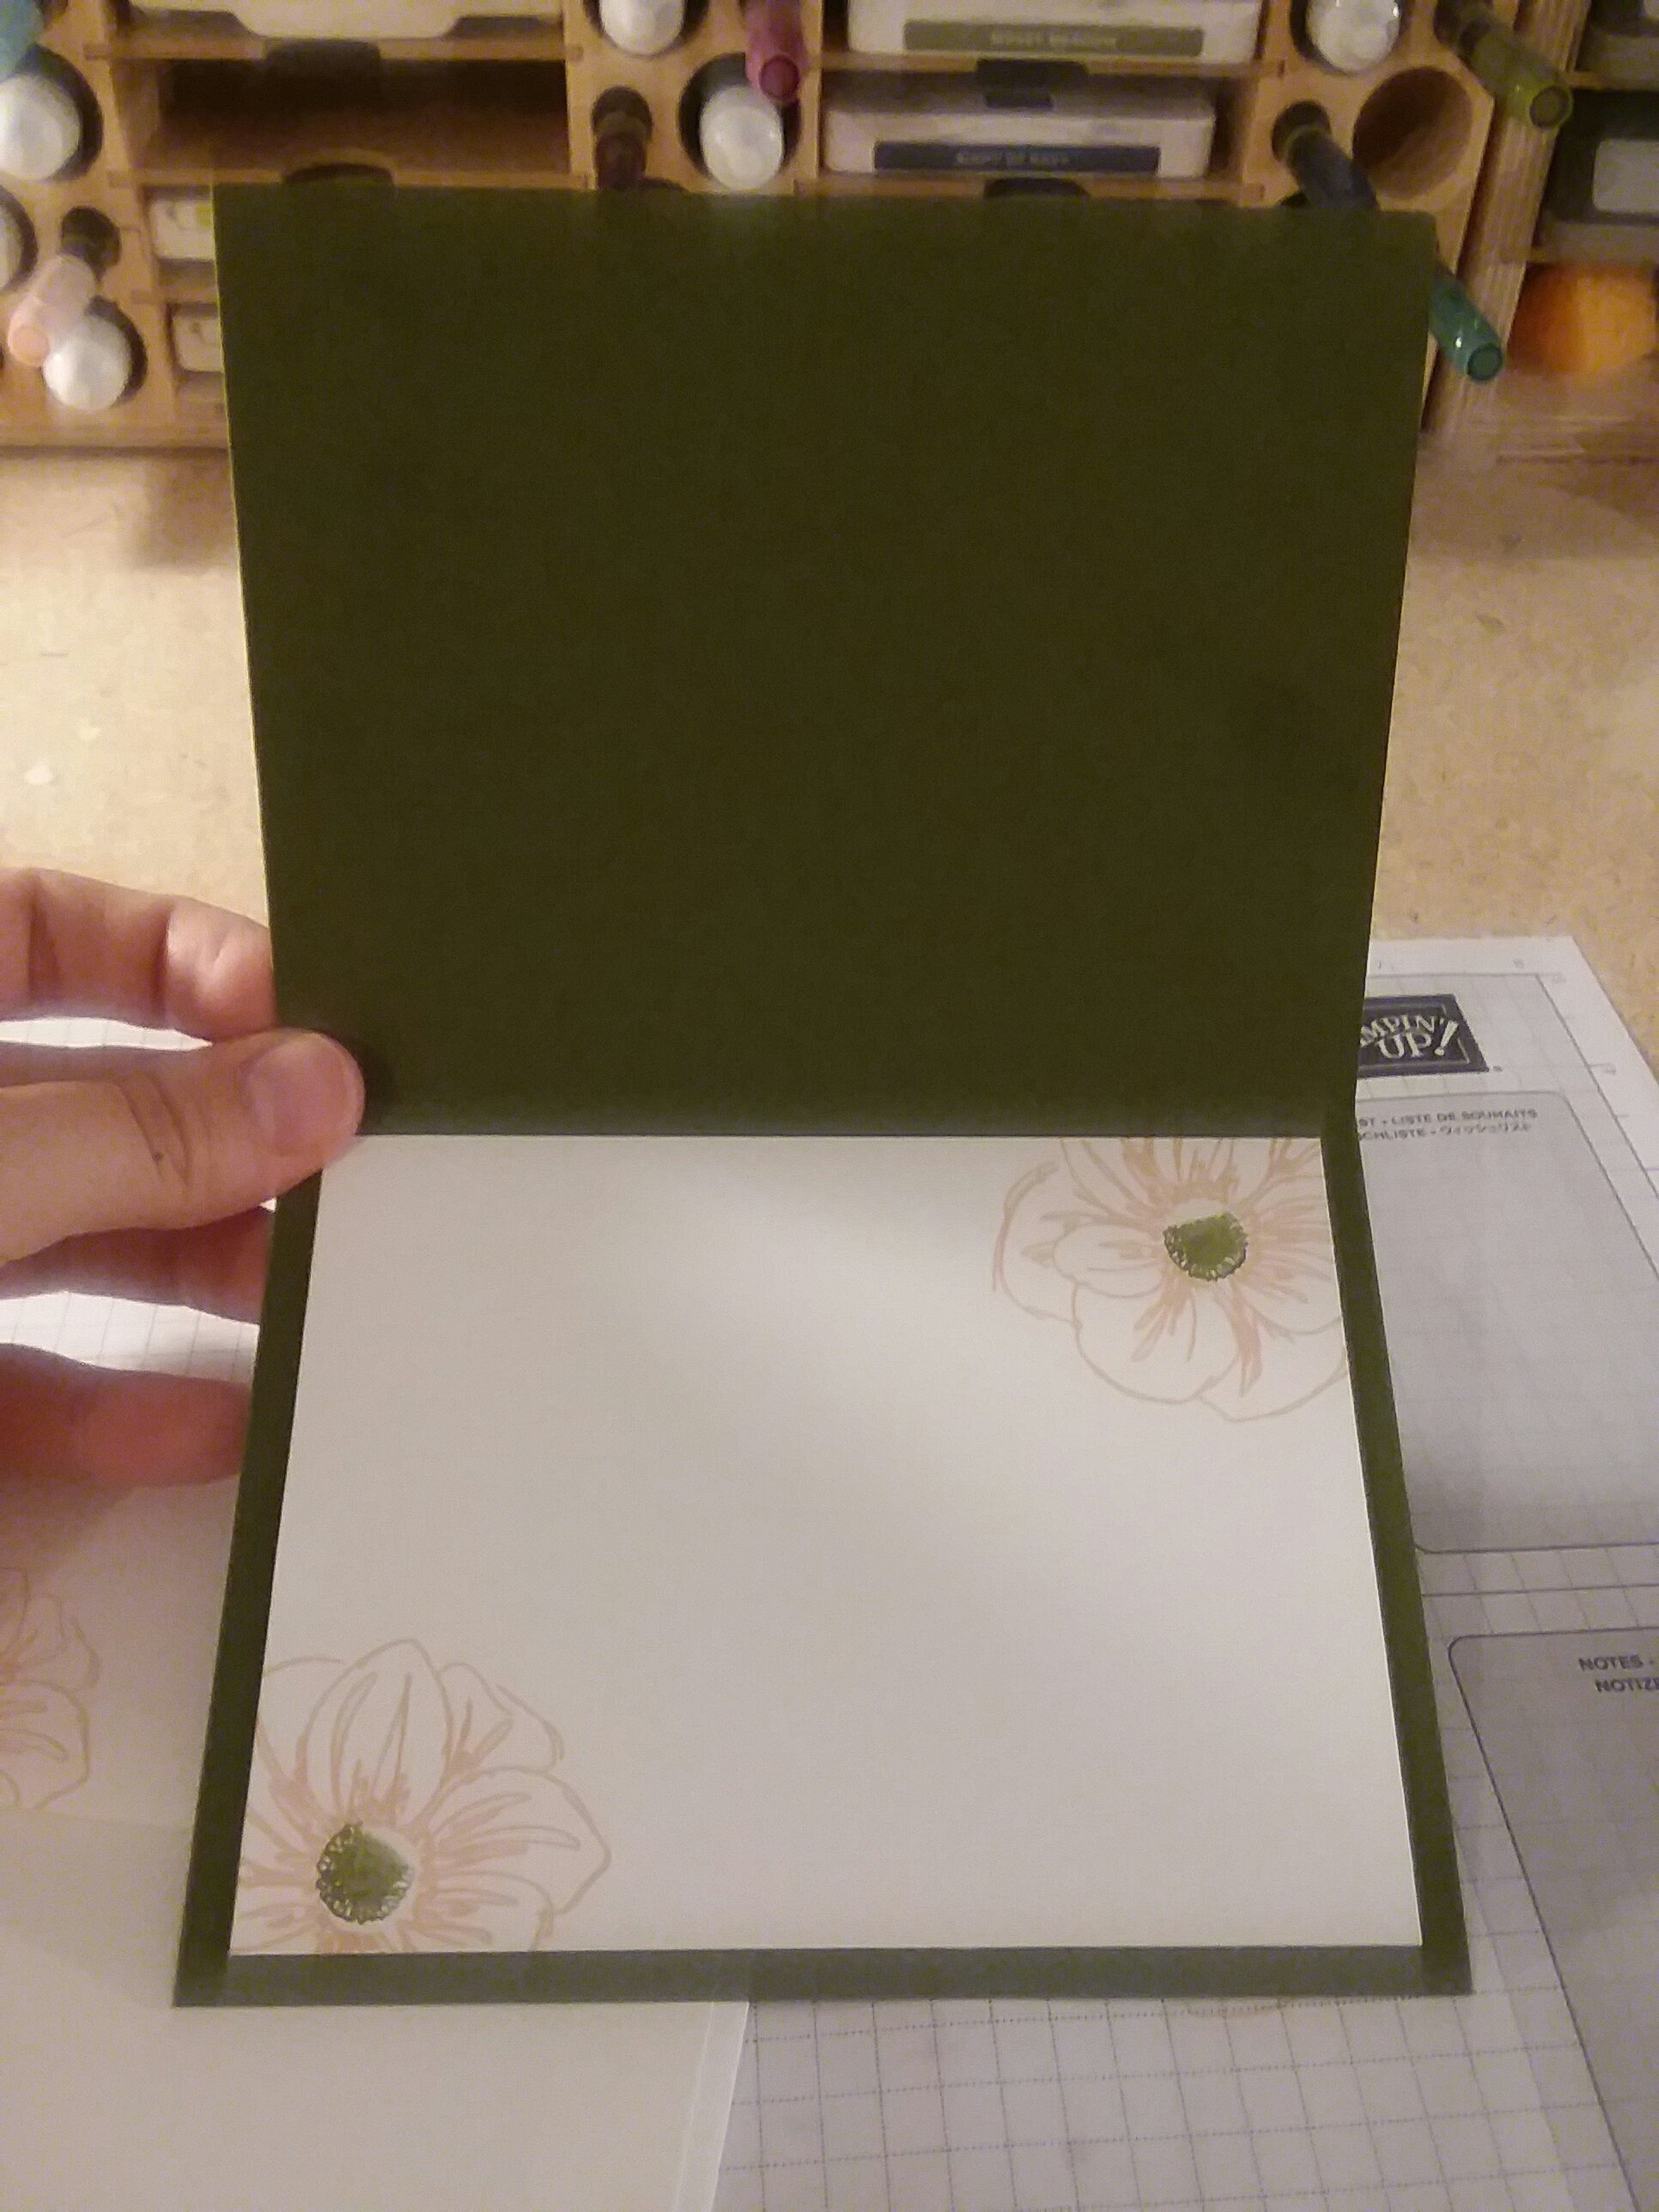
The layers don’t show up super well in a head-on picture but you can see them much better in the above and below pictures. You can use any stacking/layering dies, although I do think rectangles work super well. On this card I used the “Stitched So Sweetly Dies”. I really love the stitching along the edges.

Top View

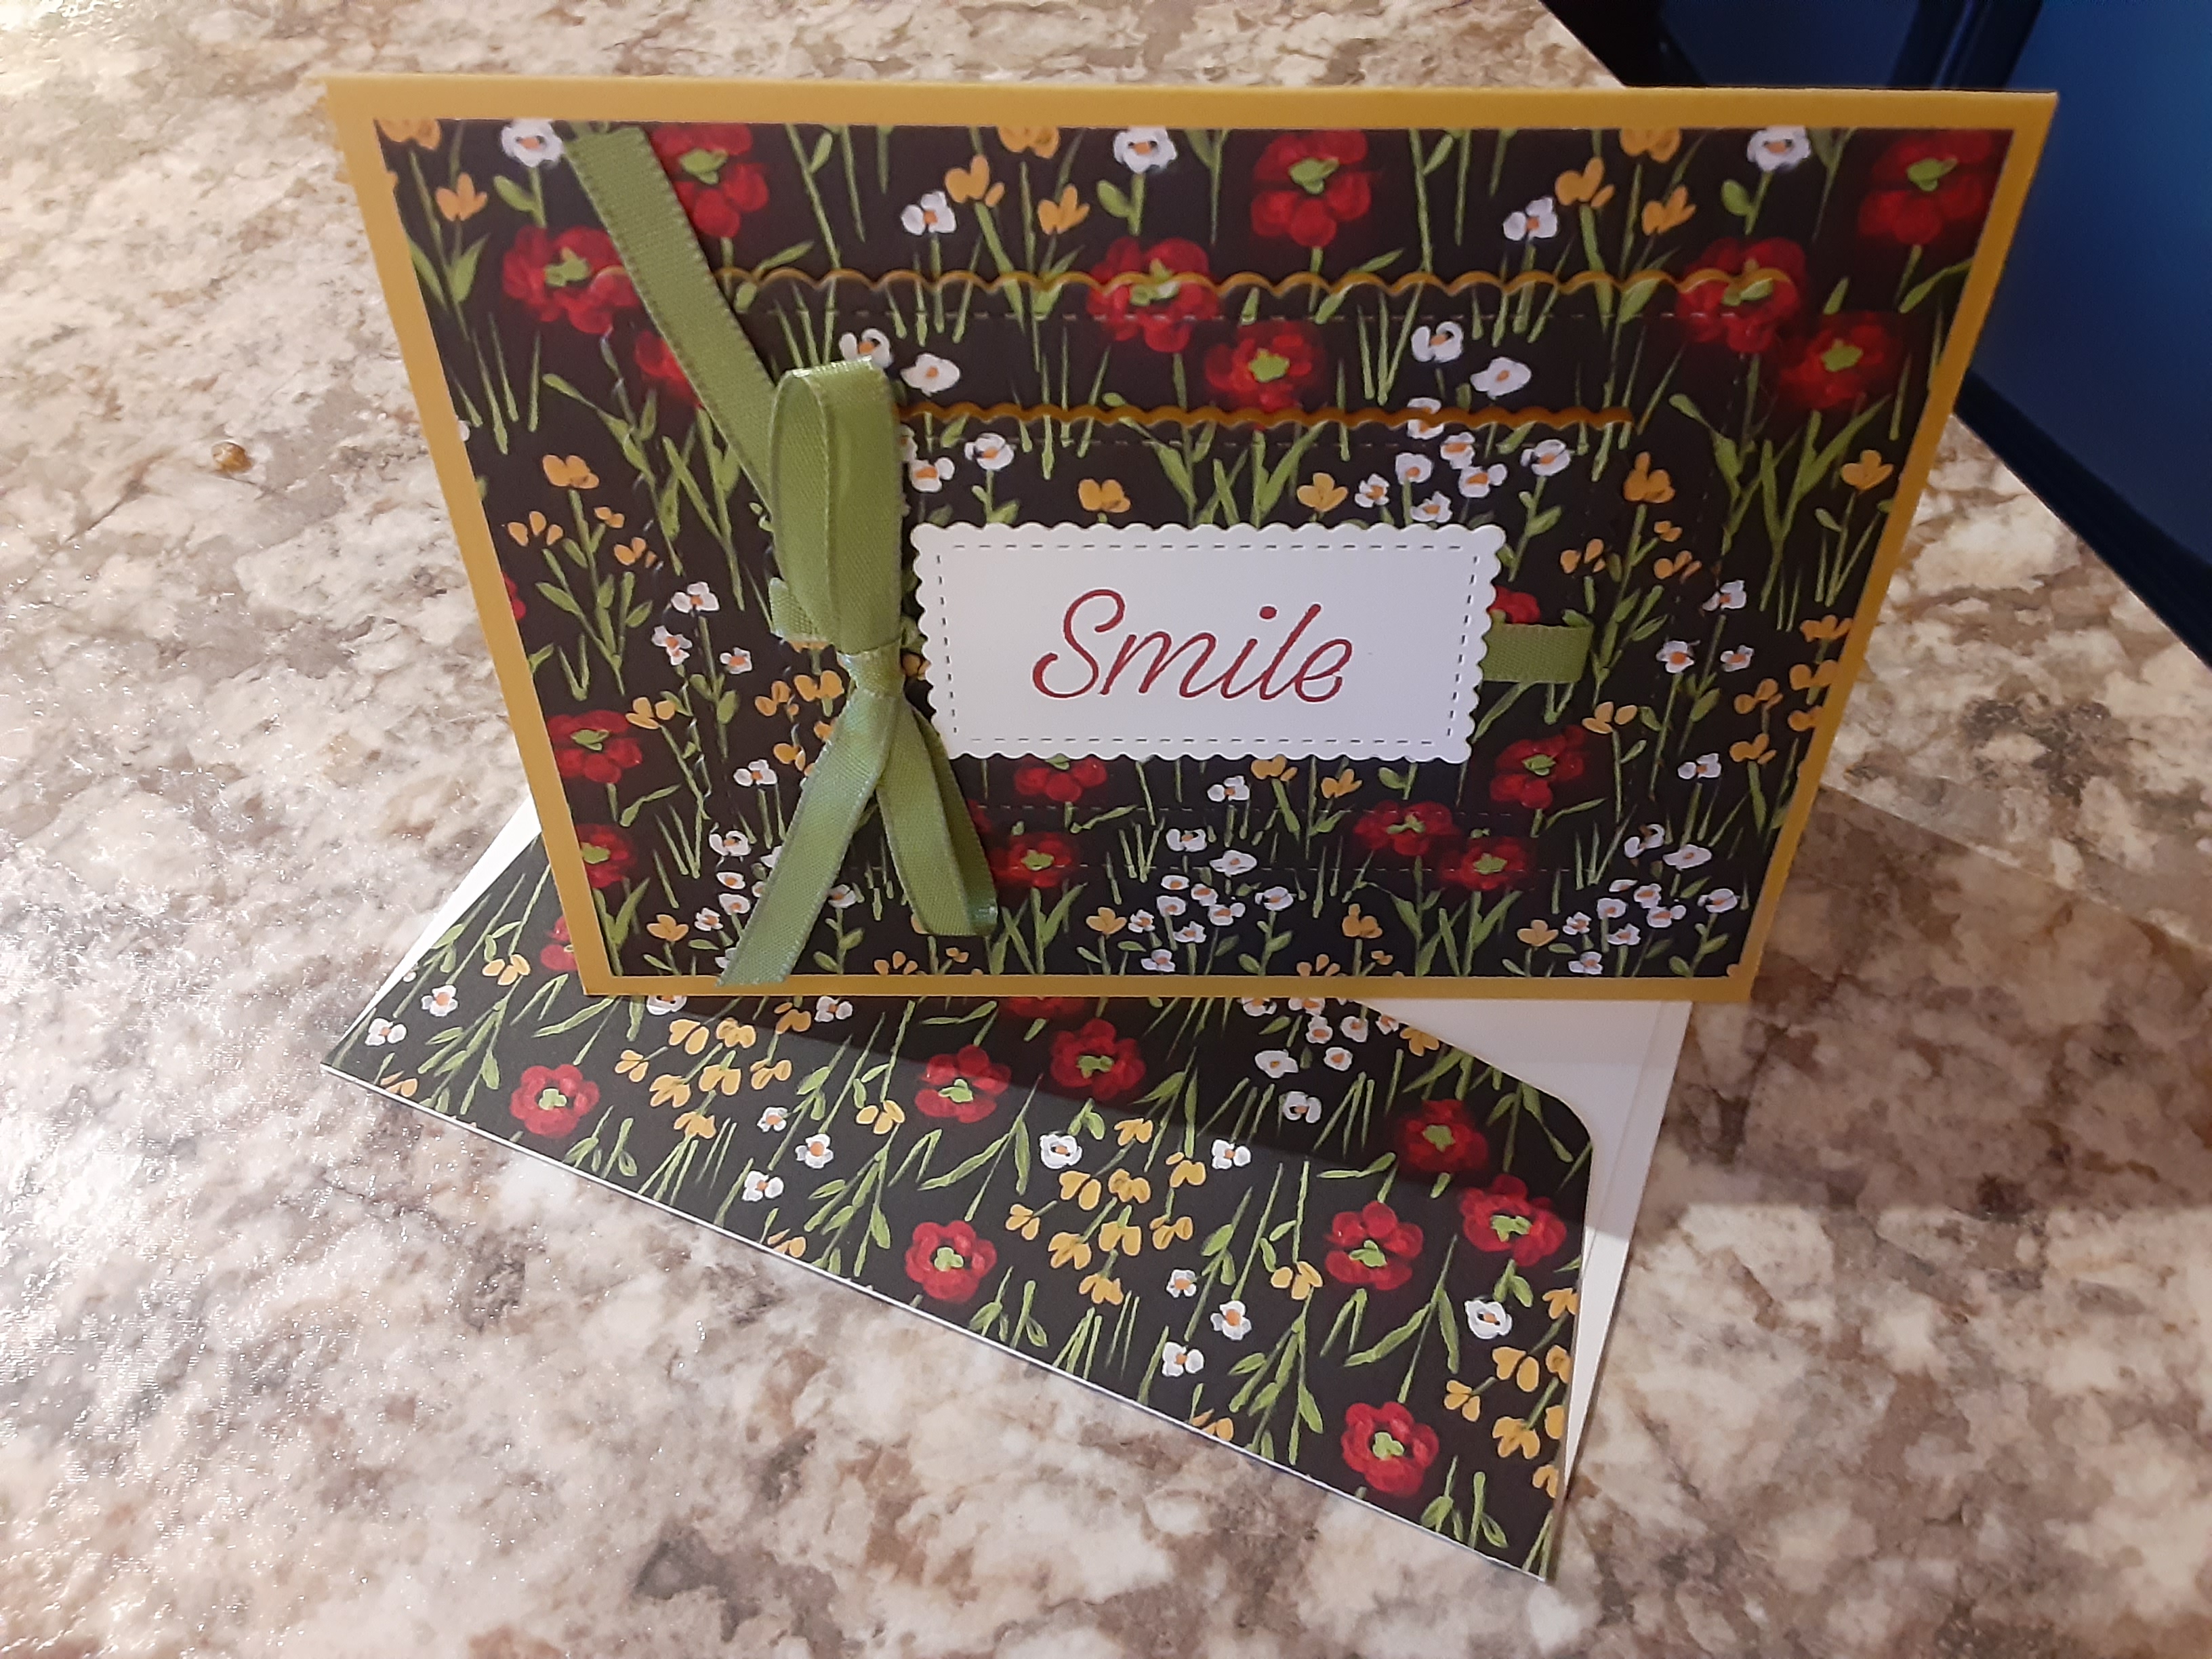
I adhered the bottom layer of DSP flat (using Stampin’ Seal or liquid glue, NOT dimensionals), the middle layer using one layer of dimensionals, and the top layer of DSP using a double layer of dimensionals (so two dimensionals stacked on top of each other).

Check out the video below for a step-by-step video tutorial. If you enjoy my video and find it helpful be sure to “like” it on YouTube and subscribe to the channel so you don’t miss any future videos. Thanks for your support!

If you don’t already have a Stampin’ Up! demonstrator, I would love to be your go-to girl for all your stamping needs.  You can shop my Online Store 24/7.  Please let me know if there’s anything I can do to aid in your crafting experience.  I am more than happy to do what I can to help!

If you are local to Racine, WI I invite you to join my Stampin’ Up! Facebook page, Joyfully Inked Cards with Stephanie Mackey. You can find info about classes, card ideas, crafting tips, and SU! news and promotions. I am able to share a little more often on Facebook than I am in my blog or on YouTube.

If you have thought about being a Stampin’ Up! demonstrator or are interested in a 20% discount, among other perks, I’d love to have you on my team, The Joyful Inkers. You can sign up here or contact me if you have questions or would like to talk more about this.

Jan-Feb 2021 Sale-a-Bration! - Stampin’ Up!® - Stamp Your Art Out! www.stampyourartout.com
Join now for a BONUS gift!

Now through February 28th, new demonstrators get an EXTRA, exclusive gift from the new catalog – an assortment of five 6 x 6″ stacks of our newest Designer Series Paper! As always, your starter kit ships free and you choose $125 of product but only pay $99 + tax. 🙂

Joyful stamping!

~Stephanie

Product List

Paper Snips

[103579]
$10.00

Stampin' Up!

2 Cute Christmas Cards and a Christmas Card Showcase

I’ve recently begun doing Facebook Live video on my Stampin’ Up! Facebook page, Joyfully Inked Cards with Stephanie Mackey, each Tuesday evening at 7:30pm Central Time. This past Tuesday I actually shared two cards AND all the Christmas cards I’ve made this past year. I need to make about 12 more to get to my goal of 150 cards. I try to whittle my list down each year, but siblings keep getting married and I keep making friends. I suppose a long Christmas card list is a good problem to have!

Simple & Serene

I absolutely love decorating the envelope/envelope flap. I often do Designer Series Paper or stamping on the flap, but I often forget about embossing folders on the flap. It’s such a fun look! I really love the pop of the red glimmer paper against the crisp white background. As I mention in the video, the embellishments I used are retired (I made this card not thinking of using it in a video) but I included a great gold embellishment from the current June-December Mini Catalog in the Supply List for this card below. Also, I mention in the video that I thought the stamp set the sentiment came from, Perfectly Plaid, was retired, but it isn’t! It’s still in the 2020-2021 Annual Catalog. Yay!

Dimensions

-Whisper White Thick Cardstock 11 x 4 1/4″ (scored in half at 5 1/5″)

– Whisper White Cardstock 4 x 5 1/4″

– 2 1/4″ Circle Punch for Red Glimmer Paper

-2″ Circle Punch for Whisper White Cardstock Circle

Glittery & Fun

I copied this card from p. 36 of the 2020 June-December Holiday Catalog. I love the Balmy Blue glimmer paper peeking out from behind the snowflake die cut. I hadn’t made a square card in quite awhile and really enjoyed making a customer envelope with the Envelope Punch Board. The video walks you through how to use the punch board and how to figure out what size to cut the paper for your envelope.

Dimensions

-Whisper White Thick Cardstock 8 x 4″, scored in half at 4″

-Balmy Blue Glimmer Paper 4×4″

-DSP 3 7/8″ x 3 7/8″

-Whisper White Cardstock for banner 3 1/2 x 3/4″

To jump right to the Christmas Card Showcase skip to the 20:00 mark in the video.

If you don’t already have a Stampin’ Up! demonstrator, I would love to be your go-to girl for all your stamping needs.  You can shop my Online Store 24/7.  Please let me know if there’s anything I can do to aid in your crafting experience.  I am more than happy to do what I can to help!

If you are local to Racine, WI I invite you to join my Stampin’ Up! Facebook page, Joyfully Inked Cards with Stephanie Mackey. You can find info about classes, card ideas, crafting tips, and SU! news and promotions. I am able to share a little more often on Facebook than I am in my blog or on YouTube.

If you have thought about being a Stampin’ Up! demonstrator or are interested in a 20% discount, among other perks, I’d love to have you on my team, The Joyful Inkers. You can sign up here or contact me if you have questions or would like to talk more about this.

Joyful stamping!

~Stephanie

Product List for White & Red Card

Product List for Blue Snowflake Card

Envelope Punch Board

Envelope Punch Board
[133774]
$20.00

Paper Snips

$10.00


Christmas Cards

Merry Moose Christmas Card

Hello! Today I’ve got a new Christmas card with an old (but a goodie!) stamp set for you. I think it was just last year that Stampin’ Up! introduced the Merry Moose Bundle and they brought it back for this year’s Holiday Catalog. I’m so glad they did! I love using punches when mass producing Christmas cards – it helps so much to cut down on the assembly time!

I stamped the inside with “Merry Christmoose”. hehe Check out the video below to see that.

I copied this card from p. 27 of the 2020 Holiday Catalog. I used the Plaid Tidings DSP instead of the Poinsettia Place DSP shown in the picture. Watch the video below to see how I put this card together and to get the measurements.

If you don’t already have a Stampin’ Up! demonstrator, I would love to be your go-to girl for all your stamping needs.  You can shop my Online Store 24/7.  Please let me know if there’s anything I can do to aid in your crafting experience.  I am more than happy to do what I can to help!

If you are local to Racine, WI I invite you to join my Stampin’ Up! Facebook page, Joyfully Inked Cards with Stephanie Mackey. You can find info about classes, card ideas, crafting tips, and SU! news and promotions. I am able to share a little more often on Facebook than I am in my blog or on YouTube.

If you have thought about being a Stampin’ Up! demonstrator or are interested in a 20% discount, among other perks, I’d love to have you on my team, The Joyful Inkers. You can sign up here or contact me if you have questions or would like to talk more about this.

Joyful stamping!

~Stephanie

Product List

Moose Punch

[150652]
$18.00

Paper Snips

[103579]
$10.00

Stampin' Up!

Super Simple Shaker Card with Whale of a Time Suite

Hello everyone! It’s been a REALLY long time since my last post but I’m here today! Last weekend was OnStage at Home, Stampin’ Up!’s online convention. One presenter shared this amazing simplified version of a shaker card using a clear envelope. I took that technique and came up with my own version using the Whale of a Time Suite. I am really excited to make more versions of this card with this same clear envelope shaker technique. It was so quick and easy and still has that wow factor.

These backdrop Designer Series Paper designs work great with this super simple shaker technique.
Here’s a peek at the inside of the card. There’s my “mistake” ribbon on the top side that I actually like better than tucking it behind the clear envelope.
Can’t leave a naked envelope! Measurements for paper to cover the flap of our Medium envelopes is 6” x 2 1/4”. Gotta love that coordination!

Here’s a 10 minute video taking you through the steps of creating this super simple shaker card. Be sure to like my video and leave me a comment telling me what you think! I invite you to subscribe to my YouTube channel (and this blog!) to be notified of future videos and blog posts. Thanks in advance!

If you don’t already have a Stampin’ Up! demonstrator, I would love to be your go-to girl for all your stamping needs. 🙂  You can shop my Online Store 24/7.  Please let me know if there’s anything I can do to aid in your crafting experience.  I am more than happy to do what I can to help!

If you are local to Racine, WI I invite you to join my Stampin’ Up! Facebook page, Joyfully Inked Cards with Stephanie Mackey. You can find info about classes, card ideas, crafting tips, and SU! news and promotions. I am able to share a little more often on Facebook than I am in my blog or on YouTube.

If you have thought about being a Stampin’ Up! demonstrator or are interested in a 20% discount, among other perks, I’d love to have you on my team, The Joyful Inkers. You can sign up here or contact me if you have questions or would like to talk more about this.

Joyful stamping!

~Stephanie

Product List

Stampin' Up!

Ladybugs in a Row Card

Hello! I have a cute and colorful card to share with you today. Scroll down near the bottom of this post for a video that takes you through the coloring and assembly of this card. I had a lot of fun coming up with this one. I love the pops of color against the black card base. I also stamped and colored the three ladybugs on the envelope flap and one on the front of the envelope, bottom left hand corner. I neglected to take a picture of that but give it a try – I’m sure your card’s recipient will love a cute and coordinated envelope!

LITTLE LADYBUG HOST CLING STAMP SET (ENGLISH)

This card uses the Little Ladybug stamp set. This is a host set you can earn for FREE during Sale-A-Bration, which runs each year from early January to the last day of March. You can earn this set when your workshop (a.k.a stampin’ party) reaches $300 or when your personal order reaches the same amount. With the latter option you would be earning quite a few regular Sale-A-Bration rewards as well as this SAB Host reward.

To redeem this stamp set in your online order you enter the item number 152384 on the Stampin’ Rewards page (not the Merchandise page). You can check out all the regular Sale-A-Bration rewards here. These rewards are available with each $50 or $100 purchase.

I love that there are several ladybug designs to choose from. So many sides to this little bug’s personality! I think the flying ladybug is my favorite.  I could have colored all the ladybugs in the traditional red color, but I liked the idea of having colorful ladybugs. My favorite color for a ladybug is one of Stampin’ Up!’s light purples, Highland Heather. I encourage you to give a pretty purple ladybug a try. 🙂

I borrowed the Hello sentiment stamp from the Accented Blooms stamp set. That set has the same shape stamp in Thank You. I absolutely adore the coordinating Tailored Tag punch that perfectly punches out those two sentiments. You can check out those products, along with all other products for this card, at the end of this blog post.

I find myself being inspired to stamp and decorate the inside of my card. This set works has plenty of options for inside sentiments, like the one pictures here.  I highly recommend the Take Your Pick tool for picking up and putting down the rhinestone. The putty end just grips that rhinestone perfectly for easy placement.

As far as the coloring goes, you can leave the ladybugs face white, or color it in with the Ivory Stampin’ Blend like I did. I saw it both ways and really think the Ivory adds something. I also saw the hands and feet (and spots) colored in with Basic Black, but I thought that made everything look too dark. I like the spots untouched so they still have a nice sketched look.

LADYBUGS DIES

There is a coordinating die set, the Ladbugs Dies, that is available for purchase. It costs $29 and can be added to your order with item number 153588. I love the little curlicue to help you show a ladybug zipping around. 🙂 I think it’s also neat that you can cut out the entire flower or just the petals. Makes for lots of personalization.

I hope you enjoy this video! Please leave me a comment on YouTube letting me know what you liked best about this video and if it helped you. I invite you to “like it” and share it as well. I appreciate your support!

Related image

If you don’t already have a Stampin’ Up! demonstrator, I would love to be your go-to girl for all your stamping needs. 🙂  You can shop my Online Store 24/7.  Please let me know if there’s anything I can do to aid in your crafting experience.  I am more than happy to do what I can to help!

If you are local to Racine, WI I invite you to join my Stampin’ Up! Facebook page, Joyfully Inked Cards with Stephanie Mackey. You can find info about classes, card ideas, crafting tips, and SU! news and promotions. I am able to share a little more often on Facebook than I am in my blog or on YouTube.

If you have thought about being a Stampin’ Up! demonstrator or are interested in a 20% discount, among other perks, I’d love to have you on my team, The Joyful Inkers. You can sign up here or contact me if you have questions or would like to talk more about this.

Joyful stamping!

~Stephanie

Product List

Die Cut Cards, Stampin' Up!, Techniques, Tutorials

“To a Wild Rose” Peek Through Card

Hello everyone! I am happy to finally share my favorite card that features my favorite bundle: “To a Wild Rose”.  I copied this card from a demonstrator inspiration/training email.  There was only a picture in the email;  I had to figure out the supplies, peek through technique, and assembling on my own.  Took a little bit of work but I love the layout and colors so much it was worth it. Plus, now I can share it with all of you. 🙂

Scroll down past the pictures of the card to find a video walking you through how to create this card.

I love the white on white of the die cuts on the card base and how that contrasts with the pops of color from the leaves and flower. I adhered the three background die cuts with liquid glue. Then I die cut a circle off to the right hand side using the second largest regular (non-scalloped) circle die cut from the Layering Circle Die set. I cut the frame with the first and third largest circle dies from the same set and adhered the frame with glue dots. The basic black banner is 3/8″ x 3 1/2″. I flagged the right end, embossed with White Stampin’ Emboss Powder, and adhered the banner with glue dots to the frame.

The peek through element even looks sharp from the inside. 🙂 I decided to include a frame on the inside to keep the clean, minimalist look. Remind me of a ship’s porthole. lol

The flower uses two of three flower stamps from the To a Wild Rose Set.  There is an base layer, an accent layer, and an outline layer. I used Grapefruit Grove for my base layer and Calypso Coral for the accent layer.  I skipped the outline on this flower.  I stamped the center of the flower in Memento Tuxedo Black ink.  I popped the flower up with Stampin’ Dimensionals and arranged the leaves and black accent pieces around the flower, adhering them with glue dots.

Here’s the video I filmed that walks you through how to create this card. Please leave me a comment letting me know what you think.  I welcome your feedback. If you like what you see please also “like” this video on YouTube. I appreciate your support!

Related image

If you don’t already have a Stampin’ Up! demonstrator, I would love to be your go-to girl for all your stamping needs. 🙂  You can shop my Online Store 24/7.  Please let me know if there’s anything I can do to aid in your crafting experience.  I am more than happy to do what I can to help!

If you are local to Racine, WI I invite you to join my Stampin’ Up! Facebook page, Joyfully Inked Cards with Stephanie Mackey. You can find info about classes, card ideas, crafting tips, and SU! news and promotions. I am able to share a little more often on Facebook than I am in my blog or on YouTube.

If you have thought about being a Stampin’ Up! demonstrator or are interested in a 20% discount, among other perks, I’d love to have you on my team, The Joyful Inkers. You can sign up here or contact me if you have questions or would like to talk more about this.

Joyful stamping!

~Stephanie

                                                     Product List

Paper Snips

$10.00
All Occasion Cards, Designer Series Paper Cards, Die Cut Cards, Interactive Cards, Stampin' Blends, Stampin' Up!

Bird Ballad Cards with Stampin’ Blends

Hello! I’ve had a wonderful time coming up with these cards using product from the Bird Ballad Suite. It’s such a sweet, elegant group of products. I really love that Stampin’ Up! has created an ordering number for the entire suite (for those of you who are like me and want everything in the suites we like). They also still have ordering number for individual products in each suite.

Check the end of this post for a YouTube video showing how to color and assemble these three cards. Thanks for taking a look! I invite you to leave me a comment on this post letting me know what you think of my cards. I love your feedback!

These delicate laser-cut notecards come with beautiful envelopes with scalloped flaps. The notecards are sold in a pack of 12 and come in a gorgeous petal pink tin with copper decoration. Check that out in the product link at the end of this post.

I hold about three classes a month in my home in Racine, WI and I always make sure that one of them is a Stampin’ Blends class. I really love coloring with these alcohol-based blending markers. I am always on the lookout for stamp sets that work well with coloring and the Blends markers. The “Free as a Bird” stamp set from this suite is one of those great for coloring sets.

The Designer Series Paper is usually what grabs my eye first from each suite and this Bird Ballad DSP was no exception. These charming designs and soft colors really spoke to me. Check out the video for another version of this card featuring a different DSP design.

Stampin’ Up! added another die set with stitching to their die set line up with the Stitched Nested Labels dies from this suite. The Free as a Bird Stamp Set and the Stitched Nested Labels dies are available in a bundle for a 10% discount. I used the largest and third largest dies to make the frame for this second card. To do this you run them through a die cutting machine at the same time.

The above photo shows one of the four designs from the delightful Bird Ballad Trinkets.  Below you can see that I decided to change things up on the inside of my card and add what was left when I cut out my frame.

When I cut out white piece of cardstock for the sentiment in the card above I was left with a really cool negative image that cried out “sponge with me!” I was inspired to create this card below. You can see how I did that in the video.

I’m not sure how well you can see in the picture above but I did color the birds with my Seaside Spray Blends even with the Petal Pink sponging below the image, and it looks really neat. I also colored over the bird image with my Clear Wink of Stella Glitter Brush. Really adds a WOW factor to the simpler design of this card. I must have added these later, but I did put a few Rhinestones on this card too. It seems I thought of that at the end of the video. lol

Here’s the video I made that shows how to color and assemble these three cards. You will also get a more complete look at the products in the Bird Ballad Suite. Check it out and leave me a comment. I love to hear your thoughts! Be sure to “like” the video if you enjoyed the cards. 🙂

Related image

If you don’t already have a Stampin’ Up! demonstrator, I would love to be your go-to girl for all your stamping needs. 🙂  You can shop my Online Store 24/7.  Please let me know if there’s anything I can do to aid in your crafting experience. I am more than happy to do what I can to help!

If you are local to Racine, WI I invite you to join my Stampin’ Up! Facebook page, Joyfully Inked Cards with Stephanie Mackey. You can find info about classes, card ideas, crafting tips, and SU! news and promotions. I am able to share a little more often on Facebook than I am in my blog or on YouTube.

If you have thought about being a Stampin’ Up! demonstrator or are interested in a 20% discount, among other perks, I’d love to have you on my team, The Joyful Inkers. You can sign up here or contact me if you have questions or would like to talk more about this.

Joyful stamping!

~Stephanie

Product List

All Occasion Cards, Designer Series Paper Cards, Stampin' Up!, Techniques, Tutorials

Embossed Vellum Flower Card with Products from the Perennial Essence Suite

Hello everyone! I’m back (with much less time between posts this time!) with two fun and colorful versions of this card layout. It took me a long time to get comfortable designing my own cards, but the accomplishment and happiness I feel after I do create my own card is definitely worth the effort! Scroll down to the bottom of this post (after all the pictures) and you’ll find my YouTube video for these cards.

I really love both versions of this card. The card with the yellow (So Saffron) flower is so bright and cheery and the card with the pink (Petal Pink) flower on the right is so elegant and soothing. Besides the difference in color scheme there is also a slight variation in the dimensions. This is due to a cutting error at first, but I actually like the wider border on the card with the pink flower.

**Note**: I don’t think it’s visible in the pictures, but I popped up the cardstock layers (So Saffron on the left, Whisper White on the Left) with Stampin’ Dimensionals and Mini Stampin’ Dimensionals. The video shows this much more clearly.


Although the Floral Essence Stamp Set is the core of this suite, I really feel the Perennial Essence Designer Series Paper is the star of the Perennial Essence Suite. You can check out all the amazing designs at this link.


I wanted to make sure there was a picture that really showed the shine of the gold embossing powder on this version. I love the simple stamping on the inside of the card. Just a little something to pretty it up. 🙂 The stamp pads I used on this card were Versamark (for the embossing, So Saffron (flowers), Soft Suede (flower centers and sentiment).


Dimensions (Card with Soft Suede Base)

  • Base = 8 1/2 x 5 1/2″ (Scored on the long side at 4 1/4″)
  • So Saffron cardstock layer = 4 x 5 1/4″
  • DSP Layer = 3 7/8 x 5 1/8″
  • Sentiment Banner = 3 x 3/4″ (Trim left end as needed)
  • Inside cardstock layer = 4 x 5 1/4″


I love how the silver embossing powder really softened the look of this version. It goes so well with the blues and purples in the DSP. The stamp pads I used on this card were Versamark (for embossing), Petal Pink (flowers) and Mossy Meadow (flower centers and sentiment).


Dimensions (Card with Mossy Meadow Base)

  • Base = 8 1/2 x 5 1/2″ (Scored on the long side at 4 1/4″)
  • Whisper White cardstock layer = 3 7/8 x 5 1/8″
  • DSP Layer = 3 3/4 x 5″
  • Sentiment Banner = 3 x 3/4″ (Trim left end as needed- this sentiment is shorter than above so you could probably do 2 1/2 x 3/4″)
  • Inside cardstock layer = 3 3/4 x 5″

I really hope you have been inspired by this card. There are so many possibilities with this suite! I’d love to hear what you think of my cards. Which one is your favorite? Please leave me a comment and let me know your thoughts. I truly appreciate your feedback. Just be kind please! 🙂

Related image

If you don’t already have a Stampin’ Up! demonstrator, I would love to be your go-to gor; for all your stamping needs. 🙂  You can shop my Online Store 24/7 . Please let me know if there’s anything I can do to aid in your crafting experience. I am more than happy to do what I can to help!

If you are local to Racine, WI I invite you to join my Stampin’ Up! Facebook page, Joyfully Inked Cards with Stephanie Mackey. You can find info about classes, card ideas, crafting tips, and SU! news and promotions. I am able to share a little more often on Facebook than I am in my blog or on YouTube.

Joyful stamping!

~Stephanie

Product List

Paper Snips

$10.00
Designer Series Paper Cards, Fun Fold Cards, Stampin' Up!, Tutorials

Multi-Panel Pullout Card with Woven Threads & Mosaic Mood DSP

Hello everyone! I’m jumping back into blogging after quite a break.  I’m going to try to blog whenever the Brewers have day games and it lines up with my daughters’ naps. 🙂

I have lots of new ideas to share with you since the recent release of the new 2019-2020 Stampin’ Up! Annual Catalog.  Check out these beautiful cards featuring the brand new Woven Threads Designer Series Paper (DSP) and Mosaic Mood Specialty DSP. I can’t get enough of this card design. I just saw it a few weeks ago on fellow SU! demo, LeeAnn Greff’s, blog.  Is it new to you as well? Leave me a comment on this post and let me know. I’m curious which of these 4 designs is your favorite as well.

You can find my YouTube video for this card at the end of this post.


The Woven Threads Designer Series Paper features all 5 of the new In Colors: Pretty Peacock, Terracotta Tile, Seaside Spray, Purple Posy, and Rococo Rose.  These In Colors will only be around for the next two years so you’ll want to snatch them up now to have the most time to create with them. I love that this catalog has a suite of products dedicated just to the new 2019-2021 In Colors. The Woven Threads DSP is part of that suite. Click here to check out that In Color Suite. 


It doesn’t show up very well in the pictures but several of the Mosaic Mood Specialty DSP designs have clear embossing. The shine is so pretty! Like all of the 12 x 12 DSP packs, the Mosaic Mood Specialty pack comes with 12 sheets of paper, 2 each of 6 double-sided designs. One of each side has the shiny, clear embossing over the designs.


Measurements

-Back panel & 3rd from back layer= 4 1/4″ X 5 1/2″ & 3 1/4″ X 4 1/2″ (also scrap for die cutting biggest scalloped square)

-2nd from back layer = 4″ X 5 1/4″ & 2 1/2″  (also scrap for die cutting second biggest scalloped square)

-Whisper White 4 1/4″ X 11″,  scored at 1 1/2″, 3″, 5 1/2″ & 8″,  2 1/4″ (also scrap for die cutting the sentiment square)

-DSP (from left to right) = 1 1/4″ X 4″,  2 1/4″ X 4″ & 2 3/4″ X 4″

*Note: All cards with the Mosaic Mood Specialty DSP have the inside sentiment stamped in Early Espresso Ink. The card with the So Saffron layer has Garden Green Ink for the front sentiment.  The card with the Mint Macaron layer has Cajun Craze for the front sentiment. The card with the Calypso Coral layer has Mint Macaron for the front sentiment.


A few weeks ago I made a video showing how to make this card. I would be honored if you would “like” this video and leave me a comment letting me know what you think of it. I also invite you to subscribe to my channel to be notified of future videos. I am just starting out with making card videos and am having a lot of fun. Thanks for checking that out!

Thanks so much for checking out this post. I hope you are inspired to make a multi-panel pullout card like this with your favorite new Designer Series Paper from the new catalog. You can check out all of the new DSP packs here.

Related image

If you don’t already have a Stampin’ Up! demonstrator, I would love to be your go-to girl for all your stamping needs. 🙂  You can shop my Online Store 24/7 . Please let me know if there’s anything I can do to aid in your crafting experience. I am more than happy to do what I can to help!

If you are local to Racine, WI I invite you to join my Stampin’ Up! Facebook page, Joyfully Inked Cards with Stephanie Mackey. You can find info about classes, card ideas, crafting tips, and SU! news and promotions. I am able to share a little more often on Facebook than I am in my blog or on YouTube.

Joyful stamping!

~Stephanie

Product List

Embossing Folder Cards, Stampin' Blends, Stampin' Up!, Thank You Cards

Copper Embossed Butterfly with Stampin’ Blends

If you love our Stampin’ Blends markers, then you need this stamp set, Beautiful Day. There are just so many possibilities with this stamp set and the Stampin’ Blends markers. I love the butterfly image from this set. Previously I have used the light and dark markers of just one color to color this image, but today I have a multicolored butterfly for you. I think the Calypso Coral and Daffodil Delight make for a beautiful, bright butterfly to lighten the darker winter months we’re experiencing now.

Another first for me (at least that I can remember) with this stamp set was embossing the image instead of stamping with Memento Tuxedo Black Ink (which is the ink you need to use when coloring with the Blends markers).  In the picture below you can really see the shine from the copper embossing powder, which I felt would help contribute to the cheeriness of the card as well as switching things up from the traditional Memento ink. I also embossed the sentiment (from the Floral Phrases stamp set) with copper embossing powder.

The Basket Weave embossing folder hasn’t seen much love from me since it was first introduced last year, but I think it really adds to this card. I love these Dynamic, or super thick, embossing folders. They make such a deep impression on the cardstock, and as you can see below, embossing looks great on envelope flaps too!

***Tip: When embossing with the Dynamic embossing folders spritz your cardstock with water before embossing to help the cardstock fibers to flex and  be able to give the great super deep impression they are meant to give without cracking the cardstock.

Dimensions: 

*Card base: 8 1/2 x 5 1/2″, scored in half at 4 1/4″

*Calypso Coral embossed layer: 4 x 5 1/4″

*Sentiment layer: 3 1/4 x 4 1/2″


49067511_700137627382_1736234074072154112_n

Stampin’ Up!’s biggest sale of the year, Sale-A-Bration starts again in two days! Earn free product for every $50 or $100 you spend between January 3rd and March 1st. Look for a post on January 3rd with more ways to earn rewards as well as a PDF link to both the new Occasions Catalog and the Sale-A-Bration Brochure.


Image result for thank you

Thank you so very much for taking the time to read my post. I hope you have been inspired!

I would love to be your Stampin’ Up! demonstrator and would truly appreciate your business and support. If you would like to order with me you can do so by clicking the link to my Online Store on the right hand side of this page.

If your order is less than $150, I invite you to use this month’s Host Code 4SWVPDVC when checking out. If your order is $150 or more, than be sure to claim the Host Rewards for yourself! 🙂

Joyful stamping!

~Stephanie


Product List

Big Shot

$110.00
Heat Tool

$30.00